
Overview
Many organizations use analysis and management technologies to facilitate efficient troubleshooting and monitoring of platforms and applications that span multiple nodes/VMs/containers/devices. To accomplish this, the first step is to aggregate the required logs. Log aggregation is the process of collecting, centralizing, and organizing log data from multiple sources into a single repository. This process involves gathering logs from diverse sources like servers, applications, and devices using tools or systems that collect, normalize, and centralize the data. Centralized log aggregation is vital for troubleshooting and monitoring as it accelerates issue resolution by providing a single source of truth, improves real-time monitoring with consolidated insights, and enhances collaboration across teams.
In this article we’re going to delve into aggregating the logs from your QuantaStor storage cluster nodes to a centralized location using the Fluentd technology. The discussion of log analysis is beyond the scope of this article. This is all about pulling the logs from each of your QuantaStor cluster nodes to some other destination, in this case a Fluentd server.
Before I get started, for those not familiar with all the technologies we’re going to go over in this article today I’ll start with a brief synopsis of each to get everyone up to speed.
Fluentd is…
an open-source data collector designed for unified logging and data processing across various systems. It allows you to unify data collection and consumption for better use and understanding of data. Fluentd decouples data sources from backend systems by providing a unified logging layer, enabling the aggregation, transformation, and forwarding of logs to multiple destinations for analysis and monitoring. With over 500 community-contributed plugins, it connects to numerous data sources and outputs, making it highly versatile for different logging and data processing needs.
For reference, a few of the natively supported output plugins Fluentd supports are S3 storage, Kafka, Elasticsearch, OpenSearch and MongoDB. That alone should suggest that you have many interesting options, but then you could also create a plugin yourself for any data source or output technology. Fluentd structures the data you pull from sources into JSON, making it easy to transform for many purposes.
QuantaStor is…
an enterprise-grade Software Defined Storage platform that turns standard servers into multi-protocol, scale-out storage appliances and delivers file, block, and object storage. OSNexus has made managing enterprise-grade, performant scale-out storage (Ceph-based) and scale-up storage (ZFS-based) extremely simple in QuantaStor, and able to be done quickly from anywhere. The differentiating Storage Grid technology makes storage management a breeze.
At a Glance
We’ll be standing up a server virtual machine to act as a Fluentd server and configuring all of the QuantaStor nodes to send specific log files to the Fluentd server. QuantaStor doesn’t utilize the native rsyslog logging facility to do its logging work, so setting up rsyslog to send to a remote server won’t work. That said, Fluentd is exponentially more powerful in what it can accomplish and integrate with. With options can come complexity, but we’re going to try to shed some light on how to work with Fluentd.
To deploy Fluentd I’ve chosen to use Docker containers. This makes deployment really easy. I’m passing stateful data into the containers, keeping them ephemeral and easy to upgrade.
In this process we will send logs in the following formats to the Fluentd server, illustrating how flexible Fluentd is:
- Syslog – Standard Linux system log format
- JSON – JavaScript Object Notation, a lightweight data interchange format
- Regexp – Regular expression based parsing of a non-standard log format (pattern matching)
Activity Components
QuantaStor is a very versatile storage platform that can be designed for many different scenarios and scales. You can start with a single node for scale-up storage (file & block) and as few as 3 nodes for scale-out storage (file, block and object). For this Proof of Concept, I’m using virtual machines running on VMware vSphere with a 6-node QuantaStor Storage Grid with each QuantaStor VM containing:
- vCPUs: 6
- RAM: 8GB
- OS: QuantaStor 6.5
- Networking: Single 10GB connection with simple, combined front-end and back-end configuration
- Storage:
- 1 x 100GB SSD for QS OS install/boot
- 2 x 100GB SSDs for journaling
- 4 x 10GB SSDs for data
Fluentd v1.18.0 – Single VM running Ubuntu 24.04 (minimized):
- vCPUs: 2
- RAM: 8GB
- Network: Single 10GB Network connection with a static IP address
- Storage:
- 1 x 16GB vDisk (root)
- 1 x 30GB vDisk (Fluentd)
Fluentd Server Configuration
As with any configuration that has the potential of storing large amounts of data, you want to make sure that you don’t fill up your root drive. You also don’t want to create a chicken-n-egg scenario. For example, in this case we’re transferring QuantaStor cluster node logs to a central server. You would not want to store the transferred logs to a mounted QuantaStor volume/share provided from the same cluster. Instead of safeguarding your logs on a separate system you’d be storing the logs in a different location on those same systems, such that if the cluster went down you wouldn’t have access to the logs from those systems to troubleshoot. Hence chicken-n-egg.
In a production deployment you’d be building a new system and going through proper storage planning whereby you’d have the /var filesystem located on a different disk, partition, logical volume, SAN volume, etc. so as to be completely separate from your root filesystem. Since this is a proof-of-concept and not a production deployment, I’m taking a shortcut in the interest of brevity. I’ve left my /var tree on my root volume, and my local system logs will remain there, but I’ve created a mount at /var/log/fluentd, mounted a second system disk there and will store all the remote logs from the cluster within that path, completely separate from the root volume. If I were doing this for real, I’d probably have /var be on a separate volume from root AND have the remote logs be located on yet another volume. That would give me the ability to move just the remote logging capability to another system or play storage tricks with just the remote logs like snapshotting, replicating, compressing, deduping, etc. at a volume level.
Storage Prep
So to get started, let’s prep that separate system disk to be added to the Fluentd server. I’ve created an SSH session to the Fluentd system for this activity.
qadmin@fluentd:~$ sudo -i
[sudo] password for qadmin:
root@fluentd:~# lsblk
NAME                      MAJ:MIN RM  SIZE RO TYPE MOUNTPOINTS
sda                         8:0    0   16G  0 disk
├─sda1                      8:1    0    1M  0 part
├─sda2                      8:2    0  1.8G  0 part /boot
└─sda3                      8:3    0 14.2G  0 part
  └─ubuntu--vg-ubuntu--lv 252:0    0   10G  0 lvm  /
sdb                         8:16   0   30G  0 disk
sr0                        11:0    1 1024M  0 rom
You’ll see from the lsblk command that sdb is the disk I’m interested in. So we’ll work with that. In the next command window I’ve added my input to the terminal output, mainly showing where I pressed “<enter>”. Now we’ll partition the volume.
root@fluentd:~# gdisk /dev/sdb
GPT fdisk (gdisk) version 1.0.10

Partition table scan:
  MBR: not present
  BSD: not present
  APM: not present
  GPT: not present

Creating new GPT entries in memory.

Command (? for help): n
Partition number (1-128, default 1): <enter>
First sector (34-62914526, default = 2048) or {+-}size{KMGTP}: <enter>
Last sector (2048-62914526, default = 62912511) or {+-}size{KMGTP}: <enter>
Current type is 8300 (Linux filesystem)
Hex code or GUID (L to show codes, Enter = 8300): <enter>
Changed type of partition to 'Linux filesystem'

Command (? for help): c
Using 1
Enter name: fluentd

Command (? for help): p
Disk /dev/sdb: 62914560 sectors, 30.0 GiB
Model: Virtual disk
Sector size (logical/physical): 512/512 bytes
Disk identifier (GUID): A49E52C9-DFA0-49E4-83B1-D3BE8F7F9F9D
Partition table holds up to 128 entries
Main partition table begins at sector 2 and ends at sector 33
First usable sector is 34, last usable sector is 62914526
Partitions will be aligned on 2048-sector boundaries
Total free space is 4029 sectors (2.0 MiB)

Number  Start (sector)    End (sector)  Size       Code  Name
   1            2048        62912511   30.0 GiB    8300  fluentd

Command (? for help): w

Final checks complete. About to write GPT data. THIS WILL OVERWRITE EXISTING
PARTITIONS!!

Do you want to proceed? (Y/N): y
OK; writing new GUID partition table (GPT) to /dev/sdb.
The operation has completed successfully.
Now that the partition has been created, we need to give it a format.
root@fluentd:~# mkfs.ext4 /dev/sdb1
mke2fs 1.47.0 (5-Feb-2023)
Discarding device blocks: done
Creating filesystem with 7863808 4k blocks and 1966080 inodes
Filesystem UUID: 267783ba-8476-42af-b5e6-4cd50f709a11
Superblock backups stored on blocks:
	32768, 98304, 163840, 229376, 294912, 819200, 884736, 1605632, 2654208,
	4096000

Allocating group tables: done
Writing inode tables: done
Creating journal (32768 blocks): done
Writing superblocks and filesystem accounting information: done
root@fluentd:~#
With the filesystem created, we need to permanently mount the volume to the /var/log/fluentd mountpoint. In the process we’ll backup the original /etc/fstab file. We could have added the fluentd entry to the fstab using /dev/sdb1, but modern versions of Ubuntu prefer to use the universally unique identifier (UUID), so we’ll go through the process of identifying that and use it. In addition, it also negates the possibility of disks being enumerated differently if we were to add or remove volumes from the system. Note that on the line where we save the UUID to the SDB1_UUID variable we’re using backticks (the key below ESC) not single quotes!
root@fluentd:~# mkdir /var/log/fluentd
root@fluentd:~# cp /etc/fstab /etc/fstab.orig
root@fluentd:~# ls -l /dev/disk/by-uuid/ | grep sdb | cut -d " " -f 9
267783ba-8476-42af-b5e6-4cd50f709a11
root@fluentd:~# SDB1_UUID=`ls -l /dev/disk/by-uuid/ | grep sdb1 | cut -d " " -f 9`
root@fluentd:~# echo $SDB1_UUID
267783ba-8476-42af-b5e6-4cd50f709a11
root@fluentd:~# echo /dev/disk/by-uuid/$SDB1_UUID /var/log/fluentd ext4 defaults 0 2
/dev/disk/by-uuid/267783ba-8476-42af-b5e6-4cd50f709a11 /var/log/fluentd ext4 defaults 0 2
root@fluentd:~# echo /dev/disk/by-uuid/$SDB1_UUID /var/log/fluentd ext4 defaults 0 2 >> /etc/fstab
root@fluentd:~# cat /etc/fstab
# /etc/fstab: static file system information.
#
# Use 'blkid' to print the universally unique identifier for a
# device; this may be used with UUID= as a more robust way to name devices
# that works even if disks are added and removed. See fstab(5).
#
#
# / was on /dev/ubuntu-vg/ubuntu-lv during curtin installation
/dev/disk/by-id/dm-uuid-LVM-OWJLgRqyckUROmB1lkCUuqSpcEfv2oe4YdlyIMSGsPYYDpdZRZR5H89RZzEWASqw / ext4 defaults 0 1
# /boot was on /dev/sda2 during curtin installation
/dev/disk/by-uuid/2f91e69d-6bdc-4026-834e-91a127ad2702 /boot ext4 defaults 0 1
/dev/disk/by-uuid/267783ba-8476-42af-b5e6-4cd50f709a11 /var/log/fluentd ext4 defaults 0 2
root@fluentd:~# mount | grep sdb
root@fluentd:~# systemctl daemon-reload
root@fluentd:~# mount | grep sdb
/dev/sdb1 on /var/log/fluentd type ext4 (rw,relatime)
root@fluentd:~# chgrp adm /var/log/fluentd
root@fluentd:~# chmod 775 /var/log/fluentd
root@fluentd:~# exit
qadmin@fluentd:~$
Note that at the end of that command block we changed the group of the fluentd directory to the adm group and gave adm write permissions. I’ll discuss why we did that in a bit, so sit tight.
Install Docker
Now that the storage is ready, we’ll move on to installing Docker. Note that at the end of the last command block we exited out of the root shell back to a user shell. We’ll use a normal user for the rest of the time.
Here’s a script that I use to install the latest Docker version from the Docker repo. You can paste it into your favorite text editor (vim, nano, emacs, etc.) and save it as ~/installDocker.sh.
#!/bin/bash -x

# Add Docker's official GPG key:
sudo apt-get update
sudo apt-get install ca-certificates curl bash-completion
sudo install -m 0755 -d /etc/apt/keyrings
sudo curl -fsSL https://download.docker.com/linux/ubuntu/gpg -o /etc/apt/keyrings/docker.asc
sudo chmod a+r /etc/apt/keyrings/docker.asc

# Add the repository to Apt sources:
echo \
  "deb [arch=$(dpkg --print-architecture) signed-by=/etc/apt/keyrings/docker.asc] https://download.docker.com/linux/ubuntu \
  $(. /etc/os-release && echo "$VERSION_CODENAME") stable" | \
  sudo tee /etc/apt/sources.list.d/docker.list > /dev/null
sudo apt-get update

sudo apt-get install -y docker-ce docker-ce-cli containerd.io docker-buildx-plugin docker-compose-plugin

sudo usermod -aG docker $USER
Now you need to run that script and then get your user ready to command docker. After running the script, your user will have been added to the docker group, but that action doesn’t activate immediately. To activate the group for your user requires a login activity, so you’ve got two options. One is to exit your SSH session and log back in. A trick though is to start a new login shell, which is what I’ve done here. Just remember when exiting that you need to exit twice to get out of your SSH session! I’ve omitted the output from the installDocker script in this next command block.
qadmin@fluentd:~$ cd
qadmin@fluentd:~$ chmod +x installDocker.sh
qadmin@fluentd:~$ ./installDocker.sh
qadmin@fluentd:~$ su - qadmin
Password:
qadmin@fluentd:~$ docker -v
Docker version 27.5.1, build 9f9e405
qadmin@fluentd:~$
Now that your groups have been reloaded you are now able to command Docker as your normal user.
Configure Fluentd
In this section we’re going to be pulling a Docker image from Docker Hub and modifying it slightly for our use. The Fluentd Docker image that’s provided from Treasure Data runs as a non-root user named fluent. This user hasn’t been given permissions to access files in the /var/log tree. There are a couple ways of handling this. One way would be to run the container as root, but that gives the container user permissions it doesn’t need. My approach is to add the fluent user, inside the container, to the group that has permissions to the files we care about. If you were doing the syslog file you would add fluent to the adm group. The QuantaStor log files use the root group, so we’ll add the fluent user to the root group as well. This nuance is mostly applicable on the client (the QuantaStor cluster), but from a standards perspective also affects the server. We’ll use the same modification process/configuration on both client and server.
Remember after mounting the fluentd partition we changed the group to adm and gave adm write permissions? If you do a long listing in the /var/log directory you’ll find that most of the normal log files are owned by root and grouped to the adm group. That’s the Ubuntu standard, so we’ll follow that. The permissions for the files that Fluentd writes inside the /var/log/fluentd directory are the responsibility of the container process. I didn’t change those. I’ll show what that looks like later.
Let’s first create the /opt/fluentd tree that we’ll use for the server. It will eventually look like this, but we’ll create the three files as we use them:
/opt/fluentd
├── docker          (used to modify the fluent docker image)
│   └── Dockerfile  (used to modify the fluent docker image)
├── qs_server.conf  (the Fluentd server config file)
└── server.run      (shell script to run the Docker container)
qadmin@sj-643f-21:~$ sudo mkdir /opt/fluentd
[sudo] password for qadmin:
qadmin@sj-643f-21:~$ sudo chgrp qadmin /opt/fluentd
qadmin@sj-643f-21:~$ sudo chmod g+w /opt/fluentd
qadmin@sj-643f-21:~$ cd /opt/fluentd
qadmin@fluentd:/opt/fluentd$ mkdir data
qadmin@fluentd:/opt/fluentd$ sudo chown 999:999 data
qadmin@fluentd:/opt/fluentd$ mkdir docker
qadmin@fluentd:/opt/fluentd$ cd docker
qadmin@fluentd:/opt/fluentd/docker$ For the uninitiated, the most basic way of creating a custom Docker image is to use a Dockerfile, which is just a series of instructions to modify a pre-existing base image and create a new image. Here we’re going to use the fluent/fluentd:v1.18.0-debian-1.0 image from Docker Hub and do one thing to it, add the fluent user to two different groups. Technically, for the server side we really only need to add the fluent user to the adm group, but to keep things simple we’ll use the same Dockerfile for both client and server. You can copy the following Dockerfile contents and paste it into your favorite text editor (vim, nano, emacs, etc.) and save it as /opt/fluentd/docker/Dockerfile.
FROM fluent/fluentd:v1.18.0-debian-1.0
LABEL maintainer "Steve Jordahl <steve.jordahl at osnexus.com>"

USER root

RUN usermod -aG root,adm fluent

USER fluent
Once we have the Dockerfile created, we need to tell Docker to build a new image that uses the file. Note that the output can vary depending on the version of Docker you’re running, so your output may look different, but the important thing is that the docker image ls command at the end produces the correct result.
qadmin@fluentd:/opt/fluentd/docker$ docker build -t osn/fluentd:v1.18.0-debian-1.0 .
[+] Building 22.3s (6/6) FINISHED                                               docker:default
 => [internal] load build definition from Dockerfile                                      0.0s
 => => transferring dockerfile: 192B                                                      0.0s
 => [internal] load metadata for docker.io/fluent/fluentd:v1.18.0-debian-1.0              0.7s
 => [internal] load .dockerignore                                                         0.0s
 => => transferring context: 2B                                                           0.0s
 => [1/2] FROM docker.io/fluent/fluentd:v1.18.0-debian-1.0@sha256:ed56cae68a593c7dd2ca5  20.1s
 => => resolve docker.io/fluent/fluentd:v1.18.0-debian-1.0@sha256:ed56cae68a593c7dd2ca5b  0.0s
 => => sha256:ed56cae68a593c7dd2ca5b5af260783460bec108ff964153d599ab73fa0098 990B / 990B  0.0s
 => => sha256:fd736c57eaf25695c6ce024e283d1b6e080d49a2c0d07c0af75d9ad0e0 2.07kB / 2.07kB  0.0s
 => => sha256:0f9d15faa086efb0ee54fa66520c2fb44366b6e5f0cd70ff878ba8f1 10.41kB / 10.41kB  0.0s
 => => sha256:2d429b9e73a6cf90a5bb85105c8118b30a1b2deedeae3ea9587055ff 29.13MB / 29.13MB  7.4s
 => => sha256:ed8433d702d5ea937ff393f1d72a225ea1ece977860e78a82cb7ea86288c81 198B / 198B  0.4s
 => => sha256:db7012cfae44fce24d2ce87b1df401456980e1e80d0bee35658df2d8 13.86MB / 13.86MB  3.8s
 => => sha256:b080b50a59c1101198321da9ca33b8a8a2bbc065b8d6ca91461398d6 36.27MB / 36.27MB  7.2s
 => => sha256:80c3535124be18673a2aa4e532798fb8102d65056fb528a79d10a77c0e0296 142B / 142B  4.0s
 => => sha256:6393442351de60e76a4c965a23d0029b7188d635eff7d5c05e4d5b2108 5.14MB / 5.14MB  5.1s
 => => sha256:3324b09d98337e325e77087095764b361fd092be6d4e26f9d76de6a93b 1.18kB / 1.18kB  5.3s
 => => sha256:2109324d49bcb8986fcc95f55a596c2bc41c2f1ff71c4a87759ce2c9640054 403B / 403B  5.5s
 => => sha256:7c163c5538684621ad2007a459d1e99f89815c98bb953c2be712d993f12b76 478B / 478B  5.7s
 => => extracting sha256:2d429b9e73a6cf90a5bb85105c8118b30a1b2deedeae3ea9587055ffcb80eb4  4.0s
 => => extracting sha256:db7012cfae44fce24d2ce87b1df401456980e1e80d0bee35658df2d8f180872  2.5s
 => => extracting sha256:ed8433d702d5ea937ff393f1d72a225ea1ece977860e78a82cb7ea86288c818  0.0s
 => => extracting sha256:b080b50a59c1101198321da9ca33b8a8a2bbc065b8d6ca91461398d6bcd6449  3.1s
 => => extracting sha256:80c3535124be18673a2aa4e532798fb8102d65056fb528a79d10a77c0e0296c  0.0s
 => => extracting sha256:6393442351de60e76a4c965a23d0029b7188d635eff7d5c05e4d5b21087205a  1.8s
 => => extracting sha256:3324b09d98337e325e77087095764b361fd092be6d4e26f9d76de6a93b17174  0.0s
 => => extracting sha256:2109324d49bcb8986fcc95f55a596c2bc41c2f1ff71c4a87759ce2c96400548  0.0s
 => => extracting sha256:7c163c5538684621ad2007a459d1e99f89815c98bb953c2be712d993f12b76c  0.0s
 => [2/2] RUN usermod -aG adm fluent                                                      1.3s
 => exporting to image                                                                    0.1s
 => => exporting layers                                                                   0.0s
 => => writing image sha256:2428dfe5a2dccc21ae31208094135ef6a499d213b538ed82b68eabd5b2a0  0.0s
 => => naming to docker.io/osn/fluentd:v1.18.0-debian-1.0                                 0.0s

 1 warning found (use docker --debug to expand):
 - LegacyKeyValueFormat: "LABEL key=value" should be used instead of legacy "LABEL key value" format (line 2)
qadmin@fluentd:/opt/fluentd/docker$ docker image ls
REPOSITORY    TAG                  IMAGE ID       CREATED          SIZE
osn/fluentd   v1.18.0-debian-1.0   2428dfe5a2dc   25 seconds ago   201MB
qadmin@fluentd:/opt/fluentd/docker$ cd
qadmin@fluentd:/opt/fluentd$
We’ve now got the Docker image we need to run a container that contains the Fluentd bits. Now we need to create the configuration file required to make this instance of Fluentd a server that does what we want.
Note: If you’re new to Fluentd I would suggest you at least read through the Config File Syntax documentation page to get a basic understanding of what it expects.
You can copy the following Fluentd config contents and paste it into your favorite text editor (vim, nano, emacs, etc.) and save it as /opt/fluentd/qs_server.conf (note that we changed directories one level up in the last code block).
<source>
  @type forward
  port 24224
  bind 0.0.0.0
</source>

<filter **>
  @type record_transformer
  <record>
    tag ${tag}
  </record>
</filter>

<match qs.** sys.**>
  @type copy
#  <store>
#    @type stdout
#  </store>
  <store>
    @type file
    path /var/log/host/${host}/${tag}/${tag}
    <buffer host, tag>
#      flush_mode immediate
      flush_mode default
      flush_at_shutdown true
    </buffer>
  </store>
</match>
Let’s take a look at what that configuration does, remembering we’re on the server side that is accepting log files from other nodes.
- Source block: The source block has a type of forward (a Fluentd input plugin) and tells Fluentd to open a TCP socket on port 24224 for all of its IP addresses. The forward plugin is a receiver and will accept log data and “forward” them through the pipeline.
- Filter block: You’ll see this on the client side, but each log entry can be tagged (metadata) and used to make decisions, but by default it is not actually added to the log data. The filter block with a type of record_transformer is modifying the log data by adding the tag as an actual field, thereby copying it from metadata to data.
- Match block: The match block determines what happens to the log data once received. We’re narrowing the matching down to qs.** and sys.** tagged log data. The type of the match section is copy, which allows us to duplicate the output, determined by the store sections.
- The first store block of type stdout would output the log entries to stdout if it weren’t commented out.
- The second store block of type file outputs the log entries to a file based on the tag field that the filter section added as well as the host field that’s sent by the client.
- The buffer block determines how quickly and often the log data is written to the file and has many options that are beyond the scope of this article.
When determining a proper config it can be beneficial to uncomment the stdout store block and change the flush_mode from default to immediate.
There’s one last thing to do to the qs_server.conf file, and that’s to change its owner and group to root:adm.
qadmin@fluentd:/opt/fluentd$ sudo chown root:adm qs_server.conf
qadmin@fluentd:/opt/fluentd$
Now that we’ve got the configuration squared away, we can get to running a container that uses that config and will accept data from clients, storing it in log files located in /var/log/fluentd. To do this we’re going to create two run scripts for the docker configuration, one for actively working on a config and debugging it and a second for production. You can copy the contents of the following two sections and paste it into your favorite text editor (vim, nano, emacs, etc.) and save them with the corresponding names.
/opt/fluentd/server-debug.run
#!/bin/bash

docker run -it \
	--rm \
	--privileged \
	--name fluentd_server \
	-p 24224:24224 \
	-p 24224:24224/udp \
	-v $(pwd)/qs_server.conf:/fluentd/etc/fluent.conf \
	-v /var/log/fluentd:/var/log/host \
	osn/fluentd:v1.18.0-debian-1.0 $@
# Use the following to add debugging output
#       osn/fluentd:v1.18.0-debian-1.0 -v $@
This script will run a docker container based on the osn/fluentd:v1.18.0-debian-1.0 image that we created earlier. Here’s what the other parameters do:
- -it: Creates an interactive session with a terminal bind
- –rm: Makes this container ephemeral, meaning it will be deleted when it’s stopped
- –privileged: This gives the container many more permissions than is normally required by a container. If you try to run Fluentd without this it will error out with a Ruby error, so making it privileged is a cheat to get it to run. The proper way of handling it would be to give the container just the additional privileges it needs through a –security-opt line with a Seccomp security profile for Docker.
- –name: This gives the container a name of your choosing
- -p 24224:24224: This maps TCP port 24224 on the host to port 24224 on the container. This is for log data transfer.
- -p 24224:24224/udp: This maps UDP port 24224 on the host to port 24224 on the container. This is used for heartbeats.
- -v $(pwd)/qs_server.conf:/fluentd/etc/fluent.conf: This maps the qs_server.conf file we just created into the container with a different name and location
- -v /var/log/fluentd:/var/log/host: This maps the /var/log/fluentd directory that we created that uses the sdb1 partition into the container at /var/log/host
- osn/fluentd:v1.18.0-debian-1.0 $@: This determines the image to base the container on and the $@ allows additional parameters to be added to the command line, which will be helpful in a bit.
Note: The way the *.run scripts are written, it will only work from a directory that contains a qs_server.conf or qs_client.conf file (depending on which system you’re running on and due to the $(pwd)). As configured, it will only work from /opt/fluentd. The interesting side effect of this is that you can create other debug or test configurations in different directories and run the script from those directories to use the different config. For example, if you created a directory named debug and added a modified config to debug/qs_server.conf, executing the server.run script from the debug directory would use the modified config.
/opt/fluentd/server.run
#!/bin/bash

docker run -d \
	--restart always \
	--privileged \
	--name fluentd_server \
	-p 24224:24224 \
	-p 24224:24224/udp \
	-v $(pwd)/qs_server.conf:/fluentd/etc/fluent.conf \
	-v /var/log/fluentd:/var/log/host \
	osn/fluentd:v1.18.0-debian-1.0 $@
# Use the following to add debugging output
#       osn/fluentd:v1.18.0-debian-1.0 -v $@
The server.run script is very similar to the server-debug.run script except for two parameters:
- -it > -d: Changing the -it parameter to -d has the container run in daemon mode (terminal-less)
- –rm > –restart always: This change creates a permanent container that wont be deleted when it stops, and it sets the restart policy so that if for some reason the container stops running Docker will always try to restart it
It’s time to pull everything together and run the server. We’ll start by validating the config and then we’ll run it for real.
qadmin@fluentd:/opt/fluentd$ chmod +x server*run
qadmin@fluentd:/opt/fluentd$ ./server-debug.run --dry-run
2025-02-01 18:51:59 +0000 [info]: init supervisor logger path=nil rotate_age=nil rotate_size=nil
2025-02-01 18:51:59 +0000 [info]: parsing config file is succeeded path="/fluentd/etc/fluent.conf"
2025-02-01 18:51:59 +0000 [info]: gem 'fluentd' version '1.18.0'
2025-02-01 18:51:59 +0000 [info]: starting fluentd-1.18.0 as dry run mode ruby="3.2.6"
2025-02-01 18:51:59 +0000 [warn]: define <match fluent.**> to capture fluentd logs in top level is deprecated. Use <label @FLUENT_LOG> instead
2025-02-01 18:51:59 +0000 [info]: using configuration file: <ROOT>
  <source>
    @type forward
    port 24224
    bind "0.0.0.0"
  </source>
  <filter **>
    @type record_transformer
    <record>
      tag ${tag}
    </record>
  </filter>
  <match qs.** sys.**>
    @type copy
    <store>
      @type "file"
      path "/var/log/host/${host}/${tag}/${tag}"
      <buffer host, tag>
        flush_mode default
        flush_at_shutdown true
        path "/var/log/host/${host}/${tag}/${tag}"
      </buffer>
    </store>
  </match>
</ROOT>
2025-02-01 18:51:59 +0000 [info]: finished dry run mode
qadmin@fluentd:/opt/fluentd$
Adding –dry-run to the server-debug.run command tells Fluentd to check its config and give you feedback. There is one warning that we don’t care about but is worth noting:
… [warn]: define <match fluent.**> to capture fluentd logs …
If you wanted to capture Fluent’s process logs (a good idea for production) you define a match section in your config file and push them wherever you want using whatever plugin you want.
Now we can run the server for real:
qadmin@fluentd:/opt/fluentd$ ./server-debug.run
2025-02-01 18:52:17 +0000 [info]: init supervisor logger path=nil rotate_age=nil rotate_size=nil
2025-02-01 18:52:17 +0000 [info]: parsing config file is succeeded path="/fluentd/etc/fluent.conf"
2025-02-01 18:52:17 +0000 [info]: gem 'fluentd' version '1.18.0'
2025-02-01 18:52:17 +0000 [warn]: define <match fluent.**> to capture fluentd logs in top level is deprecated. Use <label @FLUENT_LOG> instead
2025-02-01 18:52:17 +0000 [info]: using configuration file: <ROOT>
  <source>
    @type forward
    port 24224
    bind "0.0.0.0"
  </source>
  <filter **>
    @type record_transformer
    <record>
      tag ${tag}
    </record>
  </filter>
  <match qs.** sys.**>
    @type copy
    <store>
      @type "file"
      path "/var/log/host/${host}/${tag}/${tag}"
      <buffer host, tag>
        flush_mode default
        flush_at_shutdown true
        path "/var/log/host/${host}/${tag}/${tag}"
      </buffer>
    </store>
  </match>
</ROOT>
2025-02-01 18:52:17 +0000 [info]: starting fluentd-1.18.0 pid=7 ruby="3.2.6"
2025-02-01 18:52:17 +0000 [info]: spawn command to main:  cmdline=["/usr/local/bin/ruby", "-Eascii-8bit:ascii-8bit", "/usr/local/bundle/bin/fluentd", "--config", "/fluentd/etc/fluent.conf", "--plugin", "/fluentd/plugins", "--under-supervisor"]
2025-02-01 18:52:18 +0000 [info]: #0 init worker0 logger path=nil rotate_age=nil rotate_size=nil
2025-02-01 18:52:18 +0000 [info]: adding filter pattern="**" type="record_transformer"
2025-02-01 18:52:18 +0000 [info]: adding match pattern="qs.** sys.**" type="copy"
2025-02-01 18:52:18 +0000 [info]: adding source type="forward"
2025-02-01 18:52:18 +0000 [warn]: #0 define <match fluent.**> to capture fluentd logs in top level is deprecated. Use <label @FLUENT_LOG> instead
2025-02-01 18:52:18 +0000 [info]: #0 starting fluentd worker pid=16 ppid=7 worker=0
2025-02-01 18:52:18 +0000 [info]: #0 listening port port=24224 bind="0.0.0.0"
2025-02-01 18:52:18 +0000 [info]: #0 fluentd worker is now running worker=0
2025-02-01 18:52:18 +0000 [warn]: #0 no patterns matched tag="fluent.info"
2025-02-01 18:52:18 +0000 [warn]: #0 no patterns matched tag="fluent.info"
When you run the container in the foreground (in the terminal directly from the docker run -it command as we did) you are put into the process output of the container showing stdout/stderr. We want to leave this running so we can move to configuring the client, but we don’t want to stop the process. One way would be to stop the container with CTRL-C and restart it, replacing -it with -d. Another, more immediate way is to issue CTRL-P, CTRL-Q into the terminal which should detach the container from the terminal session. It will still be running, as evidenced by the docker ps command:
qadmin@fluentd:/opt/fluentd$ docker ps
CONTAINER ID   IMAGE                            COMMAND                  CREATED          STATUS          PORTS                                                                                                    NAMES
d8529e99d3e5   osn/fluentd:v1.18.0-debian-1.0   "tini -- /bin/entryp…"   13 minutes ago   Up 13 minutes   5140/tcp, 0.0.0.0:24224->24224/tcp, 0.0.0.0:24224->24224/udp, :::24224->24224/tcp, :::24224->24224/udp   fluentd_server
qadmin@fluentd:/opt/fluentd$
Note: Using the server-debug.run script will create an ephemeral container that is deleted as soon as it’s stopped, either manually or when the system is restarted. This is good for testing but not good for production. The server.run script will create a permanent container that can only be deleted manually. If the server is restarted, the container will be automatically restarted when the docker daemon starts.
So that’s about it for the server for now. Let’s move on to the client side.
Fluentd Client Configuration
The client-side configuration is very similar to the server side with a couple of tweaks. I’m going to streamline the client installation using a tarball. You can download it from here, but it will be easiest to download and use it within an SSH session to the client (QuantaStor) node.
$ ssh qadmin@10.0.18.21
qadmin@10.0.18.21's password:
Linux sj-643f-21 5.15.0-91-generic #101~20.04.1-Ubuntu SMP Thu Nov 16 14:22:28 UTC 2023 x86_64 x86_64 x86_64 GNU/Linux
Ubuntu 20.04.6 LTS
OSNEXUS QuantaStor 6.5.0.152+next-e09a6f149b

== System Info ==
Uptime: up 2 weeks, 1 day, 6 hours, 11 minutes
CPU: 6 cores
RAM: 7.75104 GB


 System information as of Mon 03 Feb 2025 09:24:49 PM UTC

  System load:  1.35               Processes:               355
  Usage of /:   27.6% of 56.38GB   Users logged in:         0
  Memory usage: 47%                IPv4 address for ens192: 10.0.18.21
  Swap usage:   6%

Last login: Mon Feb  3 20:48:06 2025 from 10.0.0.1
qadmin@sj-643f-21:~$ wget https://s3.us-west-2.amazonaws.com/blog.osnexus.com/fluentd/osn_fluentd_client.tgz
qadmin@sj-643f-21:~$ sudo tar xzPf osn_fluentd_client.tgz
qadmin@sj-643f-21:~$
Let’s discuss what just happened. By executing the tar command with those parameters, we extracted the /opt/fluentd directory tree with all the proper permissions already set. Here’s the directory structure that was put in place:
/opt/fluentd
├── client-debug.run
├── client.run
├── data
├── docker
│   └── Dockerfile
├── fluentd.d
│   ├── qs_audit.conf
│   ├── qs_service.conf
│   └── syslog.conf
└── qs_client.conf
You’ll note that structure is somewhat similar; there are two run scripts, a docker directory with a Dockerfile and a qs_client.conf Fluentd config file. The data and fluentd.d directories are different. The data directory is where Fluentd will keep track of its read position for each of the files it’s tracking. The fluentd.d directory is where we’ll keep the Fluentd configuration for each file that we want to track. Note, this is only one way of configuring Fluentd, and I’ve chosen it for it’s simplicity and straight-forward approach. We’ll talk about how the configuration is used shortly.
After positioning the directory structure, you need to go through the same process as you did on the server to create the slightly modified Docker image of the Fluentd bits. QuantaStor includes Docker with its standard install, so no install is necessary, but we do need to add qadmin to the docker group so it can run the container. For brevity, I’ll show the commands again, but without output. Revisit the server configuration section if you need to compare output.
$ sudo usermod -aG docker $USER

(exit and reconnect, or execute "su - qadmin")

$ docker build -t osn/fluentd:v1.18.0-debian-1.0 .
$ docker image ls
$ cd
It’s time to talk about the Fluentd configuration structure. Here’s the qs_client.conf configuration file which drives the whole config:
@include fluentd.d/*.conf

<match qs.** sys.**>
  @type copy
#  <store>
#    @type stdout
#  </store>
  <store>
    @type forward
    <buffer>
#      flush_mode immediate
      flush_mode default
      flush_at_shutdown true
    </buffer>
    <server>
      host 10.0.18.14
      port 24224
    </server>
  </store>
</match>
Now we’re looking at the Fluentd configuration on the client side.
- @include: The first line tells Fluentd to look in the
/opt/fluentd/fluentd.ddirectory and add any files ending in conf to this configuration. We’ll look at those next. - Match block: You’ll notice that this match statement only allows the
qs.**andsys.**tags, so it will ignore any other tags that would be used unless you add to that tag list. You’ll see that in the 3 configurations we’re going to do we only useqs.**andsys.**tags, which is perfect for our use. As in the server config, we’re using the copy type so we COULD duplicate the log entry, one to stdout and one sent to the server. But since stdout is commented out we’re ONLY sending to the server with this config as-is.- Buffer block: We’re using the standard buffer settings. Again, for testing it can be worthwhile to change the flush_mode from default to immediate.
- Server block: Here we’re sending log entries to the server listed
- Note: You need to change the server address to the actual address of your server!
Now, in the /opt/fluentd/fluentd.d directory, the first file we’ll talk about is the syslog.conf file.
<source>
  @type tail
  path /var/log/host/syslog
  pos_file /fluentd/data/syslog.pos
  tag sys.syslog
  <parse>
    @type syslog
  </parse>
</source>
If you recall, on the server side our configuration began with a source block that was of type forward which allows the server to listen to a socket for log events. Here on the client we want our sources to be files so it’s still a source but of a different type.
- Source block: One of the main input plugins for Fluentd is the in_tail plugin. This, as it’s name implies, it reads events from the tail of text files. Its behavior is similar to the tail -F command.
- path directive: The path is the actual path to the file to be tailed.
- pos_file directive: the pos_file is the path to the file in the data directory where Fluentd will keep record of the position that it has read to.
- tag directive: Remember in the
qs_client.conffile when we discussed theqs.**andsys.**tags that were part of the match header? The tag directive is how we set tags. - Parse block: Finally, we need to tell Fluentd how to parse the log entries it reads. I mentioned earlier, Fluentd utilizes JSON for it’s event passing, so it needs to know how to parse the log entries so it can properly turn them into JSON. This parse block is of type syslog, which is a built-in parse plugin that knows how to deal with the standard syslog format.
Here is the qs_audit.conf file.
<source>
  @type tail
  path /var/log/host/qs/qs_audit.log
  pos_file /fluentd/data/qs_audit.pos
  tag qs.audit
  <parse>
    @type json
    time_format %a %b %e %H:%M:%S %Y
    time_type string
  </parse>
</source>

<filter qs.audit>
  @type record_transformer
  <record>
    host "#{Socket.gethostname}"
  </record>
</filter>
The first part of the source block is similar to the syslog.conf, so we won’t go over it again. Let’s talk about the new stuff. In that context, with respect to what we’ll cover, know that the data in the qs_audit logs includes a field called “time”. Also note that as opposed to syslog format, the qs_audit logs do NOT include a field for the server name/host.
- Parse block: This time we’re using a type of JSON. This will take each log entry and treat it as a properly formatted JSON string and attempt to parse it.
- time_format directive: Because there is no standard in JSON to dictate how time entries are formatted we need to tell Fluentd how the file that it’s going to parse formats time.
- time_type: We need to tell Fluentd what type of data to expect in the “time” field of our log event.
- Filter block: Because the qs_audit logs don’t include the server name or host entry, we need to add one so that the server can properly direct output to the correct file.
Here is the qs_service.conf file.
<source>
  @type tail
  path /var/log/host/qs/qs_service.log
  pos_file /fluentd/data/qs_service.pos
  tag qs.service
  <parse>
    @type regexp
    expression /^[^\{]*\{(?<logtime>[^,]+),\s+(?<level>[^,]+),\s+(?<process>[^\}]+)\}\s+(?<message>[^\n]+)*$/
    time_key logtime
    time_format %a %b %e %H:%M:%S %Y
  </parse>
</source>

<filter qs.service>
  @type record_transformer
  <record>
    host "#{Socket.gethostname}"
  </record>
</filter>
This is the most advanced configuration of the 3 example files. This config uses Regular Expressions or pattern matching to do its work since the qs_service logs use a completely custom format. Again, the first part of the source block and the filter block are similar to the qs_audit config, so we won’t go over it again and we’ll focus on the new stuff. Let’s look at how a log entry in the qs_service log file looks:
{Sat Feb 1 21:07:18 2025, INFO, ea7bc700:ceph_cfgfile_util:564} Removing expired ceph config backup '/var/opt/osnexus/quantastor/ceph-ceph-cfg-backup_GMT20250122_152606.tar.gz'Note: If you want a much better visual and explanation of how this expression matches the data in the qs_service log file, go to regex101, copy/paste the regular expression (without leading/trailing “/” characters) into the Regular Expression field and then copy a few FULL lines of the qs_service log file into the Test String field and it will break it down nicely.
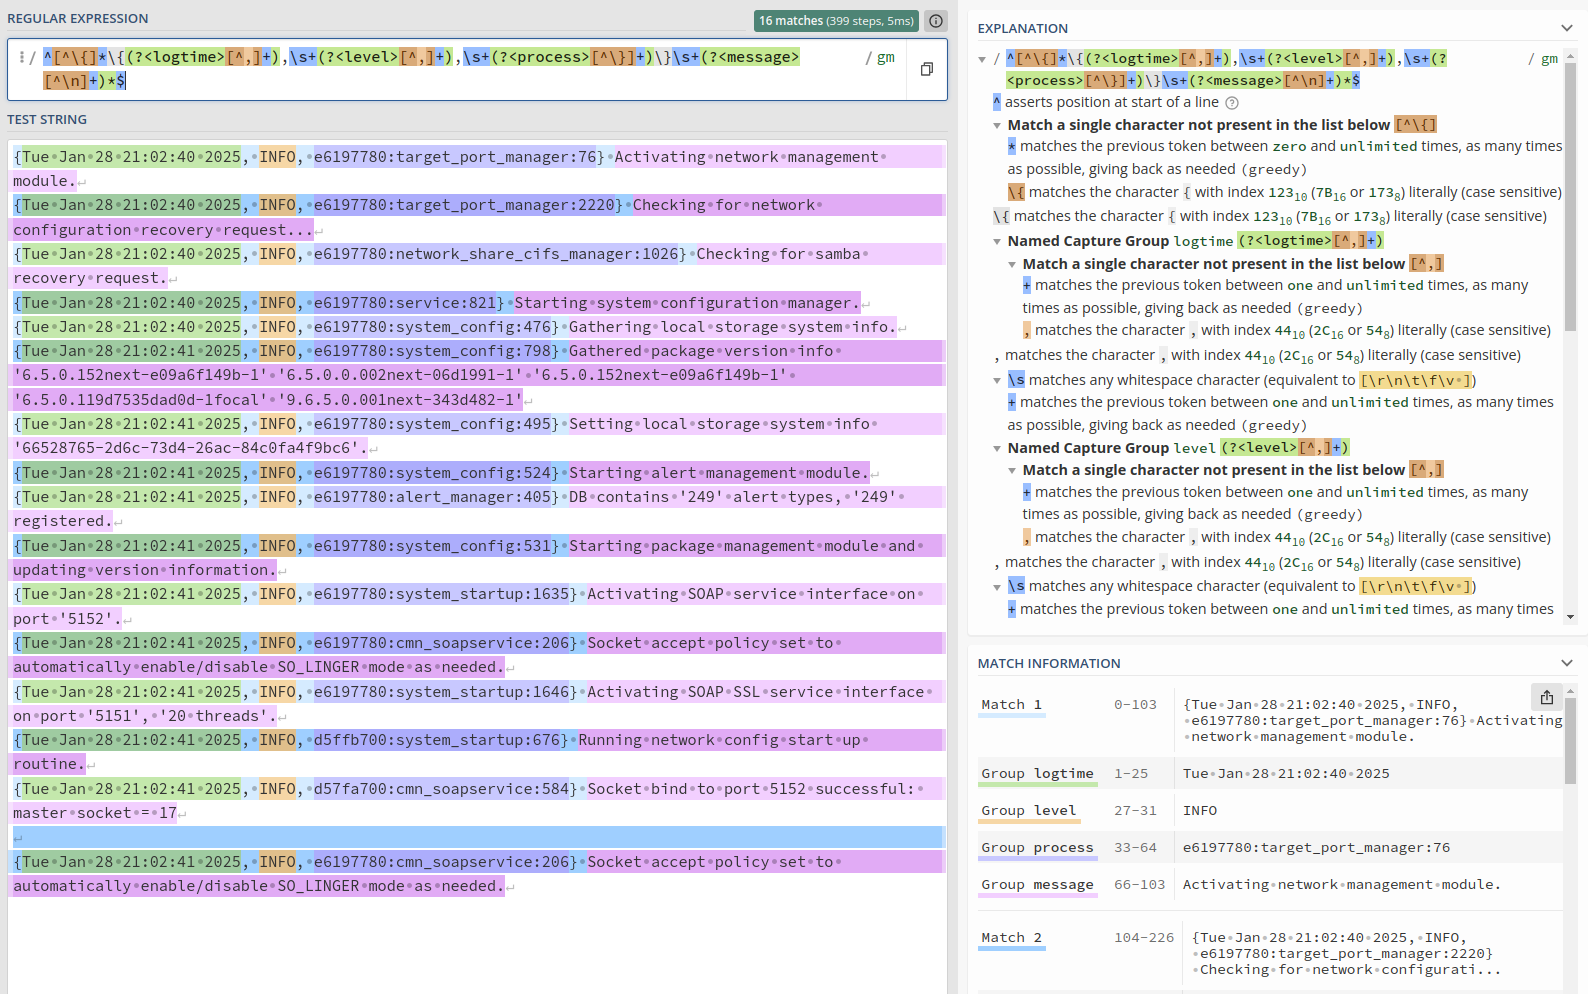
- Parse block: We’ve typed it as regexp to use the Regular Expression parser plugin.
- expression: Here’s where the magic happens. The expression is wrapped in “/” characters, so know that those are not included in the expression that we need to provide. I’ll break down the individual parts of the expression after finishing the parts of the config.
- time_key: You’ll find that we’re naming the time portion of the regular expression logtime, and that’s what the parser should use for the time element.
Now for the regular expression explanation:
^ - Denotes the start of the string
[^\{]* - Allows for extra, non-valuable characters before the opening "{". (a few number of lines in the logs contain terminal color markup starting with ESC[33m)
\{ - Escaped "{" as "{" has special meaning
(?<logtime>[^,]+) - Named match group of one or more characters that aren't a comma
,\s+ - Comma (",") followed by one or more whitespace characters
(?<level>[^,]+) - Named match group of one or more characters that aren't a comma
,\s+ - Comma (",") followed by one or more whitespace characters
(?<process>[^\}]+) - Named match group of one or more characters that aren't a }
\}\s+ - Literal "}" (escaped with \) followed by one or more whitespace characters
(?<message>[^\n]+)*
$ - Denotes the end of the string
So far in this section we’ve covered four config files; the main qs_client.conf file that pulls in the syslog.conf, qs_audit.conf and qs_service.conf config files using the @include directive. Now let’s see how that looks to Fluentd.
qadmin@sj-643f-21:/opt/fluentd$ ./client-debug.run --dry-run
2025-02-10 18:12:57 +0000 [info]: init supervisor logger path=nil rotate_age=nil rotate_size=nil
2025-02-10 18:12:57 +0000 [info]: parsing config file is succeeded path="/fluentd/etc/fluent.conf"
2025-02-10 18:12:57 +0000 [info]: gem 'fluentd' version '1.18.0'
2025-02-10 18:12:57 +0000 [info]: starting fluentd-1.18.0 as dry run mode ruby="3.2.6"
2025-02-10 18:12:57 +0000 [info]: adding forwarding server '10.0.18.14:24224' host="10.0.18.14" port=24224 weight=60 plugin_id="object:99c"
2025-02-10 18:12:57 +0000 [info]: using configuration file: <ROOT>
  <source>
    @type tail
    path "/var/log/host/qs/qs_audit.log"
    pos_file "/fluentd/data/qs_audit.pos"
    tag "qs.audit"
    <parse>
      @type "json"
      time_format "%a %b %e %H:%M:%S %Y"
      time_type string
      unmatched_lines
    </parse>
  </source>
  <filter qs.audit>
    @type record_transformer
    <record>
      host sj-643f-21
    </record>
  </filter>
  <source>
    @type tail
    path "/var/log/host/qs/qs_service.log"
    pos_file "/fluentd/data/qs_service.pos"
    tag "qs.service"
    <parse>
      @type "regexp"
      expression /^[^\{]*\{(?<logtime>[^,]+),\s+(?<level>[^,]+),\s+(?<process>[^\}]+)\}\s+(?<message>[^\n]+)*$/
      time_key "logtime"
      time_format "%a %b %e %H:%M:%S %Y"
      unmatched_lines
    </parse>
  </source>
  <filter qs.service>
    @type record_transformer
    <record>
      host sj-643f-21
    </record>
  </filter>
  <source>
    @type tail
    path "/var/log/host/syslog"
    pos_file "/fluentd/data/syslog.pos"
    tag "sys.syslog"
    <parse>
      @type "syslog"
      unmatched_lines
    </parse>
  </source>
  <match qs.** sys.**>
    @type copy
    <store>
      @type "forward"
      <buffer>
        flush_mode default
        flush_at_shutdown true
      </buffer>
      <server>
        host "10.0.18.14"
        port 24224
      </server>
    </store>
  </match>
</ROOT>
2025-02-10 18:12:57 +0000 [info]: finished dry run mode
qadmin@sj-643f-21:/opt/fluentd$
You’ll find that Fluentd literally brings in the configs from the /opt/fluentd/fluentd.d directory in whatever order it finds them and puts them in place of the @include directive.
Now we’re ready to start the client for real.
qadmin@sj-643f-21:/opt/fluentd$ ./client-debug.run
2025-02-10 18:15:49 +0000 [info]: init supervisor logger path=nil rotate_age=nil rotate_size=nil
2025-02-10 18:15:49 +0000 [info]: parsing config file is succeeded path="/fluentd/etc/fluent.conf"
2025-02-10 18:15:49 +0000 [info]: gem 'fluentd' version '1.18.0'
2025-02-10 18:15:49 +0000 [info]: adding forwarding server '10.0.18.14:24224' host="10.0.18.14" port=24224 weight=60 plugin_id="object:99c"
2025-02-10 18:15:49 +0000 [info]: using configuration file: <ROOT>
  <source>
    @type tail
    path "/var/log/host/qs/qs_audit.log"
    pos_file "/fluentd/data/qs_audit.pos"
    tag "qs.audit"
    <parse>
      @type "json"
      time_format "%a %b %e %H:%M:%S %Y"
      time_type string
      unmatched_lines
    </parse>
  </source>
  <filter qs.audit>
    @type record_transformer
    <record>
      host sj-643f-21
    </record>
  </filter>
  <source>
    @type tail
    path "/var/log/host/qs/qs_service.log"
    pos_file "/fluentd/data/qs_service.pos"
    tag "qs.service"
    <parse>
      @type "regexp"
      expression /^[^\{]*\{(?<logtime>[^,]+),\s+(?<level>[^,]+),\s+(?<process>[^\}]+)\}\s+(?<message>[^\n]+)*$/
      time_key "logtime"
      time_format "%a %b %e %H:%M:%S %Y"
      unmatched_lines
    </parse>
  </source>
  <filter qs.service>
    @type record_transformer
    <record>
      host sj-643f-21
    </record>
  </filter>
  <source>
    @type tail
    path "/var/log/host/syslog"
    pos_file "/fluentd/data/syslog.pos"
    tag "sys.syslog"
    <parse>
      @type "syslog"
      unmatched_lines
    </parse>
  </source>
  <match qs.** sys.**>
    @type copy
    <store>
      @type "forward"
      <buffer>
        flush_mode default
        flush_at_shutdown true
      </buffer>
      <server>
        host "10.0.18.14"
        port 24224
      </server>
    </store>
  </match>
</ROOT>
2025-02-10 18:15:49 +0000 [info]: starting fluentd-1.18.0 pid=6 ruby="3.2.6"
2025-02-10 18:15:50 +0000 [info]: spawn command to main:  cmdline=["/usr/local/bin/ruby", "-Eascii-8bit:ascii-8bit", "/usr/local/bundle/bin/fluentd", "--config", "/fluentd/etc/fluent.conf", "--plugin", "/fluentd/plugins", "--under-supervisor"]
2025-02-10 18:15:51 +0000 [info]: #0 init worker0 logger path=nil rotate_age=nil rotate_size=nil
2025-02-10 18:15:51 +0000 [info]: adding filter pattern="qs.audit" type="record_transformer"
2025-02-10 18:15:51 +0000 [info]: adding filter pattern="qs.service" type="record_transformer"
2025-02-10 18:15:51 +0000 [info]: adding match pattern="qs.** sys.**" type="copy"
2025-02-10 18:15:51 +0000 [info]: #0 adding forwarding server '10.0.18.14:24224' host="10.0.18.14" port=24224 weight=60 plugin_id="object:99c"
2025-02-10 18:15:51 +0000 [info]: adding source type="tail"
2025-02-10 18:15:52 +0000 [info]: adding source type="tail"
2025-02-10 18:15:52 +0000 [info]: adding source type="tail"
2025-02-10 18:15:52 +0000 [info]: #0 starting fluentd worker pid=15 ppid=6 worker=0
2025-02-10 18:15:52 +0000 [info]: #0 following tail of /var/log/host/syslog
2025-02-10 18:15:52 +0000 [info]: #0 following tail of /var/log/host/qs/qs_service.log
2025-02-10 18:15:52 +0000 [info]: #0 following tail of /var/log/host/qs/qs_audit.log
2025-02-10 18:15:52 +0000 [info]: #0 fluentd worker is now running worker=0
This will run indefinitely. The way the client and server are currently configured, you’re not going to see much output. The default buffer configuration for file output utilizes memory buffering before outputing the log data to disk. Therefore, it will be a few minutes before you see the resulting log data in /var/log/fluentd on the server-side. This is similar to what you should see:
qadmin@fluentd:/opt/fluentd$ ls -l /var/log/fluentd/
total 16
drwxr-xr-x 3 999 systemd-journal 4096 Feb 10 18:29 '${host}'
drwxr-xr-x 3 999 systemd-journal 4096 Feb 10 18:36  sj-643f-21
drwxr-xr-x 3 999 systemd-journal 4096 Feb 10 18:36  sj-643f-22
drwxr-xr-x 3 999 systemd-journal 4096 Feb 10 18:36  sj-643f-23
qadmin@fluentd:/opt/fluentd$ ls -l /var/log/fluentd/*
'/var/log/fluentd/${host}':
total 4
drwxr-xr-x 3 999 systemd-journal 4096 Feb 10 18:29 '${tag}'

/var/log/fluentd/sj-643f-21:
total 4
drwxr-xr-x 2 999 systemd-journal 4096 Feb 10 18:38 sys.syslog

/var/log/fluentd/sj-643f-22:
total 4
drwxr-xr-x 2 999 systemd-journal 4096 Feb 10 18:38 sys.syslog

/var/log/fluentd/sj-643f-23:
total 4
drwxr-xr-x 2 999 systemd-journal 4096 Feb 10 18:38 sys.syslog
qadmin@fluentd:/opt/fluentd$
Ultimately, what you see will be determined by how busy your QuantaStor systems are. Mine are in a PoC environment and as such the qs_audit and qs_service log files aren’t written to very often and therefore won’t initially show up. They will eventually. How often the log files are written and how big they can get are determined by the buffer settings you use. After a little while longer, and due to some activity I introduced to my systems, here’s my log file structure:
qadmin@fluentd:/opt/fluentd$ ls -l /var/log/fluentd/*
'/var/log/fluentd/${host}':
total 4
drwxr-xr-x 3 999 systemd-journal 4096 Feb 10 18:29 '${tag}'

/var/log/fluentd/sj-643f-21:
total 12
drwxr-xr-x 2 999 systemd-journal 4096 Feb 10 18:47 qs.audit
drwxr-xr-x 2 999 systemd-journal 4096 Feb 10 18:46 qs.service
drwxr-xr-x 2 999 systemd-journal 4096 Feb 10 18:47 sys.syslog

/var/log/fluentd/sj-643f-22:
total 12
drwxr-xr-x 2 999 systemd-journal 4096 Feb 10 18:47 qs.audit
drwxr-xr-x 2 999 systemd-journal 4096 Feb 10 18:47 qs.service
drwxr-xr-x 2 999 systemd-journal 4096 Feb 10 18:46 sys.syslog

/var/log/fluentd/sj-643f-23:
total 8
drwxr-xr-x 2 999 systemd-journal 4096 Feb 10 18:47 qs.service
drwxr-xr-x 2 999 systemd-journal 4096 Feb 10 18:46 sys.syslog
qadmin@fluentd:/opt/fluentd$
I’ll leave the activity of going into each file to see what it’s writing up to you.
Debugging/Building a Fluentd Configuration
Most of what I’ve described above is prescriptive and expected to work. So how do you build your own config and debug what’s going on? IMHO, the first place to start is to use the stdout plugin on both the client and the server.
Here are the config changes I’d make on the server:
<source>
  @type forward
  port 24224
  bind 0.0.0.0
</source>

<filter **>
  @type record_transformer
  <record>
    tag ${tag}
  </record>
</filter>

<match qs.** sys.**>
  @type copy
  <store>
    @type stdout
  </store>
#  <store>
#    @type file
#    path /var/log/host/${host}/${tag}/${tag}
#    <buffer host, tag>
#      flush_mode immediate
#      flush_mode default
#      flush_at_shutdown true
#    </buffer>
#  </store>
</match>
And here’s the changes for the client:
@include fluentd.d/*.conf

<match qs.** sys.**>
  @type copy
  <store>
    @type stdout
  </store>
  <store>
    @type forward
    <buffer>
      flush_mode immediate
#      flush_mode default
      flush_at_shutdown true
    </buffer>
    <server>
      host 10.0.18.14
      port 24224
    </server>
  </store>
</match>
This will show real-time log information going across the wire so you know that things are working. The thing that gets lost in the volumes of output are the client-side parsing errors. When I explained the regular expression I used for the qs_service.conf file, I mentioned that a few lines in the file include terminal color markup. Those lines didn’t match the original regular expression I came up with to parse the log lines because they weren’t part of the data I used to build the expression and I didn’t know they were there. With so much data flying by on the client from the stdout plugin, Fluentd errors and warnings are often lost. The way to see them is to revert to the original client config (once you know the server and client are talking) and watch the output for the anomalies.
If you use flush_mode immediate for file output on the server, it will write single log entries to each file, giving you lots of files. OK for short tests, but horrible for production. So use it in your creation/debug processes, but make sure you change your buffer settings to something more suitable to your environment when moving to production.
Final Words
We’ve only scratched the surface of what Fluentd can do. It’s really amazing how scalable and nimble the platform is, to the point where you can create your own plugins to do whatever you need it to do!
This should give you a head start on aggregating QuantaStor logs for your monitoring purposes. Add a comment to share how you’ve implemented this in your environment. Or drop me a line at steve.jordahl at osnexus.com to give me ideas of what other blog articles would be useful to you!
Useful Resources
- Article code tarballs:
- The following files can be extracted to the
/opt/fluentddirectory by issuing this:sudo tar xzPf osn_fluentd_*.tgz - osn_fluentd_client
- osn_fluentd_server
- The following files can be extracted to the
- Quantastor:
- Fluentd
- Regular Expressions
- Useful Docker Commands
- docker ps
- List running containers
- docker image ls
- List the Docker images on your system
- docker image rm <image name/id>
- Delete an image
- docker container ls
- List RUNNING containers on your system
- docker container ls -a
- List ALL containers on your system
- docker container rm <container name/id>
- Delete a persistent container
- docker stop <container name/id>
- Stop a running container
- docker start <container name/id>
- Start a persistent container after creation
- docker run <options>
- Create and run a container with the given options
- docker ps

Leave a comment