Overview
Network Engineers have an old saying: Never underestimate the bandwidth of a truck full of tapes.
…but what about two trucks?
Two trucks give you double the bandwidth. If one breaks down you’re still in business. If two trucks don’t provide enough performance or reliability, you can add a few more to the fleet.
Sadly, trucks full of tapes are impractical within the short-haul confines of a datacenter, yet the same scaling and redundancy principles can be applied to boring old wired networks. By adding more network adapters, cables, and switches, additional data paths can be built to provide more bandwidth and better redundancy. If a switch fails, or someone trips on a cable, the surviving data paths can keep client-server connections up and running.

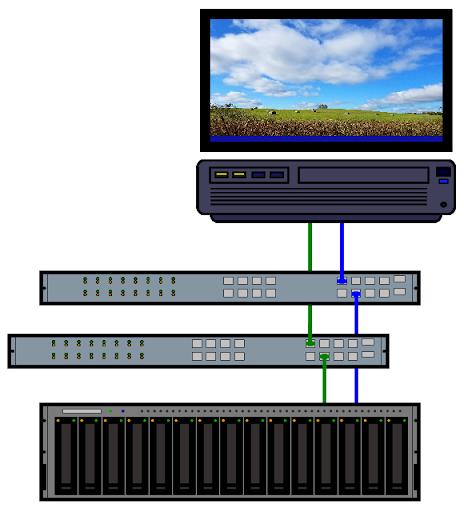
zFig 1: A simple dual-path network connection between client and server, via separate network infrastructure.
There are generic methods, such as Network Bonding, for creating multiple data paths. There are also service-specific solutions—iSCSI has Multipath, NFS offers Trunking, and SMB provides Multi-channel. Each of the latter set are built into the storage protocol they support. All of them offer the same kind of bandwidth and redundancy as that metaphoric truck fleet.
SMB3 Multi-Channel
Multi-channel made its debut with SMB 3.0, released by Microsoft back in 2012. All current Windows versions support multi-channel, and it is enabled by default for both clients and servers. Windows SMB clients and servers automatically negotiate the use of multi-channel when the client session starts.
Multi-channel makes use of a hardware feature called Receive-Side Scaling; RSS. It allows the Network Interface Card (the NIC) to distribute incoming data streams across multiple CPU cores on the host system. More cores means better parallel processing and better throughput overall. RSS is a very common feature, and should be supported on all enterprise-grade NICs, but you can test for it using the Linux ethtool command:
$ ethtool -l eno1
Channel parameters for eno1:
Pre-set maximums:
RX:             4
TX:             1
Other:          0
Combined:       0
Current hardware settings:
RX:             4
TX:             1
Other:          0
Combined:       0
The above example is from a desktop system with a single 1Gbps NIC. The RX value under “Current hardware settings” shows that there are four receive queues assigned, which matches the number of CPU cores on the host. That shows that the NIC supports RSS. An error message, or a value of 1, would indicate that RSS is not available.
Multi-channel was a fairly advanced feature when it was first introduced. It took a few years for other SMB implementations to catch up, but multi-channel is now supported by both MacOS and Linux clients, and by the Samba server suite. Wide availability makes multi-channel a good choice for deployments built around Windows network file sharing.
On QuantaStor, multi-channel is enabled by default. The system will inventory the available network interfaces, to determine which ones are available for use. When a multi-channel capable client connects, it will ask the server for the list of active interfaces, figure out which of those are likely to provide the best performance, and connect to as many of those as possible. Multi-channel connections are, therefore, relatively automagical.

Fig. 2: Nine interfaces are listed, but only a single 1Gbps NIC and two 25Gbps NICs are currently enabled. These three NICs can all be used for SMB3 multi-channel I/O.
Multi-Channel in Action
Here’s a graph:

Fig 3: SMB3 I/O over a trio of network interfaces.
…and here’s what was going on:
Using Microsoft’s diskspd utility, we generated an I/O workload (a balanced mix of reads and writes) between a Windows client and the QuantaStor server with the NICs shown in Fig 2. The initial SMB connection was made over the single 1Gbps link. As the graph in Fig 3. shows, however, the bulk of the I/O quickly moved to the pair of 25Gbps NICs.
There was an initial I/O burst that occurred as the test ramped up, but the SMB server hit the brakes and the majority of the test ran at a slower speed until the very end. In the last few seconds, another burst of activity was seen as the data transfers completed and the server sent the final batch of response messages.

Fig 3a: In this close-up, a slight bump between 6 and 8 second shows that the data transfer is initiated over the 1Gbps link, but is quickly transferred to the higher-speed links.
Zooming in on Figure 3, you might notice a bump on the 1Gbps line between the 6 and 8 second marks. That little bump represents the session initialization between the client and the server. There is a quick flurry of activity as the two systems exchange credentials and make all of the arrangements necessary to let data transfer begin. Somewhere in there, the client asks the server for a list of available interfaces and then sets up connections across those other data paths. The bulk of the I/O transits over the higher speed links.
Here’s another graph:

Fig 4: Only one 25Gbps NIC enabled.
With one of the 25Gbps NICs shut down, all of the heavy I/O traffic has moved to the remaining high-speed NIC. The overall throughput is roughly the same, however, and the general shape of this new graph is also roughly the same as in the previous example—except that the amplitude has doubled. Essentially all of the traffic that was on NIC 1 has moved to NIC 0.
Notice that each of the 25Gbps NICs, individually, provide much more capacity than required for our test scenario. Network bandwidth is not the bottleneck here. The rate-limiting factor is actually the SMB protocol itself, which supports a “credit” mechanism. In the graph, that burst of activity at the start is the client using up its initial credits by pushing as many requests into the pipeline as it can. Once the client has run out of credits, it has to wait for new credits to arrive in the response messages from the server.
That might sound a little crazy, but it means that there won’t be too many incomplete reads and writes sitting in a queue on the server side at any given time. That limits the recovery time should a link go down. Speaking of which…
The Highway Cleanup Crew

Fig 5: Losing a connection mid-transfer.
What happens to our truck full of tapes if there’s a crash on the highway?
The first part of the graph in Fig. 5 looks a lot like what we saw in our baseline example (Fig 3). At the start of the transfer, the data rate on each of the two 25Gbps channels is just under 300 MBytes/sec, for a combined total that’s a little less than 600 MBytes/sec, give or take. For this test run, however, the proverbial plug was pulled on the second high-speed link. The impact is visible at about the 22 to 24 second marks on the graph.
Several things are going on there.
- The tail end of that initial burst of I/O generated by the client just happens to coincide with the shutdown of the second high-speed link. That’s part of the reason for the quick drop-off in the I/O rate.
- When the second 25Gbps path drops, in-flight messages are lost and some cleanup has to occur. The lost messages need to be identified and re-sent on the surviving channel.
- …and, of course, once the data path identified by the green line has been shut down it flat-lines for the rest of the test run.
That all happens fairly quickly, a bit too quickly to show up with stark clarity in the graph…and that’s as it should be. High-availability is a big part of multi-channel’s purpose. If the recovery and cleanup are done quickly, neither the client application nor the end user will notice that a network glitch occurred.
Throughput
Performance is another big part of multi-channel’s raison d’etre. If limited throughput presents a bottleneck, additional links can be added.
To demonstrate, let’s turn off all of the interfaces except one.

Fig 6: Disabling a network adapter from the Web UI.
Now, using the one remaining 1Gbps link, let’s copy a 40GB file from client to server.

Fig 7: Copying a 40GB file across a single 1Gbps link, using SMB3 protocol.
SMB makes good use of the available bandwidth. 113MB/s is roughly 90% of the raw data rate on the connection.
…but we can do better. We’ll enable three more interfaces for a total of 4✕1Gbps connections.

Fig 8: All four 1Gbps links are now up.
Then run the copy again.

Fig 9: Copying the same 40GB file over 4✕1Gbyte/sec links with multi-channel enabled.
Multi-channel makes use of all four links, increasing the available bandwidth and substantially improving the speed of the data transfer. We’re not quite getting 4 times the throughput, since managing multiple communications channels incurs some additional overhead, but the improvement is significant.
Next, let’s go back to the original configuration: a single 1Gbps link plus two 25Gbps links.

Fig 10: Another 40GB copy, this time over a 1Gbps link plus two 25Gbps links.
In this configuration, the transfer rate averaged around 900MBytes/second overall with peaks in the 1GByte/second range. That’s nowhere near the available bandwidth, so we know that we are hitting the limits of the end nodes rather than being throttled by the network.
Keep in mind that these tests were run in a lab environment in which there was little or no competition for resources. In a real-world deployment there will be several clients all sending and receiving messages across the network infrastructure, and extra network bandwidth would be a really good thing to have. The configuration shown here makes good use of the available resources.
Trying the HOV Lane
As previously noted, multi-channel relies on a feature called RSS. In the ancient days of single core CPUs, the NIC would send an interrupt to the CPU to indicate that a network packet had arrived and was ready to be processed. That doesn’t scale very well when multiple network data streams are being handled at once. RSS allows the NIC to associate network connections with different cores, which spreads the load out and makes much better use of processing resources.
Here’s where it shows up…

Fig 11: Yet another 40GB copy, this time over a 2✕25Gbps bonded interface.
In this example, our two 25Gbps NICs have been bonded together to form a single virtual 50Gbps NIC. Note that the throughput is in the 700Mbps range, which is about 200Mbps slower than the multi-channel example shown in Figure 10. That’s the effect of RSS. The single bonded link isn’t making use of multiple server-side CPU cores, so it does not get the RSS performance boost.
Bonded NICs don’t do RSS, and that can cause some trouble. In testing, we enabled both the eno2 1Gbps NIC and the bonded NIC. We made the connection over the bonded NIC and ran the same copy test. The throughput surprisingly dropped back to the same 113Mbps shown in Fig. 7, above.
This happened because the server correctly reported that the 1Gbps NIC supported RSS but the 50Gbps virtual NIC did not. When the Windows client started the transfer, it used RSS as a guide and chose to transfer the data over the slower RSS-enabled link.
To get the graph in Figure 11, we had to disable SMB over all other NICs, forcing the client to create a non-multi-channel connection to the bonded port on the server. Keep this in mind when configuring network infrastructure for SMB networking.
Road-Ready
That concludes the multi-channel driver’s education course. We’ve taken our fleet of trucks out for a spin around the block, just to see what they can do, and it looks as though they can do us some good. Next, let’s take a quick look at the owner’s manual.
The Dashboard Display
Setting up SMB services is fairly quick and easy using the QuantaStor web management interface. You will need to start by setting up a network share for use with SMB.
See: Network Share Create
You may want to check the configuration of the network interfaces as well.
See: Network Port Configuration
Fine Tuning Your Tape Trucking Experience
In some situations, it’s necessary to dig into the guts of the configuration for a little fine tuning. This can be done by manually editing the SMB Server configuration file: /etc/samba/smb.conf
There are a lot of tuning directives available—a whole lot. The critical ones, of course, are managed by the QuantaStor WebUI so you generally don’t need to mess with them, but there are a couple that you should know about just in case:
- interfaces
- bind interfaces only
These two are commonly used together, as follows:
bind interfaces only = yes
interfaces = eno1, eno2, eno3, eno4
In this example the four 1Gbps interfaces are listed, and the bind interfaces only = yes directive tells the server that it should only use those four interfaces. It won’t matter which other interfaces are up and running. If, however, bind interfaces only is set to no (the default), then the interfaces line in this example will have no practical effect.
Note that Virtual Interfaces inherit the RSS capabilities of the underlying network interface. You might have reason, for example, to logically separate SMB and NFS services even if they are physically using the same networks. The interfaces directive could then be used to enable only the virtual NICs.
There is another use for the interfaces directive. It can provide hints about individual NIC features.
interfaces = eno1;capability=RSS, eno2;capability=RSS, eno3;capability=RSS, eno4;capability=RSSIn this example, the SMB Server is being told to enable RSS on all of the listed NICs. This is taken as a hint by the server—a hint that it may ignore. We tried enabling RSS on the bonded NIC, and the server still reported no RSS support, which is correct.
Using the interfaces directive this way is an advanced configuration option, and should be done with care and a good deal of study.
When modifying the configuration file by hand, best practice is to make your edits on a copy of the running configuration, and use the testparm utility to verify the correctness of the modified file before moving it into production. Some sites will likely choose to use a Configuration Management System (CMS) to manage customizations.
# cp -a /etc/samba/smb.conf edit.smb.conf
# vi edit.smb.conf
# testparm edit.smb.conf
The testparm utility checks the syntax of the file, generating warning and/or error messages if any problems are detected, and then producing a nicely formatted copy of the input. If your changes are not properly represented in the formatted output, check your edits and try again.
Once the file passes the testparm test, you can replace the current configuration. The new configuration will take effect in one of three ways:
- Just wait. The SMB server reloads the configuration automatically every few minutes.
- Force the issue. The command sudo smbcontrol all reload-config will instruct the server to immediately re-read its configuration.
- Restart the server: sudo systemctl restart smbd
The third option, restarting the server, will force the clients to reconnect, which may seem a bit dramatic…because it is. It means, however, that the clients will receive the updated interface information.
Remember that tiny blip on the blue line in Fig. 3a? Connection details are shared between client and server when the connection is initially created. If the server simply re-reads its config file, the client won’t get the memo, and existing connections won’t be updated. A reconnection is a bit disruptive, but it forces updates to be sent to the client side as well.
Use the server restart with care. SMB3 is designed to be resilient, but some client applications may be sensitive to server restarts.
Windows Client
Supported versions of Windows have multi-channel enabled by default, so the only things that need to be done are to configure the client NICs and map the remote share. If you like, you can verify that the NICs have RSS support enabled.

Mapping the network drive can be done via the Windows GUI or the command line. One option is the old-school net use command, which dates back to the MS-DOS days:
PS C:\> net use Z: \\192.168.2.25\share-1This creates a mapping from the Z: drive letter on the client to the designated share on the server. Windows doesn’t actually need the drive letter to access the share, but it’s a convenient and familiar alias.
Once the mapping has been established, the connection status can be queried. For example…
PS C:\> Get-SmbConnection

ServerName   ShareName UserName                      Credential         Dialect NumOpens
----------   --------- --------                      ----------         ------- --------
192.168.2.25 share-1   WIN-NOCBVJIRC5V\Administrator 192.168.2.25\user1 3.1.1   1

PS C:\> Get-SmbMultichannelConnection

Server Name  Selected Client IP      Server IP      Client Interface Index Server Interface Index Client RSS Capable Client RDMA Capable
-----------  -------- ---------      ---------      ---------------------- ---------------------- ------------------ -------------------
192.168.2.25 True     192.168.45.23  192.168.45.25  22                     7                      True               False
192.168.2.25 True     192.168.44.23  192.168.44.25  5                      6                      True               False
Get-SmbConnection provides a list of the active client to server sessions; similar information can be retrieved with net use.
The Get-SmbMultichannelConnection command lists the additional channels that are available to the session. In this example only two such channels are shown, which is a little odd because all of the interfaces were enabled when the connection was made. What gives?
We can dig a little deeper into this mystery by adding the -IncludeNotSelected option, as follows:
PS C:\> Get-SmbMultichannelConnection -IncludeNotSelected

Server Name  Selected Client IP      Server IP      Client Interface Index Server Interface Index Client RSS Capable Client RDMA Capable
-----------  -------- ---------      ---------      ---------------------- ---------------------- ------------------ -------------------
192.168.2.25 True     192.168.45.23  192.168.45.25  22                     7                      True               False
192.168.2.25 True     192.168.44.23  192.168.44.25  5                      6                      True               False
192.168.2.25 False    192.168.12.123 192.168.12.125 16                     4                      True               False
192.168.2.25 False    192.168.2.23   192.168.2.25   17                     3                      True               False
192.168.2.25 False    172.31.144.23  172.31.144.25  9                      5                      True               False
192.168.2.25 False    172.31.44.23   172.31.44.25   10                     2                      True               False
192.168.2.25 False    192.168.2.23   192.168.45.25  17                     7                      True               False
192.168.2.25 False    192.168.2.23   192.168.44.25  17                     6                      True               False
192.168.2.25 False    192.168.2.23   192.168.12.125 17                     4                      True               False
192.168.2.25 False    192.168.2.23   172.31.144.25  17                     5                      True               False
192.168.2.25 False    192.168.2.23   172.31.44.25   17                     2                      True               False
…and, indeed, the mystery has deepened.
There are now many more channels listed. However, as shown by the value in the second column, only two are selected. Those are the same two that were displayed when Get-SmbMultichannelConnection was run without the -IncludeNotSelected option.
Each of the channels in the list represents a separate network path from client to server. As shown previously, the server has four 1Gbps NICs and two 25Gbps NICs. Our Windows client has a similar configuration. With so many potential pathways between client and server, managing multi-channel could get very complex very quickly. The Windows client simplifies the situation by selecting the faster 25Gbps network paths as the best bets, and parking the other options.
Channel selection should be kept in mind when debugging or otherwise investigating the behavior of multi-channel on your network. The example above does a great job of showing that multi-channel is working as expected, but also shows that some available channels won’t be used.
Windows provides a number of tools to help you poke and prod multi-channel. Here are a few PowerShell commands that may come in handy:
- Set-SmbClientConfiguration -EnableMultiChannel <value>
…where <value> is either $true or $false
This command lets you globally enable or disable multi-channel on the Windows client.
- Enable-NetAdapterRss and Disable-NetAdapterRss
This pair of commands allow you to turn RSS on and off on individual NICs.
- Get-NetAdapter
Provides a list of available network adapters and their properties. - Get-NetAdapterRss
Provides a veritable firehose of information about the RSS features of the available network adapters. - Get-SmbClientConfiguration
Lists several global settings from the client’s SMB configuration, providing you with a peek into the workings of SMB network file sharing.
When making changes to the Windows configuration, remember that SMB connection parameters are negotiated at the start of the session. You may need to reset those connections to get the changes to take effect. A reboot, though dramatic, is always an option on Windows systems.
MacOS and Linux Clients
MacOS
In keeping with the established pattern, multi-channel is enabled by default MacOS starting with version 11.3. The default configuration, as you might expect, is considered the best for most use cases…but adjustments can be made.
The configuration options are similar to the ones we’ve covered already. See the MacOS support documentation for details on fine tuning your client node.
Linux
Linux has an in-kernel SMB client known, for historic reasons, as “the CIFS Kernel Client”. It allows SMB shares to be mounted on the local filesystem using the mount.cifs (or mount -t cifs) command. Another option is to make an entry in the /etc/fstab file, which will cause Linux to attempt to mount the SMB share every time the system restarts.
Breaking with established tradition, multi-channel is disabled by default. To enable it, use the multichannel mount option.
Also by default, the CIFS client limits itself to two channels. This setting can be adjusted using the max_channels mount option. Here’s a simple example:
# mount -t cifs -o multichannel,max_channels=4 //192.168.2.25/share-1 /mntSee the Linux mount.cifs(8) manual page for more information about the multichannel and max_channels mount options. The Linux Kernel User’s and Administrator’s Guide also includes a section covering the CIFS Kernel Client.
Running the I/O Tests
The network configurations and I/O tests presented here were set up to highlight multi-channel behaviors. There was no attempt to generate rigorous performance numbers or provide platform comparisons. It has all been show-and-tell, but to a purpose. Here’s a quick explanation of the tests that were run.
Testing from the Windows Client
The diskspd command was used to generate I/O workloads from Windows. Here’s how the command was run:
PS C:\> diskspd.exe -c1G -W10 -d60 -r -w50 -t4 -o16 `
>> Z:\testfile00.dat `
>> Z:\testfile01.dat `
>> Z:\testfile02.dat `
>> Z:\testfile03.dat- -c1G: A 1GiB test file.
- -W10: Ten second warm-up.
- -d60: Measure I/O for 60 seconds, following the warm-up.
- -r: Randomize the I/O.
- -w50: 50% write, which means %50 read.
- -t4: Run four threads per target.
- -o16: Allow up to sixteen outstanding I/O requests per thread for each file.
The goal was to create multiple I/O streams within a single SMB session, and allow that session to be carried across whichever channels were made available for the given test run. Data was collected using the Windows perfmon program, using a two-second sampling rate, and the graphs were generated by loading the perfmon data into LibreOffice Calc (a spreadsheet).
Another test involved copying a big file full of random data back and forth across the SMB connection. The file was generated on the server side, as follows:
# dd if=/dev/urandom of=40GB.rnd bs=4M count=10240 status=progressThe next step was to copy the file to the Windows client, which was easy since there were already shared directories set up. The file was then copied back and forth as needed to generate the I/O performance graphs. These graphs are generated automatically by the Windows File Explorer. The graphs used here were captured by taking screenshots.
Between test runs, the share was disconnected and reconnected, to ensure that the most current multi-channel information was received and that the client and server were in sync.
PS C:\> net use /d /persistent:no z:
z: was deleted successfully.

PS C:\>  net use /user:user1 Z: \\192.168.2.25\share-1
The command completed successfully.
Note that Windows caches passwords, so we did not need to enter the password to reconnect to the share. Your mileage may vary.
Also note the use of the /persistent:no switch. Windows also caches SMB connections, but specifying /persistent:no ensures a complete disconnect.
The Road Ahead
The tread is wearing a little thin on the tires of our trucking analogy, but we may be able to get some extra mileage if we add some other modes of transportation, like trains and ships and maybe even a go-kart or two. Multi-channel can do that for us because, in addition to supporting multiple TCP/IP-based network links, it can also make use of a couple of other transport protocols.
Before we get too far down the road, however, it’s important to note that support for these alternative modes of transportation is still under development. They work under Windows, but implementing SMB is always a game of Follow-the-Leader. Porting Windows behaviors to other platforms takes skill, time, and a degree of fanaticism.
Thankfully, fanatics of the right variety are readily available and work is underway to add support for two transport types, RDMA and QUIC, to the Samba suite.
RDMA
As transports go, think of this as a bullet train.
RDMA stands for Remote Direct Memory Access; it is a turbo-charged transport. It provides a speed boost for large data transfers, even beyond what is available by just using faster network links. With RDMA, all of the networking overhead is handled in hardware on the NICs, and messages are transferred directly into memory on the remote node, generating a significant data transfer speed-up.
There are, however, some significant differences in the designs of the SMB and RDMA software stacks between Windows and Linux. The resulting incompatibilities took some time to resolve, but they have been addressed and SMB over RDMA is currently on the Samba roadmap.
QUIC
This one is more like a go-kart race.
The QUIC protocol is an extension of UDP (User Datagram Protocol). It was originally developed as a way to make web page access more reliable, but Microsoft has leveraged it for better SMB connectivity. UDP is a connectionless transport. In practical terms, that means it throws packets in the direction of the intended recipient and just hopes that they arrive. That may sound sloppy, but it has some advantages.
Consider an enterprise laptop. It moves from the desktop to the lunch room to the shuttle bus to the conference room to the food court at the mini-mall down the street. As it moves, it disconnects and reconnects from various WiFi access points. With a traditional SMB connection, each time a reconnect occurs, the laptop has to establish a new SMB session. Open files have to be re-opened, and unsaved changes may be lost. Quite disruptive.
UDP protocol, however, doesn’t maintain a connection. It sends a message, and the receiver sends a reply. It is expected that some messages will be lost. QUIC protocol is built on top of UDP. It adds encryption to ensure that messages belong to the same session, and it detects when a message is lost in transit. It can very quickly recover whenever the laptop changes networks.
QUIC is not as fast as RDMA or even a TCP connection, but it can maintain an SMB session even when the network is unstable and that makes it a very valuable addition to the multi-channel transport fleet.
QUIC protocol has been implemented for Linux, and work is underway to add QUIC support to multi-channel in Samba. It’s not here yet, but it’s on the road ahead.
Parked at the Rest Stop for the Night
We’ve done some sample data deliveries as a way to test-drive SMB3 multi-channel, skimmed through the owner’s manual, and taken a look under the hood.
Multi-channel is mostly automatic, so it doesn’t take a lot to learn the basics. It only starts to get tricky if you need to do some network configuration or performance tuning. Even then, the options are generally straight-forward and there are some good shop manuals available.
* Server Message Block v3 Protocol.
SMB is a network print and file sharing protocol. It is the native network file protocol in MS-Windows. It was originally developed by IBM in the early 1980’s for use with PC-DOS, and was later ported to MS-DOS, OS/2, and WindowsNT. SMB version 2 (SMB2), introduced with Windows Vista, represented a complete rewrite of the original protocol. SMB3 is an advanced dialect of SMB2, offering several performance and reliability features.
Leave a Reply