
Overview
QuantaStor Scale-Out Object Storage uses Ceph technology as the base of its object storage technology. Ceph has implemented functionality similar to Amazon’s S3 object storage whereby notifications can be sent from QuantaStor when bucket events occur – object added, object deleted, object replicated, etc. These notifications can be sent to HTTP, AMQP (Advanced Message Queuing Protocol), and Kafka endpoints. Once sent, these notifications can be routed to other platforms or systems, alerting them to take some action based on the notification.
In this article I’ll be walking through the process of enabling QuantaStor to send bucket notifications via AMQP to RabbitMQ. To do this I’ll be using a newly supported feature of QuantaStor… Docker!! That said, I’m not going to cover full integration of containers with QuantaStor in this article, but be on the lookout for a subsequent article to flesh that out.
As a bonus, I’m also adding Node-RED to the mix. Node-RED is a flow-based, low-code development tool for visual programming of event-driven applications. It’s nice to be able to receive our bucket notifications from a script or something, but it’s REALLY COOL to get them in a web GUI and be able to do something with them immediately.
Before I get started, for those not familiar with all the technologies we’re going to go over in this article today I’ll start with a brief synopsis of each to get everyone up to speed.
Docker is…
… an open-source platform that automates the deployment of applications inside lightweight, portable containers. These containers encapsulate everything needed to run an application, including code, runtime, system tools, libraries, and settings, ensuring consistency across different computing environments. Unlike traditional virtual machines that require a full guest operating system, Docker containers share the host operating system’s kernel, making them significantly faster and more resource-efficient. This allows developers to package applications into standardized units that can run reliably on any machine, from a developer’s laptop to a production server in the cloud.
RabbitMQ is…
.. an open-source message broker software, also known as message-oriented middleware, that facilitates reliable and efficient communication between applications in distributed systems. It acts as a mediator, receiving messages from producers (senders) and routing them to consumers (receivers) based on predefined rules, much like a post office handling mail. RabbitMQ primarily implements the Advanced Message Queuing Protocol (AMQP) but also supports other protocols such as MQTT, STOMP, and others through its plug-in architecture. It is written in Erlang and built on the Open Telecom Platform framework, enabling features like clustering, failover, message persistence, and high availability, making it suitable for use in microservices, real-time data processing, and IoT applications.
Node-RED is…
… a flow-based, low-code development tool for visual programming, originally developed by IBM for wiring together hardware devices, APIs, and online services as part of the Internet of Things (IoT). It provides a web browser-based flow editor that allows users to create applications by connecting nodes — each representing a specific function such as data collection, processing, or transmission — into visual workflows.
QuantaStor is…
… an enterprise-grade Software Defined Storage platform that turns standard servers into multi-protocol, scale-out storage appliances and delivers file, block, and object storage. OSNexus has made managing enterprise-grade, performant scale-out storage (Ceph-based) and scale-up storage (ZFS-based) extremely simple in QuantaStor, and able to be done quickly from anywhere. The differentiating Storage Grid technology makes storage management a breeze.
At a Glance
In this article I’ll be deploying RabbitMQ and Node-RED as Docker services on a single node of a QuantaStor Scale-Out Object Storage cluster. Once completed, I’ll configure the QuantaStor cluster to send bucket notifications to RabbitMQ and then we’ll visualize and play with them in Node-RED.
Before doing that, I’ll discuss some of the things you’ll want to think through when deciding to host containers on QuantaStor. Just because you can, doesn’t mean you should!
What I WILL NOT be including is the setup of Scale-Out Object Storage with QuantaStor. I’ve done a number of other blogs that already discuss that, so I won’t repeat that in this one. For those that don’t want to jump to other blogs and want to QuickStart the setup of a 3+ node QuantaStor cluster, after installing QuantaStor software on all the nodes, login to the web UI on the first node and click the “Getting Started/Configuration Guide” button in the top-right corner and follow the steps. You’ll have your Scale-out Object Storage set up in no time!
Let’s Go!
Here’s the agenda:
- Discuss using Docker containers on QuantaStor
- Discuss the RabbitMQ container configuration
- Discuss the Node-RED container configuration
- Deploy Docker containers on QuantaStor
- Configure QuantaStor bucket notifications
- Test and play
Activity Components
For this article, I’m using six QuantaStor virtual machines running on VMware vSphere with the following characteristics:
- vCPUs: 6
- RAM: 8GB
- OS: QuantaStor 7
- Networking: Two 10GB connections, but only using one for all network functions
- Storage:
- 1 x 100GB SSD for QS OS install/boot
- 2 x 100GB SSDs for journaling
- 4 x 10GB SSDs for data
With that configuration I created a 6-node Scale-Out Object Storage cluster.
Docker on QuantaStor
The ability to deploy containers on top of QuantaStor provides a lot of interesting possibilities. You can add storage functionality that’s not native to QuantaStor directly on the storage platform.
Before going hog wild, maybe some guidelines should be identified:
- The container workloads should be LIGHT! Remember, this is first and foremost a storage platform, and you most likely configured it to be as high performance as possible. You don’t want to degrade your performance because of a container that should be run somewhere else!
- Realistically, the container workload should have some relation to your storage – makes sense, right?
In the case of what I’m going through in this article, RabbitMQ provides a message bus service that will be used for storage notifications, so it’s related to storage in that way, and it’s also a light workload. If I were providing persistent message queues, that might be an even better integration case — have the persistent queues stored on QuantaStor provided, protected storage with zero network latency! In the case of Node-RED, the argument could go either way — it kind of depends on what you implement IN Node-RED. In this case, it’s partially just an interesting way of interacting with the message bus with the potential to transform and/or forward the notifications. That makes it related to storage, and it’s a light workload. I wouldn’t suggest hosting it on QuantaStor without that storage connection.
In a nutshell, use common sense before deploying!
Now let’s evolve the thought to container integration with QuantaStor. This is something that I’ll cover in future articles but it involves making two files. First a qs_containerhandler_NNNN.conf file where NNNN is the name of your container tag like ‘rabbitmq’. This contains all the information for customizing the QuantaStor web management interface (WUI) so that you can easily customize what QuantaStor refers to as a ‘Service Config’ and then attach that to a ‘Resource Group’ with one or more ‘Network Shares’. Second you need a small bash script (qs_containerhandler_NNNN.sh) that takes all information captured in the WUI interface along with other params and allows you to further customize the ‘docker run’ operation however you see fit. We’ll cover this plugin development process in a follow-on article, but here we’re just going to spin up our container on a QuantaStor node using the preinstalled Docker.
Before we go further, we need to stage the files we’re going to use. Do the following:
- Determine a directory where you want to store the files for this project and clone the GitHub repo
- scp/sftp the rabbitmq/server directory to /home/qadmin on the QuantaStor server
- ssh to the server and complete the following:
Linux sj-643f-22 6.5.0-35-generic #35~22.04.1-Ubuntu SMP PREEMPT_DYNAMIC Tue May  7 09:00:52 UTC 2 x86_64 x86_64 x86_64 GNU/Linux
Ubuntu 22.04.4 LTS
OSNEXUS QuantaStor 7.0.0.016+next-20ae3a4428

== System Info ==
Uptime: up 2 weeks, 2 hours, 56 minutes
CPU: 6 cores
RAM: 7.74625 GB


 System information as of Fri Dec  5 11:44:48 PM UTC 2025

  System load:  1.44               Processes:               348
  Usage of /:   27.5% of 56.38GB   Users logged in:         0
  Memory usage: 59%                IPv4 address for ens192: 10.0.18.22
  Swap usage:   27%

Last login: Fri Dec  5 23:44:49 2025 from 10.0.0.1
qadmin@sj-643f-22:~$ sudo -i
[sudo] password for qadmin:
root@sj-643f-22:~# cp -r /home/qadmin/server /opt/rabbitmq
root@sj-643f-22:~#
Now for the fun stuff!
RabbitMQ Configuration
I’m going to say this up front, this is a demo configuration and nowhere near ready for a production deployment. That said, it’s a great starting point to build from since the scaffolding is in place and explained.
First let’s start with the files we’re using on the server. I created the following folder structure:
/opt/rabbitmq/
├── compose.yaml
├── env
├── nodered
├── rabbit
│   ├── enabled_plugins
│   ├── rabbitCert
│   │   ├── rabbit.local.crt
│   │   ├── rabbit.local.key
│   │   └── rabbitRootCA.crt
│   ├── rabbitmq.conf
│   └── rabbitmq-definitions.json
└── rabbitRootCA.crt
Realistically, for messaging like this HTTPS should be implemented. I ended up enabling HTTPS for management and both HTTP and HTTPS for data. So the rabbitCert folder contains the required components to implement HTTPS in the RabbitMQ container.
For this activity I created a local certificate authority (CA) and then created a local server certificate, signed by the CA. Yes, I know the rabbitRootCA.crt is in two spots, and yes, they’re the same. We’ll use them for different purposes, and having it at the root of the rabbitmq directory makes paths shorter. Chances are, if you’re going to implement this you’ll be using an enterprise CA or even a public CA to get your certs, so I won’t go into the nuances of creating your own local ones. If you would like the details leave a comment below or reach out to me directly (email address at the end). I will say though, I ran into an issue where Node-RED was trying to connect to the TLS-enabled AMQP port and threw an error because the RabbitMQ cert was not TLS 1.3. Using the following TLS extensions in my server cert request appeared to fix it:
[req_ext]
basicConstraints = critical,CA:FALSE
keyUsage = critical, digitalSignature, keyEncipherment
extendedKeyUsage = critical, serverAuth
Specifically, the basicConstraints line was not used for the previous cert that threw the error. Moving on…
Let’s go through the 3 config file we’re using to configure RabbitMQ starting with “enabled_plugins”. The only reason I had to add this file is to add the MQTT plugin to the RabbitMQ config. Apparently, if you have to add any non-default plugins you need to provide all of the plugins you want, so all but the rabbitmq_mqtt entry are default.
───────┬────────────────────────────────────────────────────────────────────────────────────────────────────────────────────────────────────────────────────────────────────────────
       │ File: /opt/rabbitmq/rabbit/enabled_plugins
───────┼────────────────────────────────────────────────────────────────────────────────────────────────────────────────────────────────────────────────────────────────────────────
   1   │ [rabbitmq_management, rabbitmq_management_agent, rabbitmq_web_dispatch, rabbitmq_mqtt].
Now on to rabbitmq.conf. Our use of this file is to configure the networking aspects of RabbitMQ.
───────┬────────────────────────────────────────────────────────────────────────────────────────────────────────────────────────────────────────────────────────────────────────────
       │ File: /opt/rabbitmq/rabbit/rabbitmq.conf
───────┼────────────────────────────────────────────────────────────────────────────────────────────────────────────────────────────────────────────────────────────────────────────
   1   │ #### Management UI Listeners ####
   2   │ # Enable HTTP on port 15672 (default, non-TLS)
   3   │ #management.listener.port = 15672
   4   │ #management.listener.ssl = false
   5   │ #management.listener.ip = 0.0.0.0
   6   │
   7   │ # Enable HTTPS on port 15671 (TLS)
   8   │ management.listener.ssl_opts.cacertfile = /etc/rabbitmq/certs/rabbitRootCA.crt
   9   │ management.listener.ssl_opts.certfile = /etc/rabbitmq/certs/rabbit.local.crt
  10   │ management.listener.ssl_opts.keyfile = /etc/rabbitmq/certs/rabbit.local.key
  11   │ management.listener.ssl_opts.verify = verify_none
  12   │ management.listener.ssl_opts.fail_if_no_peer_cert = false
  13   │ management.listener.port = 15671
  14   │ management.listener.ssl = true
  15   │
  16   │ #### AMQP Data Listeners ####
  17   │ # Enable AMQP non-TLS on port 5672
  18   │ listeners.tcp.default = 5672
  19   │
  20   │ # Enable AMQPS (TLS) on port 5671
  21   │ listeners.ssl.default = 5671
  22   │ ssl_options.cacertfile = /etc/rabbitmq/certs/rabbitRootCA.crt
  23   │ ssl_options.certfile = /etc/rabbitmq/certs/rabbit.local.crt
  24   │ ssl_options.keyfile = /etc/rabbitmq/certs/rabbit.local.key
  25   │
  26   │ # verification behaviour:
  27   │ # - verify_peer will validate client certs if presented
  28   │ # - fail_if_no_peer_cert = false makes client certs optional
  29   │ ssl_options.verify = verify_peer
  30   │ ssl_options.fail_if_no_peer_cert = false
  31   │
  32   │ # Pre-load Queues and Bindings
  33   │ #management.load_definitions = /etc/rabbitmq/definitions.json
Let’s talk about it by section:
- The first block is for HTTP management connections. You’ll notice that the first two lines are repeated in the second section. You can only enable HTTP or HTTPS management listeners, not both. The IP address line is irrelevant in this case because the container will only have a single IP address and doesn’t have any visibility to the host IP addresses. Management appears to not be able to provide both HTTP and HTTPS connections simultaneously, so this block is commented out and HTTPS is enabled.
- The second block is for HTTPS management connections. The lines are pretty self-explanatory, but I’ll point out the verify and fail_if_no_peer_cert lines are for client certs, which we aren’t using.
- The non-TLS listener listens on port 5672.
- The TLS listener listens on port 5671 and is using the same cert as the management port.
- The verification lines are similar to the ones for the management port.
- The load_definitions line isn’t necessary since that path is the default location and as you’ll see we’re positioning that file when the container starts.
Lastly, here’s rabbitmq-definitions file, which we’re using to pre-configure the RabbitMQ instance each time the container starts.
───────┬────────────────────────────────────────────────────────────────────────────────────────────────────────────────────────────────────────────────────────────────────────────
       │ File: /opt/rabbitmq/rabbit/rabbitmq-definitions.json
───────┼────────────────────────────────────────────────────────────────────────────────────────────────────────────────────────────────────────────────────────────────────────────
   1   │ {
   2   │   "vhosts":
   3   │   [
   4   │       {
   5   │           "limits":
   6   │           [],
   7   │           "metadata":
   8   │           {
   9   │               "description": "Default virtual host",
  10   │               "tags":
  11   │               [],
  12   │               "default_queue_type": "classic"
  13   │           },
  14   │           "name": "/"
  15   │       }
  16   │   ],
  17   │   "users":
  18   │   [
  19   │       {
  20   │           "hashing_algorithm": "rabbit_password_hashing_sha256",
  21   │           "limits":
  22   │           {},
  23   │           "name": "guest",
  24   │           "password_hash": "+s3ZUQO+7NX5sQ8EHSWoJ+TntCZ9UoJmWQnsXh3Cw3BVpnMR",
  25   │           "tags":
  26   │           [
  27   │               "administrator"
  28   │           ]
  29   │       }
  30   │   ],
  31   │   "permissions":
  32   │   [
  33   │       {
  34   │           "configure": ".*",
  35   │           "read": ".*",
  36   │           "user": "guest",
  37   │           "vhost": "/",
  38   │           "write": ".*"
  39   │       }
  40   │   ],
  41   │   "queues": [
  42   │     {
  43   │       "name": "ceph_q",
  44   │       "vhost": "/",
  45   │       "durable": true
  46   │     }
  47   │   ],
  48   │   "exchanges": [
  49   │     {
  50   │       "name": "amq.topic",
  51   │       "vhost": "/",
  52   │       "type": "topic",
  53   │       "durable": true,
  54   │       "auto_delete": true,
  55   │       "internal": false,
  56   │       "arguments": {}
  57   │     }
  58   │   ],
  59   │   "bindings": [
  60   │     {
  61   │       "source": "amq.topic",
  62   │       "vhost": "/",
  63   │       "destination": "ceph_q",
  64   │       "destination_type": "queue",
  65   │       "routing_key": "ceph",
  66   │       "arguments": {}
  67   │     }
  68   │   ]
  69   │ }
Much of this is rather default. Here are the interesting sections:
- users: The default creds for RabbitMQ are guest:guest. You could change the creds in here if you wanted, but take note that getting that custom password hash is not as straight forward as you might think. I’ll cover the steps below.
- queues: In RabbitMQ we’re taking in AMQP messages and then sending them out over MQTT, mostly because we can but also because MQTT is native in Node-RED which made things a but easier. In order to do that we need to create a queue for the messages that should go to MQTT. That is what the ceph_q queue is for. It’s specifically to have a place to push MQTT messages.
- bindings: After creating a queue we need to create this binding to tell RabbitMQ to take messages from the amq.topic exchange that have the “ceph” routing_key and send them out to MQTT.
RabbitMQ apparently uses a proprietary hashing algorithm for their passwords. The way I’ve been able to effectively get the hash is to start a default RabbitMQ container with the default config, docker exec into it and enter the following commands that would actually create a file similar to the one above. Obviously, you wouldn’t necessarily need to execute the middle two commands to just get the password hash, so proceed as you will.
rabbitmqctl add_user myuser mypassword
rabbitmqctl set_user_tags myuser administrator
rabbitmqctl set_permissions -p / myuser ".*" ".*" ".*"
rabbitmqctl export_definitions /tmp/definitions.json
Now that we’re done with the files used to configure RabbitMQ, let’s look at the section that configures the container from a Docker perspective. For this activity I’m using docker compose which is a functionality to package a number of docker aspects together and run them as a service. I’ll go into more detail when we get to the deployment, but let’s look at the section of the compose.yaml file that is specific to RabbitMQ.
───────┬────────────────────────────────────────────────────────────────────────────────────────────────────────────────────────────────────────────────────────────────────────────
       │ File: /opt/rabbitmq/compose.yaml
───────┼────────────────────────────────────────────────────────────────────────────────────────────────────────────────────────────────────────────────────────────────────────────
   4   │   qs.rabbit.local:
   5   │     image: rabbitmq:4-management
   6   │     hostname: qsrabbit
   7   │     ports:
   8   │       - "${IPADDR:-0.0.0.0}:15671:15671"
   9   │       - "${IPADDR:-0.0.0.0}:5671:5671"
  10   │       - "${IPADDR:-0.0.0.0}:5672:5672"
  11   │       - "${IPADDR:-0.0.0.0}:1883:1883"
  12   │     volumes:
  13   │       - /opt/rabbitmq/rabbit/rabbitCert:/etc/rabbitmq/certs:ro
  14   │       - /opt/rabbitmq/rabbit/rabbitmq.conf:/etc/rabbitmq/rabbitmq.conf:ro
  15   │       - /opt/rabbitmq/rabbit/enabled_plugins:/etc/rabbitmq/enabled_plugins:ro
  16   │       - /opt/rabbitmq/rabbit/rabbitmq-definitions.json:/etc/rabbitmq/definitions.json:ro
  17   │     networks:
  18   │       - rabbitnet
Let’s step through this:
- qs.rabbit.local:
This line provides a container-level name. This is particularly important because it’s what the server cert is used with. When used with a specific Docker network, this also provides automatic name resolution. So once we get the Node-RED container running we’ll be able to reach the RabbitMQ server at qs.rabbit.local. - image: rabbitmq:4-management
This is the Docker image to use from Docker HUB. - hostname: qsrabbit
This is the hostname INSIDE of the container - ports:
This is where we declare port forwarding in the form of {host IP}:{host port}:{container port}. The host IP part is variablized (back off… I’ve got dibs on that word!) which we’ll get into later. The host ports are important and can be altered if there’s already a service running on a port. The container port is what we’ve configured RabbitMQ to use in the rabbitmq.conf file.
– “${IPADDR:-0.0.0.0}:15671:15671” - volumes:
Here we’re bind mounting directories or files from the host into the container and controlling their access. The format is {host path}:{container path}:{access mode}. In this case, we don’t want the container to modify any of them so that every start is a clean start.
– /opt/rabbitmq/rabbit/rabbitCert:/etc/rabbitmq/certs:ro - networks:
Here is where we’re adding the container to a specific Docker network that only this container and the Node-RED container will share.
– rabbitnet
Easy, right? The next one is easier!
Node-RED Configuration
Let’s go through the same thing for Node-RED. First, the directory structure.
/opt/rabbitmq/
├── compose.yaml
├── env
├── nodered
│   └── nodered_data
│       └── flows.json
├── rabbit
└── rabbitRootCA.crt
See? I told you it was simple. In the nodered directory we have the nodered_data folder with a single file called flows.json. The permissions on nodered_data are 777 so the Node-RED configuration will be persisted between container runs. For now that’s OK since this is really just to demo RabbitMQ.
Now let’s look at the Node-RED part of the compose.yaml file.
───────┬────────────────────────────────────────────────────────────────────────────────────────────────────────────────────────────────────────────────────────────────────────────
       │ File: /opt/rabbitmq/compose.yaml
───────┼────────────────────────────────────────────────────────────────────────────────────────────────────────────────────────────────────────────────────────────────────────────
  20   │   nodered:
  21   │     image: nodered/node-red:latest
  22   │     ports:
  23   │       - "${IPADDR:-0.0.0.0}:1880:1880"
  24   │     volumes:
  25   │       - /opt/rabbitmq/nodered/nodered_data:/data
  26   │     networks:
  27   │       - rabbitnet
We’ve gone over everything in this section with one difference, there is no access mode on the volume entry. Without explicitly setting a mode it defaults to “rw”, which is what we want right now. This will allow the config to persist between container runs.
Deploy Containers
We’ve already gone over the vast majority of the compose.yaml file, but here it is in its entirety.
───────┬────────────────────────────────────────────────────────────────────────────────────────────────────────────────────────────────────────────────────────────────────────────
       │ File: /opt/rabbitmq/compose.yaml
───────┼────────────────────────────────────────────────────────────────────────────────────────────────────────────────────────────────────────────────────────────────────────────
   1   │ name: rabbitmq-demo
   2   │
   3   │ services:
   4   │   qs.rabbit.local:
   5   │     image: rabbitmq:4-management
   6   │     hostname: qsrabbit
   7   │     ports:
   8   │       - "${IPADDR:-0.0.0.0}:15671:15671"
   9   │       - "${IPADDR:-0.0.0.0}:5671:5671"
  10   │       - "${IPADDR:-0.0.0.0}:5672:5672"
  11   │       - "${IPADDR:-0.0.0.0}:1883:1883"
  12   │     volumes:
  13   │       - /opt/rabbitmq/rabbit/rabbitCert:/etc/rabbitmq/certs:ro
  14   │       - /opt/rabbitmq/rabbit/rabbitmq.conf:/etc/rabbitmq/rabbitmq.conf:ro
  15   │       - /opt/rabbitmq/rabbit/enabled_plugins:/etc/rabbitmq/enabled_plugins:ro
  16   │       - /opt/rabbitmq/rabbit/rabbitmq-definitions.json:/etc/rabbitmq/definitions.json:ro
  17   │     networks:
  18   │       - rabbitnet
  19   │
  20   │   nodered:
  21   │     image: nodered/node-red:latest
  22   │     ports:
  23   │       - "${IPADDR:-0.0.0.0}:1880:1880"
  24   │     volumes:
  25   │       - /opt/rabbitmq/nodered/nodered_data:/data
  26   │     networks:
  27   │       - rabbitnet
  28   │
  29   │ networks:
  30   │   rabbitnet:
  31   │     driver: bridge
First, let’s talk about variables. In both service sections I’ve variablized the IP address with “${IPADDR:-0.0.0.0}”. What this says is, if there is an environment variable with the name IPADDR use that value, otherwise use 0.0.0.0 which is a way of saying to bind the port in question to all IP addresses used on the host. To understand the possibilities here, take a look at the Docker compose Interpolation doc. This leads us to the /opt/rabbitmq/env file which includes an entry for IPADDR.
───────┬────────────────────────────────────────────────────────────────────────────────────────────────────────────────────────────────────────────────────────────────────────────
       │ File: /opt/rabbitmq/env
───────┼────────────────────────────────────────────────────────────────────────────────────────────────────────────────────────────────────────────────────────────────────────────
   1   │ IPADDR=10.0.18.20
We will pass this file when we start up the services so that we specifically specify the IP address to be used. We could have done something similar for the certifications that we’re passing into the container as well. You’ll want to put your own IP address in the env file. If you’ve created a site cluster and a virtual interface in the High-availability VIF Management tab, you can use a that if it makes sense.
Regarding IP addressing, the address you choose should be based on the use case of the container(s) you’re going to run on the platform. Here are some use cases:
- You want a container to run on a specific host and never run on other hosts. In this case you could use the host IP address, but if there is ANY chance that the container would run on other hosts you should shy away from using host addresses.
- You want a container to run on any host in the cluster, or follow a scale-up cluster storage pool when it trespasses from node to node. In this case you should create and use a cluster VIF. This allows the container to follow the association between the container and the VIF when it moves from host to host.
- You want a container to run on every node in the cluster. In this case you should use the IP address of the host that a container is configured to run on. There are potential exceptions, such as when you want to run containers on a fraction of the cluster but have resilience, but if it’s a 1:1 relationship the host address is a solid choice.
We’re finally at the point where we want to run the containers. We’re using, as you might have guest from the file naming, the Docker compose functionality which is the typical pattern to use when packaging Docker containers to be run as services. The usage is really straightforward. By default, docker compose looks for a compose.yaml file in your current directory. If you want to run it outside the directory use the -f parameter with the path to the compose file (of any name, but yaml format). The following commands are run from the /opt/rabbitmq directory.
The following will create the containers and start the services, showing the logs of the containers as they start. It’s a blocking command that doesn’t put you back to a command prompt and is good for troubleshooting container startup. Ctrl-C will stop the containers and return you to the command prompt.
docker compose --env-file env upIf you’re sure of the config and just want to create the containers and start the services, use the following which will run the containers in the background and return you immediately to the command prompt. The “-d” runs the containers in the background, or daemon mode.
docker compose --env-file env up -dAfter the containers are created, if they’re not running and you want to start them:
docker compose startTo stop them:
docker compose stopAnd to DESTROY them:
docker compose downSo, in a nutshell, to create and destroy, use “up” and “down”. After they’re created, to start and stop them use “start” and “stop”.
At this point I’m assuming you’ve run one of the “up” commands and the containers are running. Now we can start to see something. If you go to https://{your ip address}:15671/, after forcing the browser to bend to your will and continue to the site even though it doesn’t trust the site, you should see the following:

And if you go to http://{your ip address}:1880/ you should see the following:
We’re not going to do anything more with Node-RED in this section, but let’s test RabbitMQ. Go ahead and login with guest:guest which will take you to the Overview tab.

I’ll leave you to poke around if you’d like. When you’re ready, go to the Queues and Streams tab.
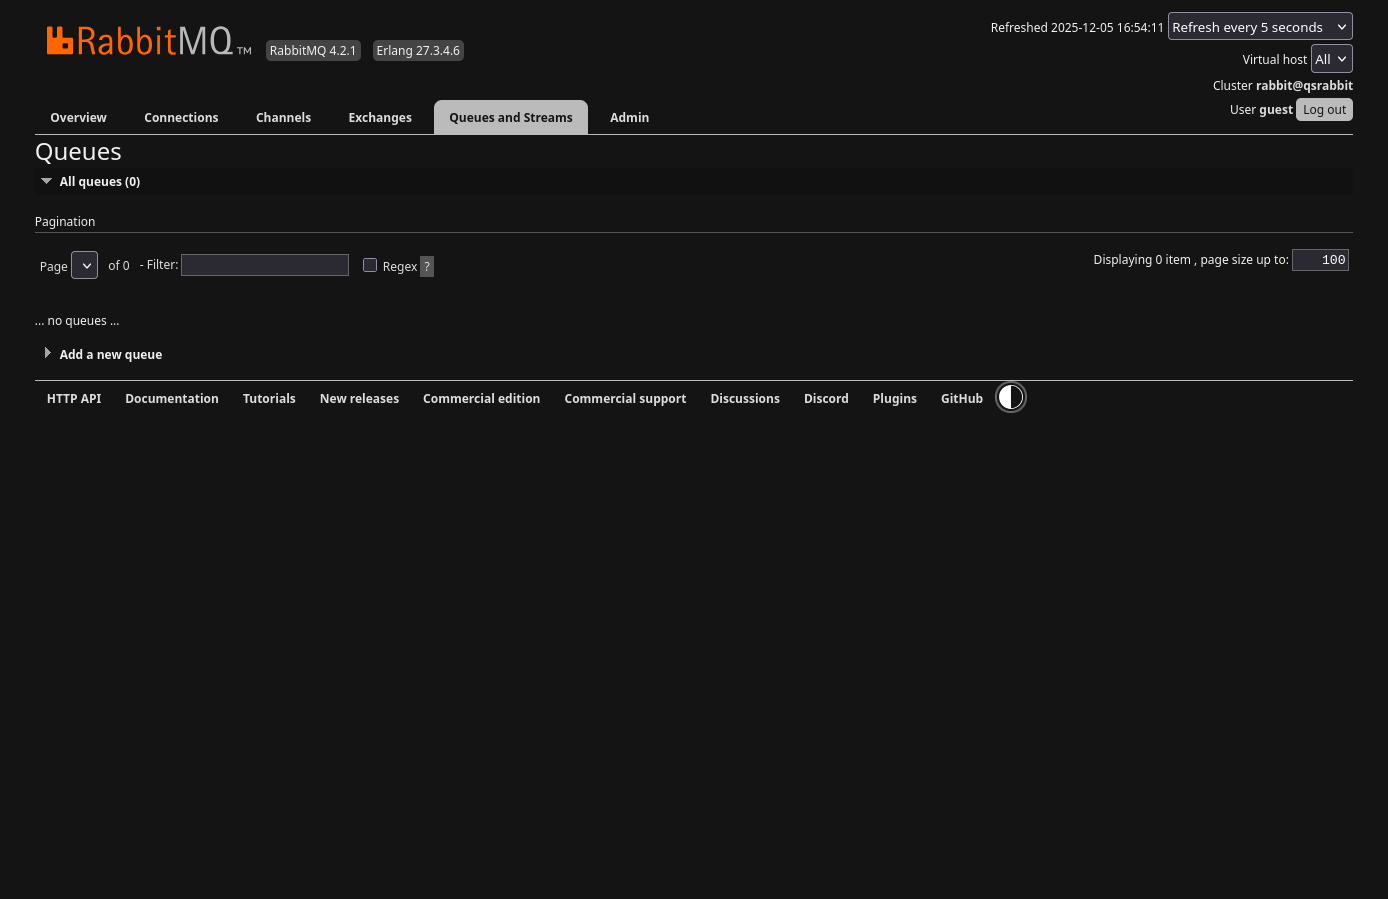
And… NOTHING, NADA! It’s expected. If you want to see something for testing you can go through the following task list. To preface, these instructions are for Linux. They can be done on Windows, but I’m not going to cover it.
- Open two terminals
- Navigate to a directory where you downloaded the files for this project in both terminals
- In the first terminal:
- You should see a directory called “rabbitmq” – DON’T go into it yet
- Run:
python3 -m venv rabbitmq - You’ve just created a virtual environment in the rabbitmq directory. Don’t worry if you don’t know what that is. It just isolates the python modules we’re going to install from the rest of your system. In the end, if you delete the rabbitmq directory everything we’re doing will be gone from your system – no bloat!
- Now:
cd rabbitmq - Run:
source ./bin/activate - Run:
pip3 install pika boto3
- Now –
cd client– in both terminals - In the second terminal:
- Edit the pullMsg.py file and change “localhost” to the ip address you used
- Run:
python3 pullMsg.py
- In the first terminal:
- Edit the pushMsg.py file and change “localhost” to the ip address you used
- Run:
python3 pushMsg.py
- You can repeat a few times if desired
Terminal 1: pushMsg.html
jordahl@apollo:~/workspace/pvenv/rabbitmq$ source bin/activate
(rabbitmq) jordahl@apollo:~/workspace/pvenv/rabbitmq$ python3 pushMsg.py
Sent 'Hello RabbitMQ!'
(rabbitmq) jordahl@apollo:~/workspace/pvenv/rabbitmq$ python3 pushMsg.py
Sent 'Hello RabbitMQ!'
(rabbitmq) jordahl@apollo:~/workspace/pvenv/rabbitmq$ python3 pushMsg.py
Sent 'Hello RabbitMQ!'
(rabbitmq) jordahl@apollo:~/workspace/pvenv/rabbitmq$
Terminal 2: pullMsg.html
jordahl@apollo:~/workspace/pvenv/rabbitmq$ source ./bin/activate
(rabbitmq) jordahl@apollo:~/workspace/pvenv/rabbitmq$ python3 pullMsg.py
       Waiting for messages. To exit press CTRL+C
       Received: b'Hello RabbitMQ!'
       Received: b'Hello RabbitMQ!'
       Received: b'Hello RabbitMQ!'
Back in the RabbitMQ interface on the Queues and Streams tab you’ll see this:
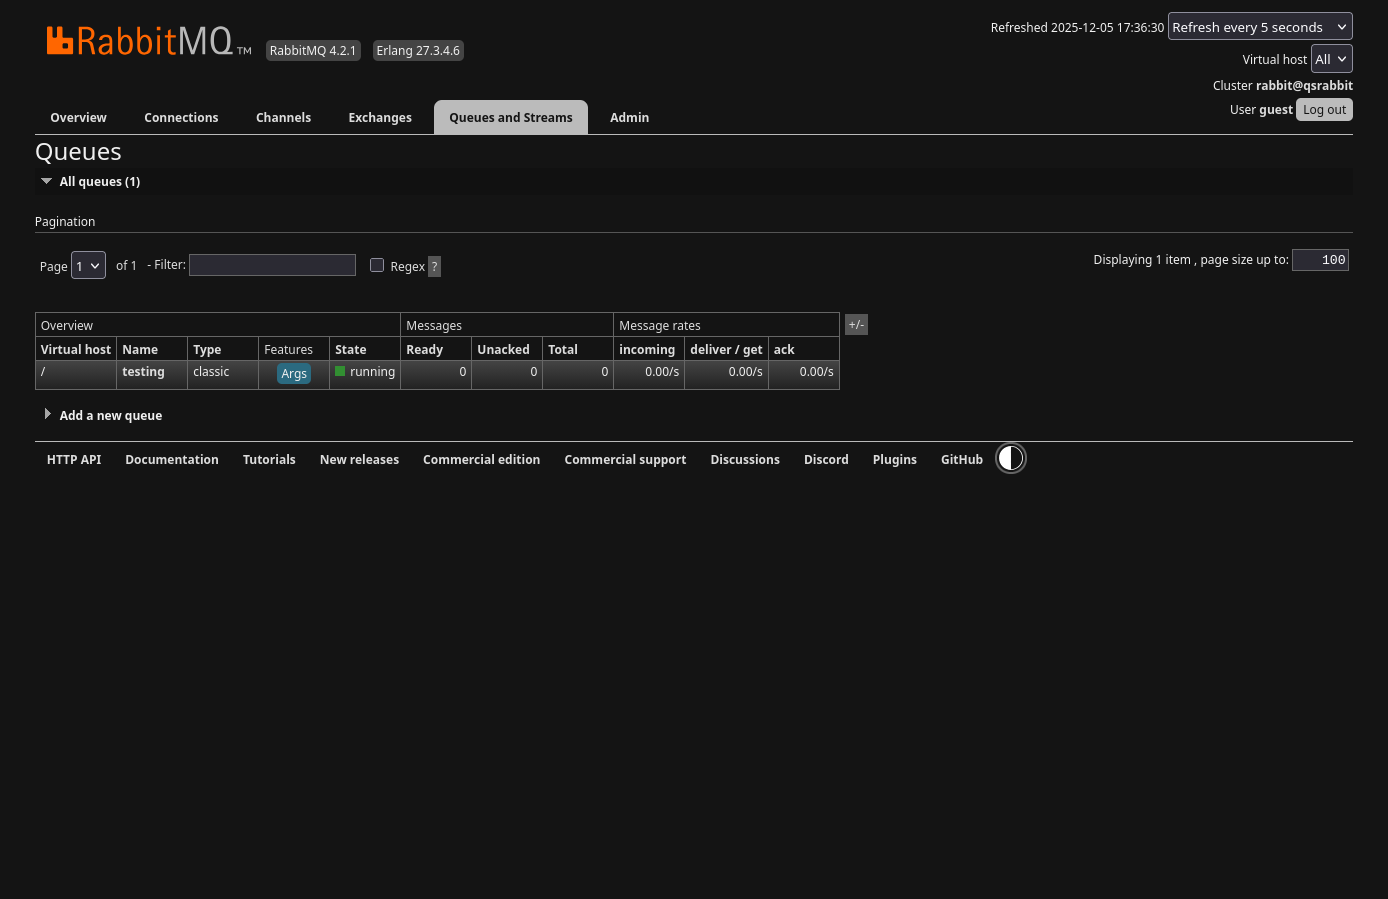
You’ll see the testing queue was created (by the pullMsg.py script), but you won’t see anything but zeros in the Messages columns. This is because the message is being pushed to the queue and immediately pulled. If you want to see numbers, Ctrl-C in the second terminal (the pulling terminal), run the pushMsg.py script a few times and then look at the interface. You should see the number of times you ran the script (it refreshes every 5 seconds).

Now run the pullMsg.py script again and the queue should drain back down to zeros again.

It’s working!! Now let’s get Ceph talking to it.
Configure QuantaStor bucket notifications
Before we get into the actual configuration of Ceph bucket notifications there’s a couple topics we should cover.
Bucket notifications are handled by the RADOS Gateway but one of the nuances is that you cannot configure them from the CLI, rather it can only be done through Ceph’s implementation of Amazon’s S3 API. Ceph’s implementation actually also implements a small subset of Amazon’s SNS API specifically for dealing with bucket notifications. These nuances will become more clear when we get into the weeds, but for now the takeaway is that we need to configure bucket notifications programmatically, NOT at the CLI. The CLI DOES have mechanisms to list and delete the objects we’ll be using, but you cannot create them.
The next thing you need to understand is that without making a rather extreme config, you CANNOT make Ceph administrative REST calls over HTTP. You’re required to use HTTPS. This means you need to make some accommodations. When you created your Scale-out Object Pool, if you were following the Getting Started steps, step 4 was to add object gateways. As part of this configuration you determined what mode your object gateway ran in with respect to the load balancer running on the server.

Basically you have 3 choices:
- Choice 1: Run the RADOS gateway with or without a load balancer
- Choice 2: Run the RADOS gateway with or without HTTPS
- Choice 3: If running the load balancer, run it with or without HTTPS
The default, which I chose to use, is to run the load balancer with HTTPS (terminating the TLS connection there) and then forwarding the traffic unencrypted to the RADOS gateway over HTTP. You can see in the following screenshot that in the Storage URL column most of my addresses are HTTP on port 7480 with HTTPS termination at the load balancer on port 8580, with the exception of the one “instance2” entry that’s HTTPS and doesn’t use a load balancer and is the gateway I created to allow me to configure bucket notifications.

Configure the Gateway
Before moving forward, you need to make a couple choices. Your ultimate goal is to have at least one HTTPS connection point into the object pool for admin configuration purposes, and by default one doesn’t exist. For clarity, this is ONLY for configuration, not for normal object operations. So you don’t really need all your nodes to have this capability. My suggestion is to decide on one node of the cluster that you’ll use for this purpose and configure it in one of two ways:
- Configure the RADOS gateway, on the node you choose, to trust unencrypted admin traffic only from the proxy. This command can only be done from the CLI on the node itself.
- Add an additional RADOS gateway on the node you choose that doesn’t use a load balancer and implements HTTPS. This is the route I chose and can be completed in the web UI.
For the first option complete the following as root on the node you chose, using “client.radosgw.{hostname}” in place of my node name. In the ceph config dump you’ll see the result of your change.
root@sj-643f-23:~# ceph config set client.radosgw.sj-643f-23 rgw_trust_forwarded_https true root@sj-643f-23:~# ceph config dump WHO MASK LEVEL OPTION VALUE RO global advanced rgw_trust_forwarded_https false mon advanced auth_allow_insecure_global_id_reclaim false mon advanced mon_warn_on_insecure_global_id_reclaim false mon advanced mon_warn_on_insecure_global_id_reclaim_allowed false osd advanced bluestore_compression_mode passive client.radosgw.sj-643f-21 advanced debug_rgw 10/10client.radosgw.sj-643f-23 advanced rgw_trust_forwarded_https trueroot@sj-643f-23:~#
The second way, in the GUI is to go to the Scale-out Storage Configuration tab, right-click the node you chose and select Add Object Gateway…
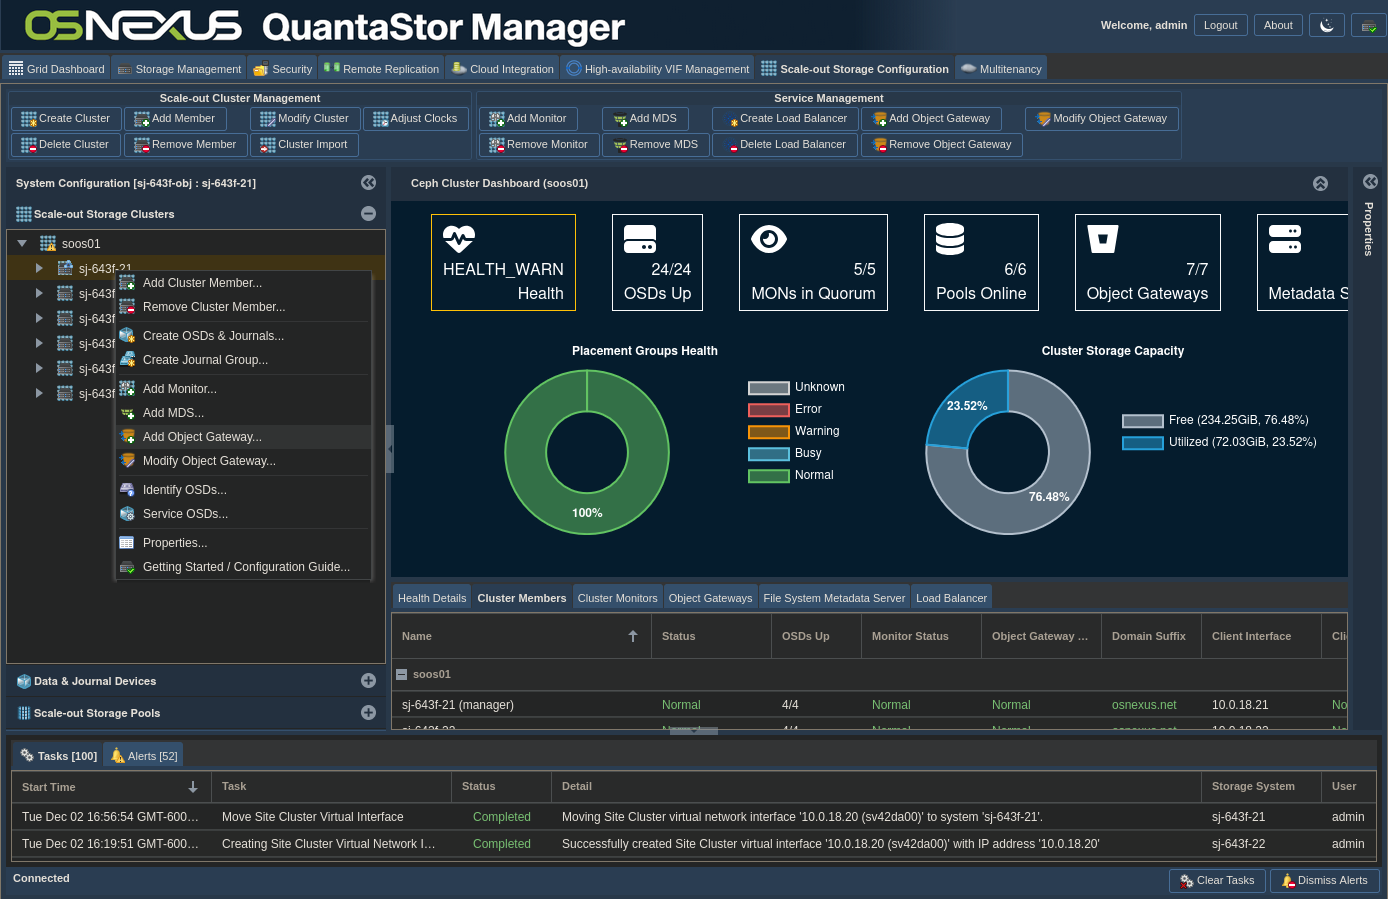
Select the node you want to use and click Next.
NOTE: You could add your own cert if needed.

Set the Object Gateway Mode to “HTTPS (S3 gateway, no load-balancer)”, Object Gateway Port to 7481, then click OK.

Get Credentials and Info
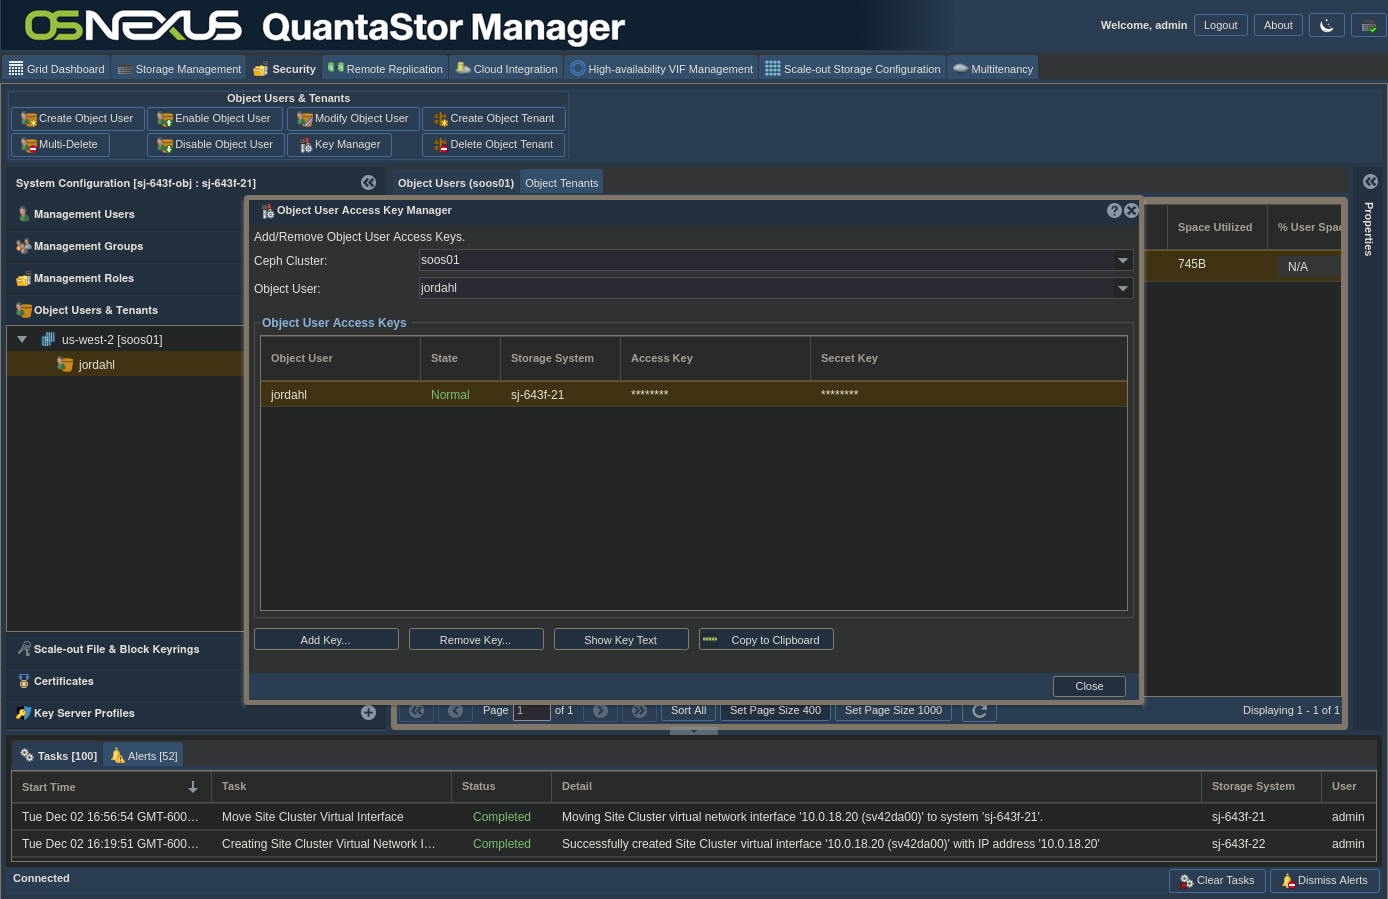
Now that that’s complete, we need to get your credentials for your Ceph user. In the web UI, switch to the Security tab, then Object Users & Tenants. Expand your region and note down what it is as you’ll need to use it shortly. Right-click your user and click Manage/View Object User Access Keys.
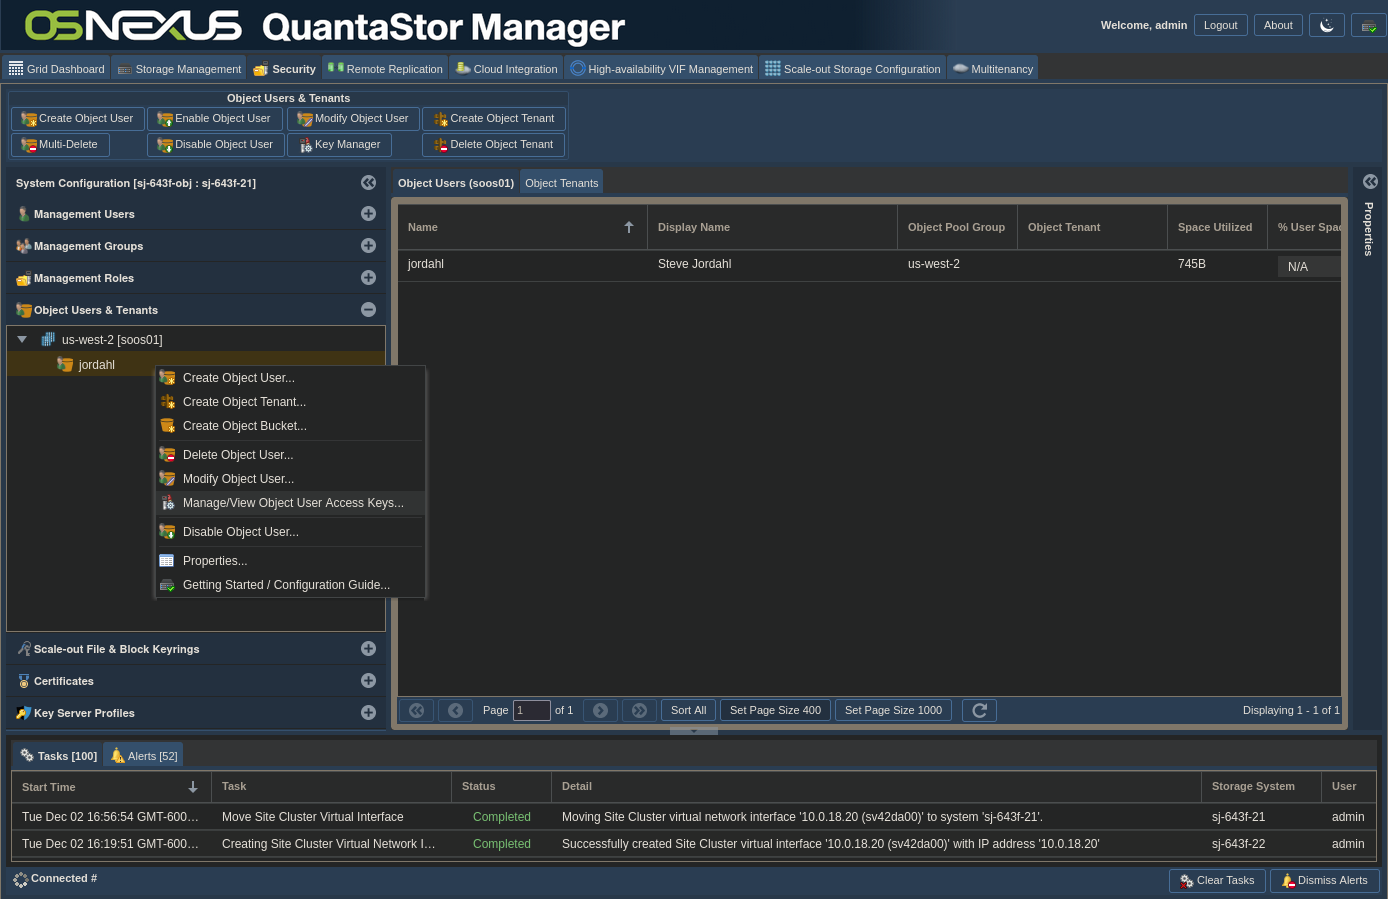
What you need from this screen is your username and your Access and Secret keys. You can copy them to the clipboard and paste them somewhere or show key text to copy them manually. Click close when you’ve secured the information.
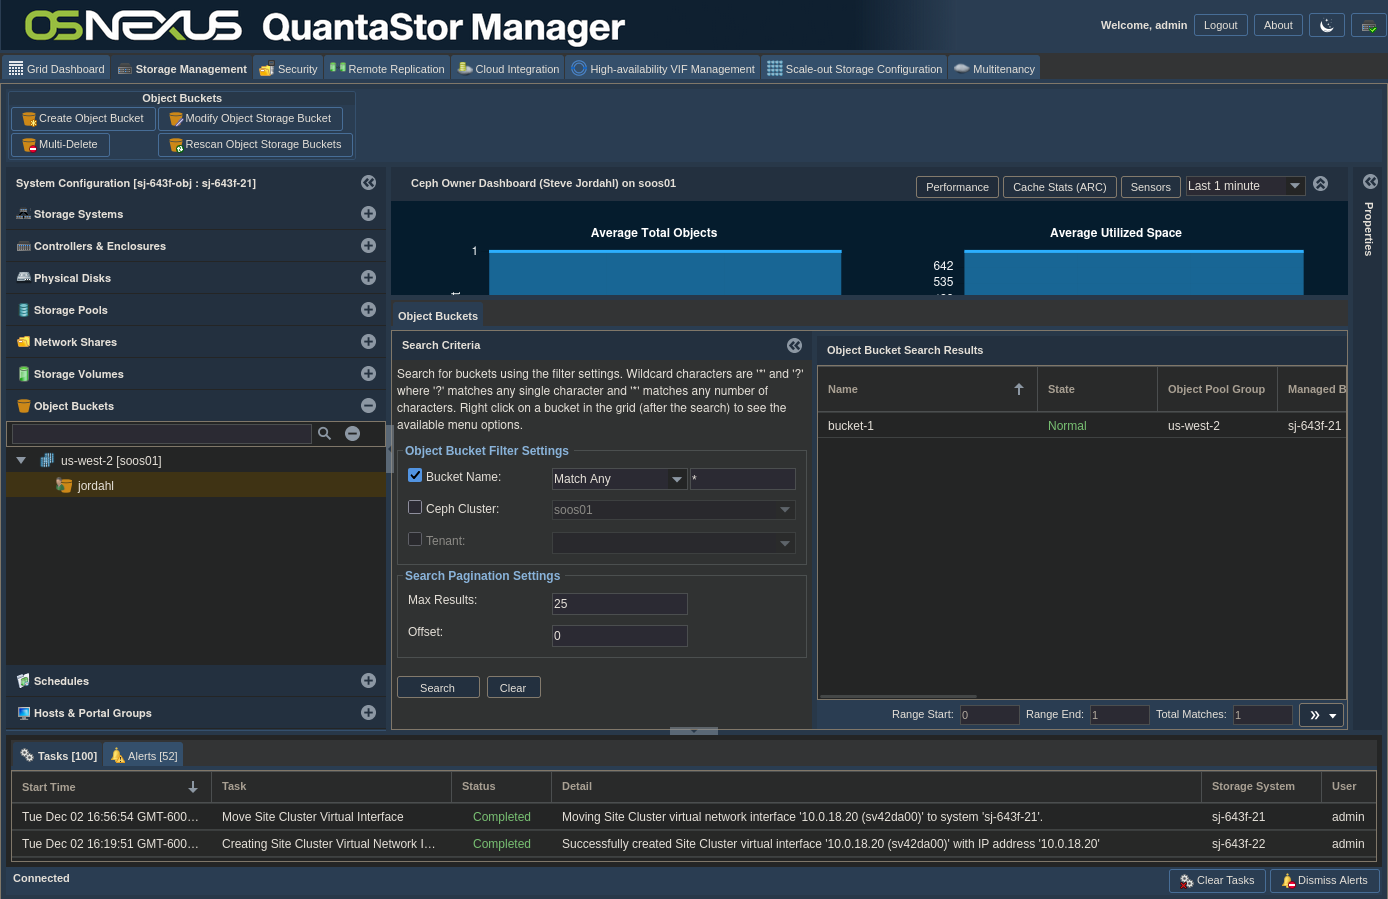
Now you need to get the bucket name that you want to apply the notifications to. Switch to the Storage Management tab, expand Object Buckets, click on the region and in the right pane with the default of {Bucket Name “Match Any” *} click Search. In the Object Bucket Search Results, note the name of the bucket you’re interested in as well as the user that owns it (scroll to the right).
Configure Bucket Notifications
It’s finally time to get notifications configured. To do that we’re going to use Python. I’ve created some code that’s really easy to use to configure bucket notifications initially and will also give you a way of managing them.
First you need to modify some variables. Open this file and add your unique info at the top:
───────┬────────────────────────────────────────────────────────────────────────────────────────────────────────────────────────────────────────────────────────────────────────────
       │ File: client/configNotifications.py
───────┼────────────────────────────────────────────────────────────────────────────────────────────────────────────────────────────────────────────────────────────────────────────
  35   │ # For Ceph connection
  36   │ ### Through RADOS HTTPS gateway
  37   │ ceph_endpoint = 'https://{ip address}:7481/'
  38   │ ### Through HTTPS proxy to RADOS HTTP gateway
  39   │ # ceph_endpoint = 'https://{ip address}:8580/'
  40   │
  41   │ # Either supply the profile details
  42   │ access_key = '{your access key}'
  43   │ secret_key = '{your secret key}'
  44   │ region = 'us-east-1'
  45   │
  46   │ # For topics
  47   │ amqp_uri = 'guest:guest@qs.rabbit.local:5672'
  48   │ exchange_name = 'amq.topic'
  49   │ topic_name = 'ceph'
  50   │ ca_location = '/opt/rabbitmq/rabbitRootCA.crt'
  51   │
  52   │ # For notifications
  53   │ bucket = '{bucket name}'
  54   │ owner = '{bucket owner}'
  55   │ notification_id = '{bucket name}_notify'
  56   │ topic_arn = 'arn:aws:sns:us::ceph'
  57   │
  58   │ ceph = CephNotificationMgr( endpoint = ceph_endpoint,
  59   │                             access_key = access_key,
  60   │                             secret_key = secret_key,
  61   │                             region = region
  62   │                           )
Going through these variable, there’s really three sections.
The first section is lines 3 – 12 and consists of most of the information we just looked up. It specifically provides connectivity and authentication to the Ceph RADOS Gateway endpoint that will accept your configuration requests. Lines 5 and 7 are mutually exclusive and just illustrate the likely ports you’d use based on how you configured your RADOS gateway in the previous section.
Lines 14 – 18 are the variable details to create the Ceph topic which contains the details to send messages to the RabbitMQ topic we configured. If you don’t want to verify the RabbitMQ cert just make it an empty string. Remember I mentioned earlier that Ceph has implemented a subset of the Amazon SNS API? It is the Ceph’s SNS API that the code uses to create the Ceph topic.
Lines 20 – 24 are the variable details to create the bucket notification. Since it’s applied to a bucket it’s Ceph’s S3 API that is used for this operation. When an operation comes through one of the gateways, the gateway checks to see if the operation requires notification, and if it does it creates the notification object and passes it to the related Ceph topic to send to the desired destination. That’s why the topic_arn variable is there. Something to note is that if you change the topic_name variable for the topic then you’ll need to change the topic_arn for the notification to match the topic_arn of the topic you created.
You’ll see the result in a bit, but I think it’s worth pointing out that I’ve abstracted the notification events in code and am specifically setting the bucket to notify on all creation and removal operations. In the references section at the end there is a link to a Ceph page that lists the event types available.
Now let’s run the code to create the bucket notification structures. You’ll do this in one of the terminals that you used earlier and you want to be in the same Python virtual environment directory with the environment activated. I’ve added comments in yellow, commands to enter are in cyan and interesting output is highlighted. Because we haven’t taken the steps for our system or app to trust the certificate provided by the gateway, each command will give you a warning – nothing to worry about!
### If you don't see the environment name before your prompt, activate the environment jordahl@apollo:~/workspace/pvenv/rabbitmq$ source ./bin/activate ### Run the configNotifications.py script with Python3 in interactive mode (rabbitmq) jordahl@apollo:~/workspace/pvenv/rabbitmq$ python3 -i configNotifications.py ### First, let's list the buckets and make sure we're connecting properly ### You're looking for the highlighted rows in the output >>> list_buckets() /home/jordahl/workspace/pvenv/rabbitmq/lib/python3.12/site-packages/urllib3/connectionpool.py:1097: InsecureRequestWarning: Unverified HTTPS request is being made to host '10.0.18.21'. Adding certificate verification is strongly advised. See: https://urllib3.readthedocs.io/en/latest/advanced-usage.html#tls-warnings warnings.warn( { "ResponseMetadata": { "RequestId": "tx0000091b19bb600078598-0069371c54-15750864-us-west-2", "HostId": "","HTTPStatusCode": 200,"HTTPHeaders": { "transfer-encoding": "chunked", "x-amz-request-id": "tx0000091b19bb600078598-0069371c54-15750864-us-west-2", "content-type": "application/xml", "server": "Ceph Object Gateway (squid)", "date": "Mon, 08 Dec 2025 18:43:32 GMT", "connection": "Keep-Alive" }, "RetryAttempts": 0 },"Buckets": [ { "Name": "bucket-1", "CreationDate": "2025-11-21 20:15:46.136000+00:00" } ], "Owner": { "DisplayName": "Steve Jordahl", "ID": "jordahl" }} ### Let's make sure there are no other topics ### Note the empty Topics array and the 200 (Success) response code >>> list_topics() /home/jordahl/workspace/pvenv/rabbitmq/lib/python3.12/site-packages/urllib3/connectionpool.py:1097: InsecureRequestWarning: Unverified HTTPS request is being made to host '10.0.18.21'. Adding certificate verification is strongly advised. See: https://urllib3.readthedocs.io/en/latest/advanced-usage.html#tls-warnings warnings.warn( {"Topics": [],"ResponseMetadata": { "RequestId": "698e9ecf-183c-4e5b-8b26-419dd613cb45.15750864.4086340394839835772","HTTPStatusCode": 200,"HTTPHeaders": { "x-amz-request-id": "tx0000038b598f051c2047c-0069371c5f-15750864-us-west-2", "content-type": "application/xml", "server": "Ceph Object Gateway (squid)", "content-length": "270", "date": "Mon, 08 Dec 2025 18:43:43 GMT", "connection": "Keep-Alive" }, "RetryAttempts": 0 } } ### Let's make sure there are no other notifications ### Note the 200 (Success) response code - list_notifications doesn't return any other info >>> list_notifications() /home/jordahl/workspace/pvenv/rabbitmq/lib/python3.12/site-packages/urllib3/connectionpool.py:1097: InsecureRequestWarning: Unverified HTTPS t is being made to host '10.0.18.21'. Adding certificate verification is strongly advised. See: https://urllib3.readthedocs.io/en/latest/advanced-usage.html#tls-warnings warnings.warn( { "ResponseMetadata": { "RequestId": "tx00000ca6b9feb95f51cb1-0069371c6a-15750864-us-west-2", "HostId": "","HTTPStatusCode": 200,"HTTPHeaders": { "x-amz-request-id": "tx00000ca6b9feb95f51cb1-0069371c6a-15750864-us-west-2", "content-type": "application/xml", "server": "Ceph Object Gateway (squid)", "content-length": "55", "date": "Mon, 08 Dec 2025 18:43:54 GMT", "connection": "Keep-Alive" }, "RetryAttempts": 0 } } ### Time to create our AMQP Ceph Topic ### Note the TopicArn as that's what needs to be used for the notification creation >>> create_amqp_topic() /home/jordahl/workspace/pvenv/rabbitmq/lib/python3.12/site-packages/urllib3/connectionpool.py:1097: InsecureRequestWarning: Unverified HTTPS t is being made to host '10.0.18.21'. Adding certificate verification is strongly advised. See: https://urllib3.readthedocs.io/en/latest/advanced-usage.html#tls-warnings warnings.warn( {"TopicArn": "arn:aws:sns:us::ceph","ResponseMetadata": { "RequestId": "698e9ecf-183c-4e5b-8b26-419dd613cb45.15750864.18214674591862190251","HTTPStatusCode": 200,"HTTPHeaders": { "x-amz-request-id": "tx00000fcc786092b4770ab-0069371c9d-15750864-us-west-2", "content-type": "application/xml", "server": "Ceph Object Gateway (squid)", "content-length": "299", "date": "Mon, 08 Dec 2025 18:44:45 GMT", "connection": "Keep-Alive" }, "RetryAttempts": 0 } } ### Listing topics again shows our new topic, but doesn't show details ### Note the empty Topics array and the 200 (Success) response code >>> list_topics() /home/jordahl/workspace/pvenv/rabbitmq/lib/python3.12/site-packages/urllib3/connectionpool.py:1097: InsecureRequestWarning: Unverified HTTPS t is being made to host '10.0.18.21'. Adding certificate verification is strongly advised. See: https://urllib3.readthedocs.io/en/latest/advanced-usage.html#tls-warnings warnings.warn( {"Topics": [ { "TopicArn": "arn:aws:sns:us::ceph" } ],"ResponseMetadata": { "RequestId": "698e9ecf-183c-4e5b-8b26-419dd613cb45.15750864.13181869539269362372","HTTPStatusCode": 200,"HTTPHeaders": { "x-amz-request-id": "tx00000b6ef688163b142c4-0069371ca9-15750864-us-west-2", "content-type": "application/xml", "server": "Ceph Object Gateway (squid)", "content-length": "849", "date": "Mon, 08 Dec 2025 18:44:57 GMT", "connection": "Keep-Alive" }, "RetryAttempts": 0 } } ### Get Topic will show our topic's details ### The Name and Attributes are what we passed to create the topic >>> get_topic() /home/jordahl/workspace/pvenv/rabbitmq/lib/python3.12/site-packages/urllib3/connectionpool.py:1097: InsecureRequestWarning: Unverified HTTPS t is being made to host '10.0.18.21'. Adding certificate verification is strongly advised. See: https://urllib3.readthedocs.io/en/latest/advanced-usage.html#tls-warnings warnings.warn( {"Attributes": { "User": "jordahl", "Name": "ceph", "EndPoint": "{\"EndpointAddress\":\"amqp://guest:guest@qs.rabbit.local:5672\",\"EndpointArgs\":\"Version=2010-03-31&amqp-ack-level=broker&amqp-exchange=amq.topic&use-ssl=true&verify-ssl=false\",\"EndpointTopic\":\"ceph\",\"HasStoredSecret\":true,\"Persistent\":false,\"TimeToLive\":\"None\",\"MaxRetries\":\"None\",\"RetrySleepDuration\":\"None\"}", "TopicArn": "arn:aws:sns:us::ceph", "OpaqueData": "", "Policy": "" },"ResponseMetadata": { "RequestId": "698e9ecf-183c-4e5b-8b26-419dd613cb45.15750864.4842658076003524292","HTTPStatusCode": 200,"HTTPHeaders": { "x-amz-request-id": "tx00000433493dcd4dddec4-0069371cb0-15750864-us-west-2", "content-type": "application/xml", "server": "Ceph Object Gateway (squid)", "content-length": "1089", "date": "Mon, 08 Dec 2025 18:45:04 GMT", "connection": "Keep-Alive" }, "RetryAttempts": 0 } } ### Time to create our notifications ### Note the 200 (Success) response code - create_notification doesn't return any other info >>> create_notification() /home/jordahl/workspace/pvenv/rabbitmq/lib/python3.12/site-packages/urllib3/connectionpool.py:1097: InsecureRequestWarning: Unverified HTTPS t is being made to host '10.0.18.21'. Adding certificate verification is strongly advised. See: https://urllib3.readthedocs.io/en/latest/advanced-usage.html#tls-warnings warnings.warn( { "ResponseMetadata": { "RequestId": "tx0000068b11de0e57e79ab-0069371cc0-15750864-us-west-2", "HostId": "","HTTPStatusCode": 200,"HTTPHeaders": { "x-amz-request-id": "tx0000068b11de0e57e79ab-0069371cc0-15750864-us-west-2", "server": "Ceph Object Gateway (squid)", "content-length": "0", "date": "Mon, 08 Dec 2025 18:45:20 GMT", "connection": "Keep-Alive" }, "RetryAttempts": 0 } } ### Now we can see the notification we created ### Note the 200 (Success) response code and the TopicConfigurations array >>> list_notifications() /home/jordahl/workspace/pvenv/rabbitmq/lib/python3.12/site-packages/urllib3/connectionpool.py:1097: InsecureRequestWarning: Unverified HTTPS request is being made to host '10.0.18.21'. Adding certificate verification is strongly advised. See: https://urllib3.readthedocs.io/en/latest/ed-usage.html#tls-warnings warnings.warn( { "ResponseMetadata": { "RequestId": "tx00000176955462b16138b-0069371cc9-15750864-us-west-2", "HostId": "","HTTPStatusCode": 200,"HTTPHeaders": { "x-amz-request-id": "tx00000176955462b16138b-0069371cc9-15750864-us-west-2", "content-type": "application/xml", "server": "Ceph Object Gateway (squid)", "content-length": "221", "date": "Mon, 08 Dec 2025 18:45:29 GMT", "connection": "Keep-Alive" }, "RetryAttempts": 0 },"TopicConfigurations": [ { "Id": "bucket-1_notify", "TopicArn": "arn:aws:sns:us::ceph", "Events": [ "s3:ObjectCreated:*", "s3:ObjectRemoved:*" ] } ]} ### Type Ctrl-d to exit the Python interpreter >>> ### There are two ways to get out of the Python virtual environment ### Typing "deactivate" will exit the interpreter and take you back to the command prompt ### Or you can close the terminal if you don't need it anymore (rabbitmq) jordahl@apollo:~/workspace/pvenv/rabbitmq$ deactivate jordahl@apollo:~/workspace/pvenv/rabbitmq$
We’ve now created the Ceph topic and bucket notification objects, so now it’s time to reap our rewards. Before we do that, let me point out a couple important thoughts:
- Your bucket notification configuration is cluster-wide, so all RADOS gateways should send the notifications.
- BUT… If other cluster nodes can’t reach RabbitMQ or if you configured it, can’t verify the cert, notifications aren’t going to work.
- For resolution either give your RabbitMQ service a name that can be resolved on your network by your DNS server or if you followed me down this rabbit hole then add an entry for qs.rabbit.local in your /etc/hosts file with the address of the node it’s running on for each of the hosts in your cluster.
- To deal with the certification, you’ll most likely need to distribute the CA certificate to all the cluster nodes in the same directory so the Ceph topic can find it.
Test and play
Having a script receive our AMQP messages has value, but it’s not very exciting. The reason to deploy Node-RED with RabbitMQ is because you can visualize the events and start doing something with the messages immediately. Node-RED has close to 6000 “nodes” that you can download and implement; everything from the various SQL flavors to Kafka to OPC U/A. If you want to take your event and push it somewhere else, Node-RED could be a great way to do that. What’s more is that the debugging value from the interface is fantastic! I’ve provided links to Node-RED training below. The first session is an hour long and you’ll be able to start manipulating the data after about 15 minutes.
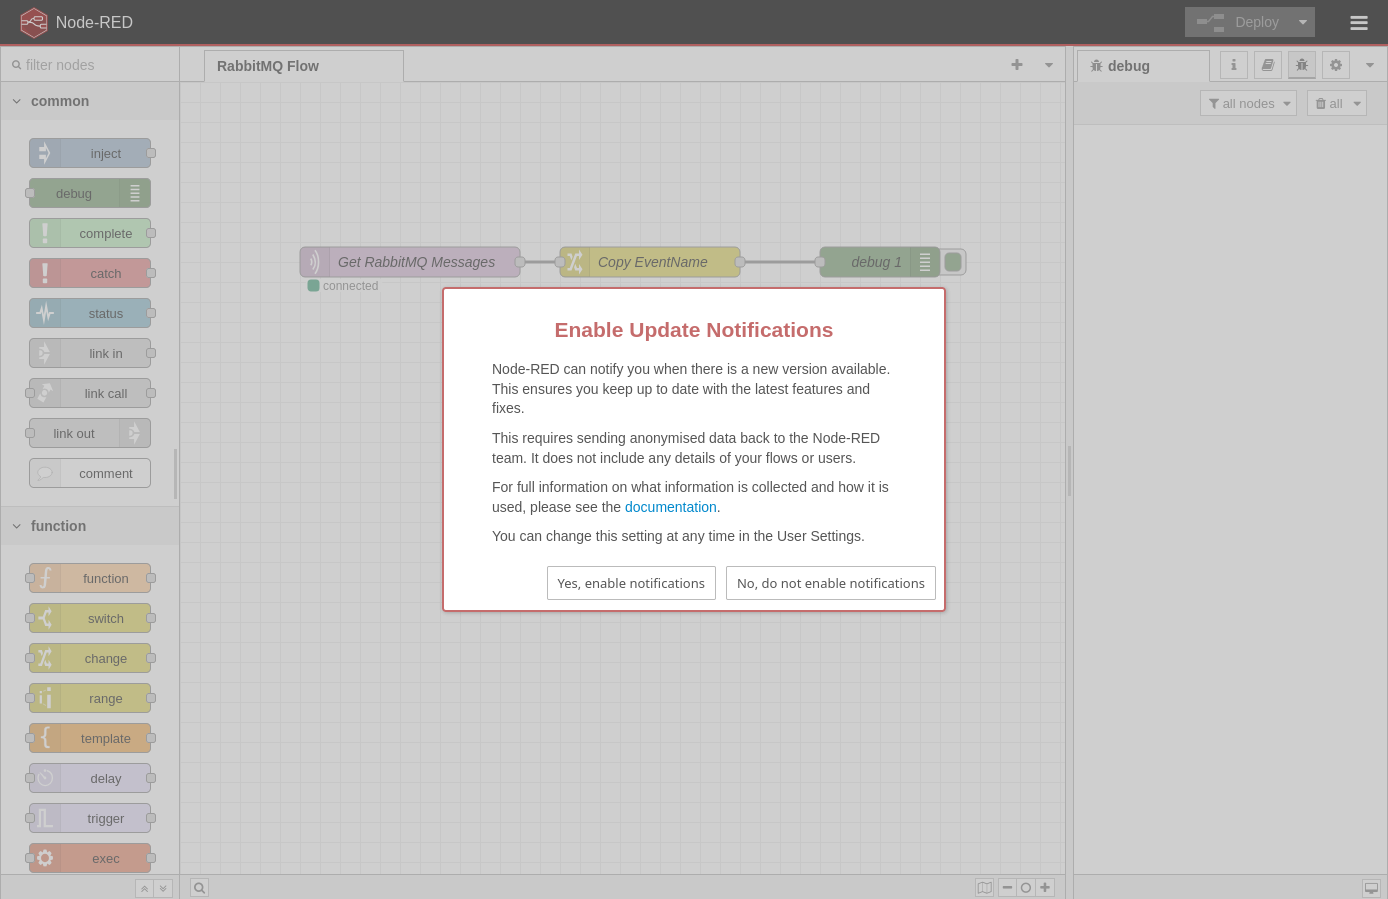
Now, back to this project. In your browser, navigate to http://{your ip address}:1880. This brings up the Node-RED interface.

Click the “No, do not enable notifications” button to dismiss the Enable Update Notifications.

Click the X to close the Welcome to Node-RED 4.1 dialog.
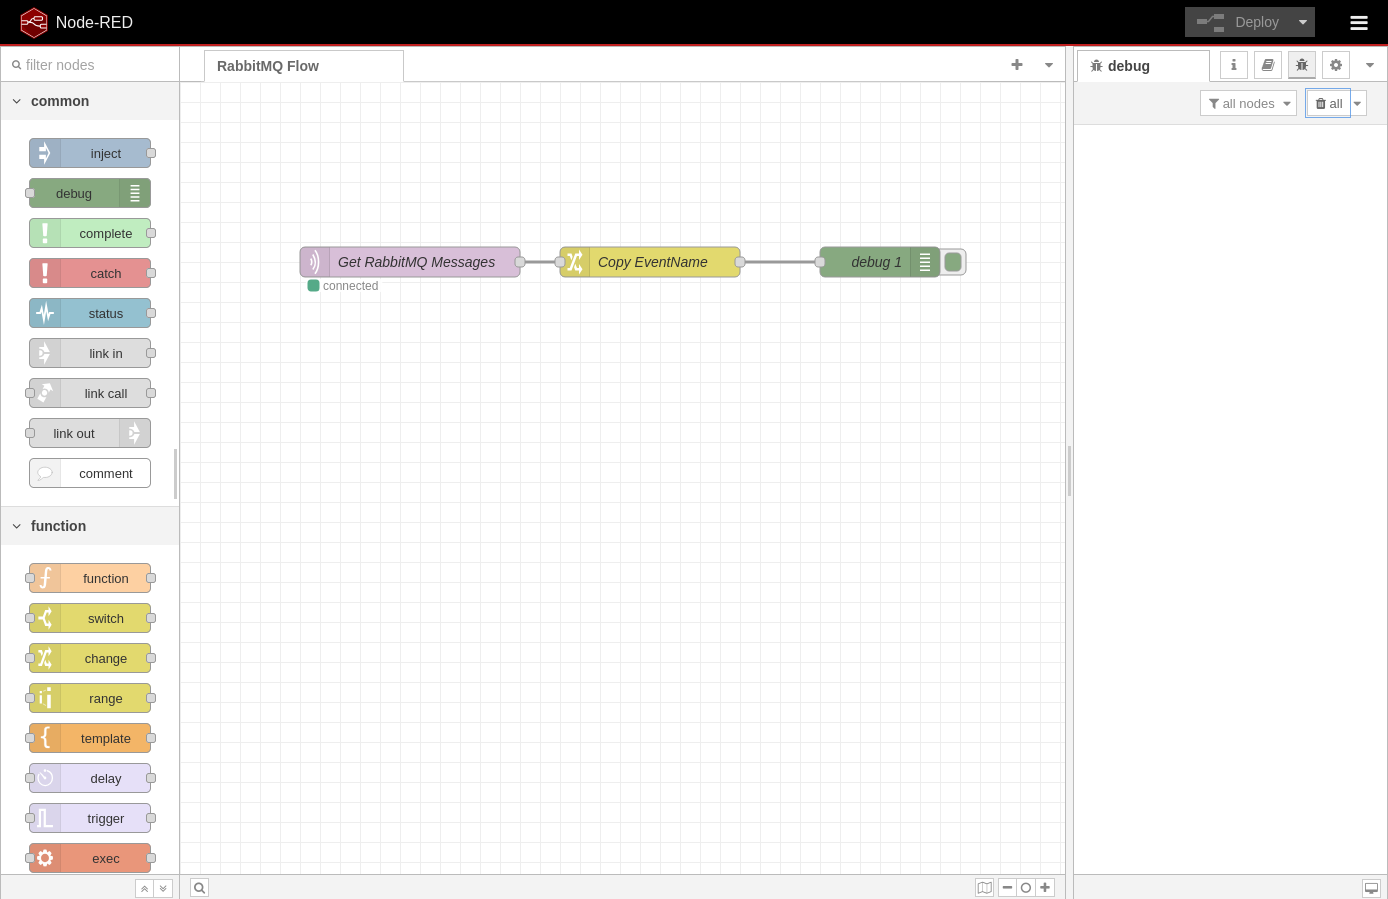
Now you’re at the main Node-RED flow designer with a pre-configured data flow that I created for this demo. In Node-RED terms there are 3 “nodes” in our data pipeline. The left side is a scrollable area called the palette. This is where you can drag “nodes” out into your workspace. The first node I have that’s called “Get RabbitMQ Messages” is an MQTT node that’s found in the network section of the palette. Node-RED natively supports MQTT, and since RabbitMQ also supports MQTT it was a rather easy call to use it. Node-RED DOES have AMQP “nodes” available, but I opted to go for simplicity for this demo. Under the Get RabbitMQ Messages button you should see that it’s “connected” and that means it has an active connection to that RabbitMQ container and is waiting to receive messages. Double-clicking on a node shows the node’s config.
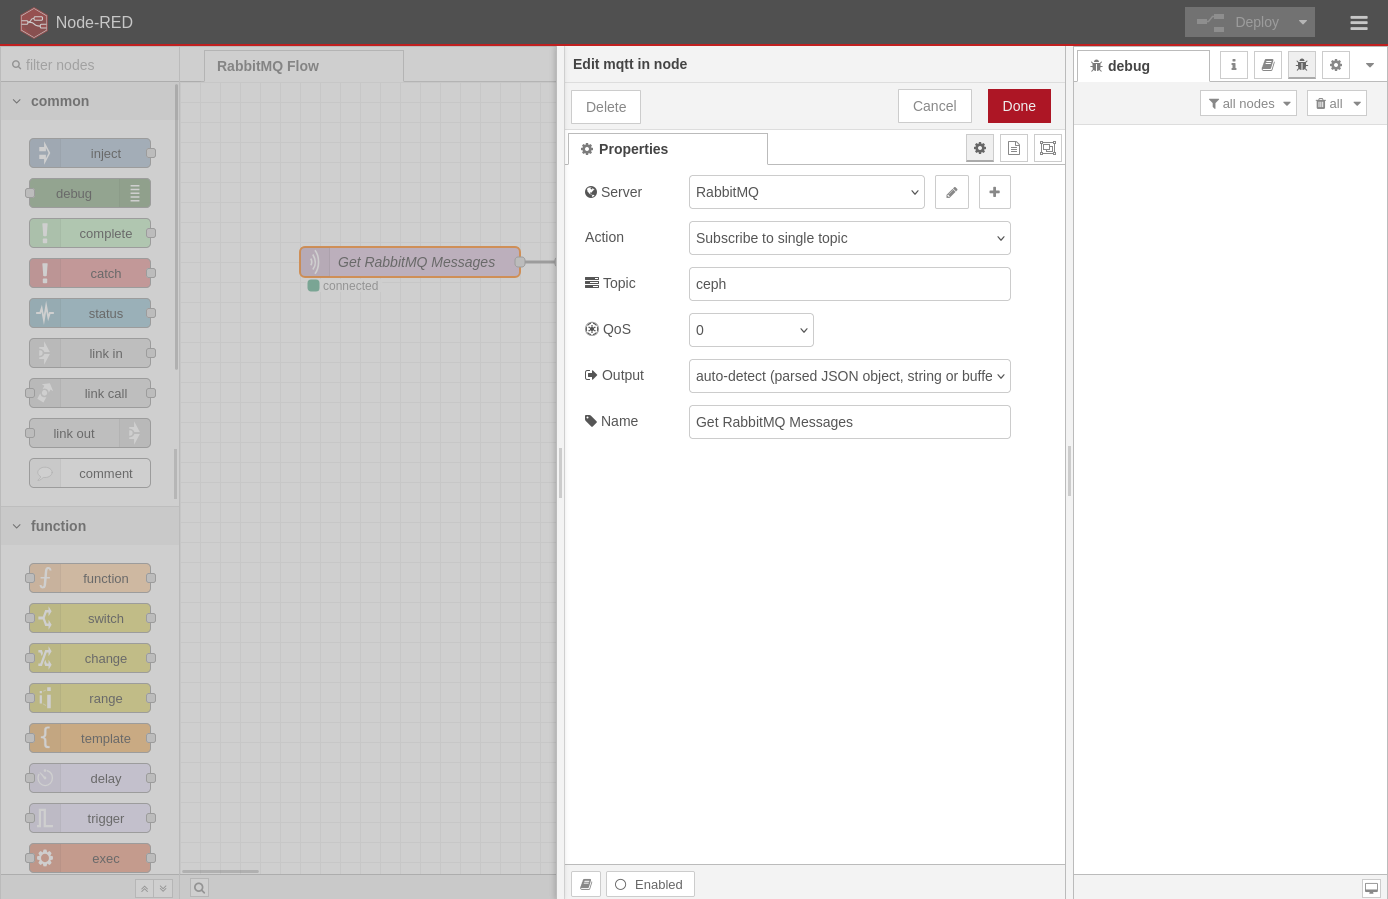
The notable setting in this configuration is that for Node-RED to talk to RabbitMQ over MQTT the QoS value needs to be 0.
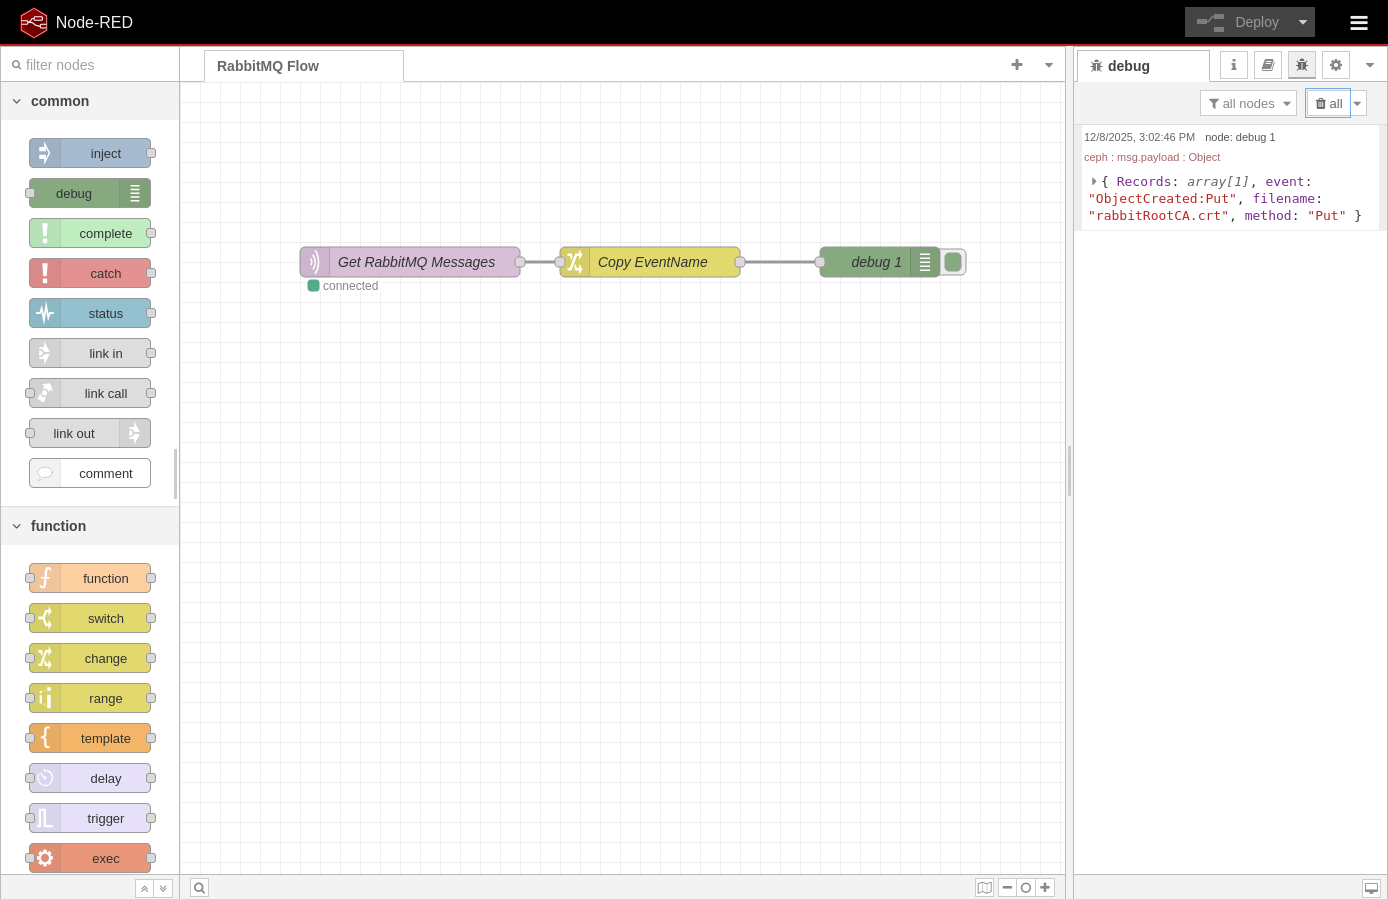
The Copy Event/Name node is a change node found in the function section of the palette. This allows you to alter the message in many ways. For this exercise I decided to copy the eventName, filename and method out of the data and create top-level attributes in the JSON payload. That way we can easily see them in the debug panel rather than having to expand the data.

The last node is the debut node, second in the common section of the palette. The configuration of this one isn’t very interesting, so I won’t show it. This node does what you’d expect, shows you debug output.
Now let’s see our bucket notifications in action. To do this we’re going to need to create and delete some objects in our bucket. If you have an existing way to do that, by all means use it. I’m going to use the AWS CLI. Installing it is out of scope for this article (link at the end), but let’s at least go through how to create a profile. Remember the access key and secret key we took note of previously? We’re going to need that now, as well as the region you configured your bucket in. Creating the profile is really easy. After running the command it will prompt for the individual data pieces. Just paste your stuff in and hit enter.
jordahl@apollo:~/workspace/pvenv/rabbitmq$ aws configure --profile qsSOOS
AWS Access Key ID [None]: 5POYNLT1P11QYC8PXAMB
AWS Secret Access Key [None]: R1t2HAu2zDPqvzUPJhxemCbfCnztl9EcYs8I5i68
Default region name [None]: us-west-2
Default output format [None]:
jordahl@apollo:~/workspace/pvenv/rabbitmq$
Now, let’s see this in action. I’m thinking by now you know what values to replace. The first command is using the default HTTP gateway on the first node where I’m running the containers. The second is through the default HTTP gateway on the second cluster node. The third is going through the HTTPS-enabled “instance2” gateway on node one. Until you’ve validated your configs on all the nodes I’d suggest not going through the load balancer since it could forward the traffic to unconfigured nodes (although it will probably go to the node it’s running on and work fine).
jordahl@apollo:~/workspace/pvenv/rabbitmq$ aws --profile qsSOOS --endpoint-url http://10.0.18.21:7480 s3 cp server/rabbit/rabbitCert/rabbitRootCA.crt s3://bucket-1/
Completed 745 Bytes/745 Bytes (1.5 KiB/s) with 1 file(s) remaining
upload: server/rabbit/rabbitCert/rabbitRootCA.crt to s3://bucket-1/rabbitRootCA.crt
jordahl@apollo:~/workspace/pvenv/rabbitmq$ aws --profile qsSOOS --endpoint-url http://10.0.18.22:7480 s3 rm s3://bucket-1/rabbitRootCA.crt
delete: s3://bucket-1/rabbitRootCA.crt
jordahl@apollo:~/workspace/pvenv/rabbitmq$ aws --no-verify-ssl --profile qsSOOS --endpoint-url https://10.0.18.21:7481 s3 cp server/rabbit/rabbitCert/rabbitRootCA.crt s3://bucket-1/
urllib3/connectionpool.py:1064: InsecureRequestWarning: Unverified HTTPS request is being made to host '10.0.18.21'. Adding certificate verification is strongly advised. See: https://urllib3.readthedocs.io/en/1.26.x/advanced-usage.html#ssl-warnings
Completed 745 Bytes/745 Bytes (1.3 KiB/s) with 1 file(s) remaining
upload: server/rabbit/rabbitCert/rabbitRootCA.crt to s3://bucket-1/rabbitRootCA.crt
jordahl@apollo:~/workspace/pvenv/rabbitmq$
After running the first command, here’s what we see in Node-RED. You can expand the message to see the full “payload” of the event as well as the attributes I created in the Copy Event/Name node.
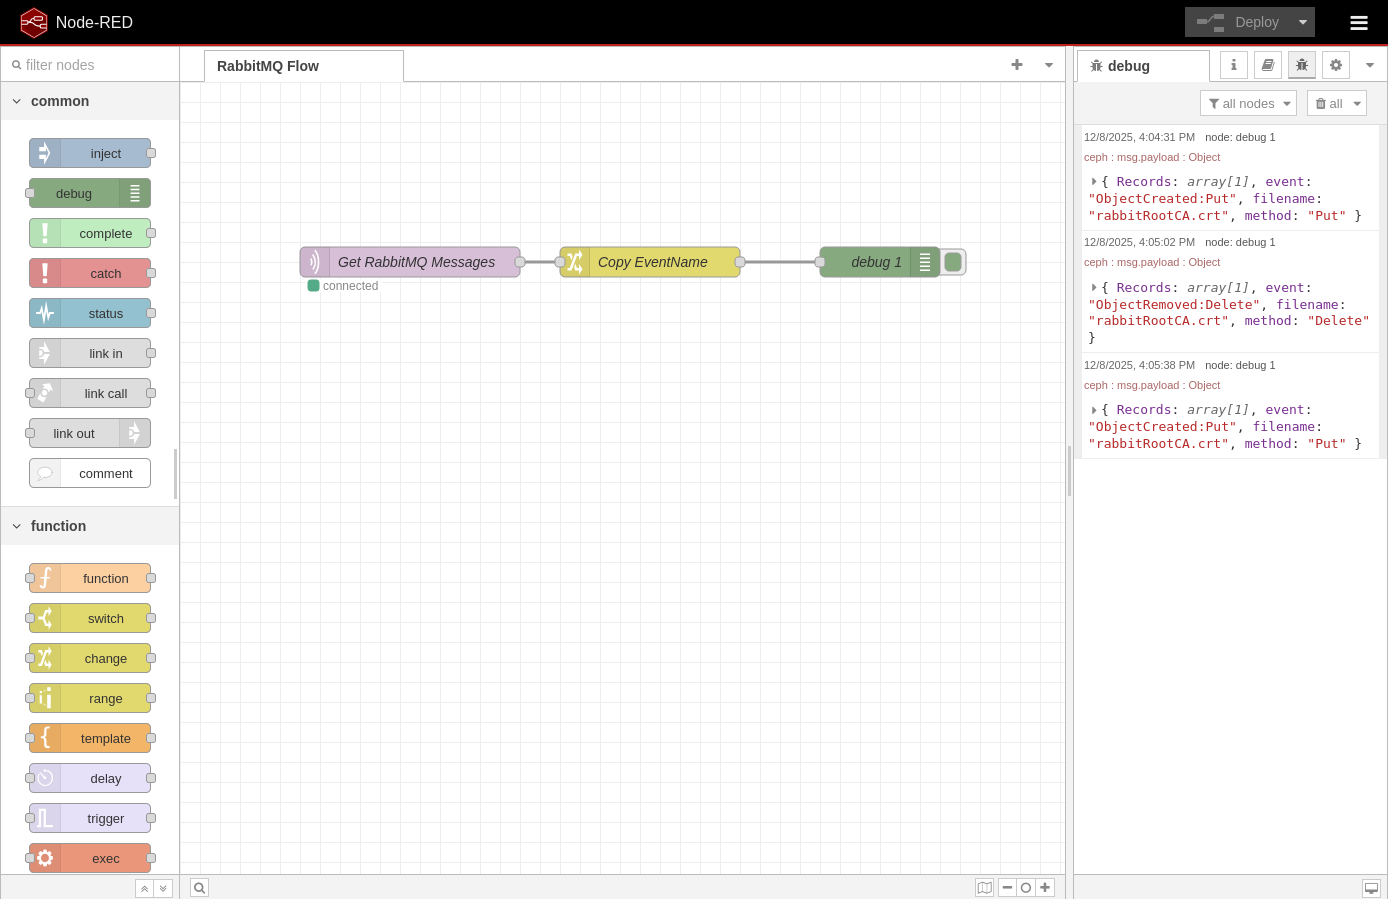
And after the second command. You’ll notice that the first event was a Create/Put event while the second is a Delete event.

And the third command.
Here’s what the full payload of the first event looks like:
───────┬────────────────────────────────────────────────────────────────────────────────────────────────────────────────────────────────────────────────────────────────────────────
       │ Ceph Bucket Notification
───────┼────────────────────────────────────────────────────────────────────────────────────────────────────────────────────────────────────────────────────────────────────────────
   1   │ {
   2   │     "Records":
   3   │     [
   4   │         {
   5   │             "eventVersion": "2.2",
   6   │             "eventSource": "ceph:s3",
   7   │             "awsRegion": "us",
   8   │             "eventTime": "2025-12-08T20:55:02.961848Z",
   9   │             "eventName": "ObjectCreated:Put",
  10   │             "userIdentity":
  11   │             {
  12   │                 "principalId": "jordahl"
  13   │             },
  14   │             "requestParameters":
  15   │             {
  16   │                 "sourceIPAddress": ""
  17   │             },
  18   │             "responseElements":
  19   │             {
  20   │                 "x-amz-request-id": "698e9ecf-183c-4e5b-8b26-419dd613cb45.185501.7830735739942846591",
  21   │                 "x-amz-id-2": "185501-us-west-2-us"
  22   │             },
  23   │             "s3":
  24   │             {
  25   │                 "s3SchemaVersion": "1.0",
  26   │                 "configurationId": "bucket-1_notify",
  27   │                 "bucket":
  28   │                 {
  29   │                     "name": "bucket-1",
  30   │                     "ownerIdentity":
  31   │                     {
  32   │                         "principalId": "jordahl"
  33   │                     },
  34   │                     "arn": "arn:aws:s3:us::bucket-1",
  35   │                     "id": "698e9ecf-183c-4e5b-8b26-419dd613cb45.78430.1"
  36   │                 },
  37   │                 "object":
  38   │                 {
  39   │                     "key": "rabbitRootCA.crt",
  40   │                     "size": 745,
  41   │                     "eTag": "e657b0cee47fa3c265ca941689b74dce",
  42   │                     "versionId": "",
  43   │                     "sequencer": "273B3769BB557904",
  44   │                     "metadata":
  45   │                     [],
  46   │                     "tags":
  47   │                     []
  48   │                 }
  49   │             },
  50   │             "eventId": "1765227303.075060.e657b0cee47fa3c265ca941689b74dce",
  51   │             "opaqueData": ""
  52   │         }
  53   │     ],
  54   │     "event": "ObjectCreated:Put",
  55   │     "filename": "rabbitRootCA.crt",
  56   │     "method": "Put"
  57   │ }
And that’s it. We’re manipulating objects in our object storage bucket and notification events are being sent through RabbitMQ to Node-RED. You now have the tools to play with various configurations and data flow patterns.
I hope the journey had value to you!
Summing it Up
Ceph bucket notifications deliver real-time insight and automation for any workflow built on object storage. By allowing applications to receive push-based events when objects are created, modified, or deleted, Ceph transforms a passive storage platform into an active event-driven system. This enables faster decision-making, eliminates the need for inefficient polling, and simplifies integration with modern cloud-native architectures.
Organizations benefit from improved responsiveness, lower operational overhead, and the ability to trigger automated pipelines the moment data arrives. Whether you’re automating ingestion, synchronizing datasets, kicking off analytics jobs, or monitoring storage activity, bucket notifications provide a lightweight and scalable mechanism to connect Ceph with downstream systems. The result is a more efficient, reactive, and intelligent storage ecosystem that seamlessly integrates with HTTP endpoints, messaging systems, and microservices—unlocking a wide range of automation and observability capabilities.
As usual, if you have any questions or comments please drop a message in the comment section. If you have any burning topics that you’d like to see an article on please don’t hesitate to drop me a line and share them at steve.jordahl (at) osnexus.com!
Useful Resources
Files Used in This Blog:
QuantaStor Links:
Ceph Links:
Docker Links:
- Docker Compose File Reference
- Docker Compose Variable Interpolation
- Docker Hub: Node-RED
- Docker Hub: RabbitMQ
RabbitMQ Links:
Node-RED Links:
Tools:
- AWS CLI Installation
- AWS CLI Getting Started
- GitHub aws/aws-cli
- Boto3
- Boto3 S3 Docs
- Boto3 SNS Docs
- Boto3 Reference
Other Tools:

Leave a comment