
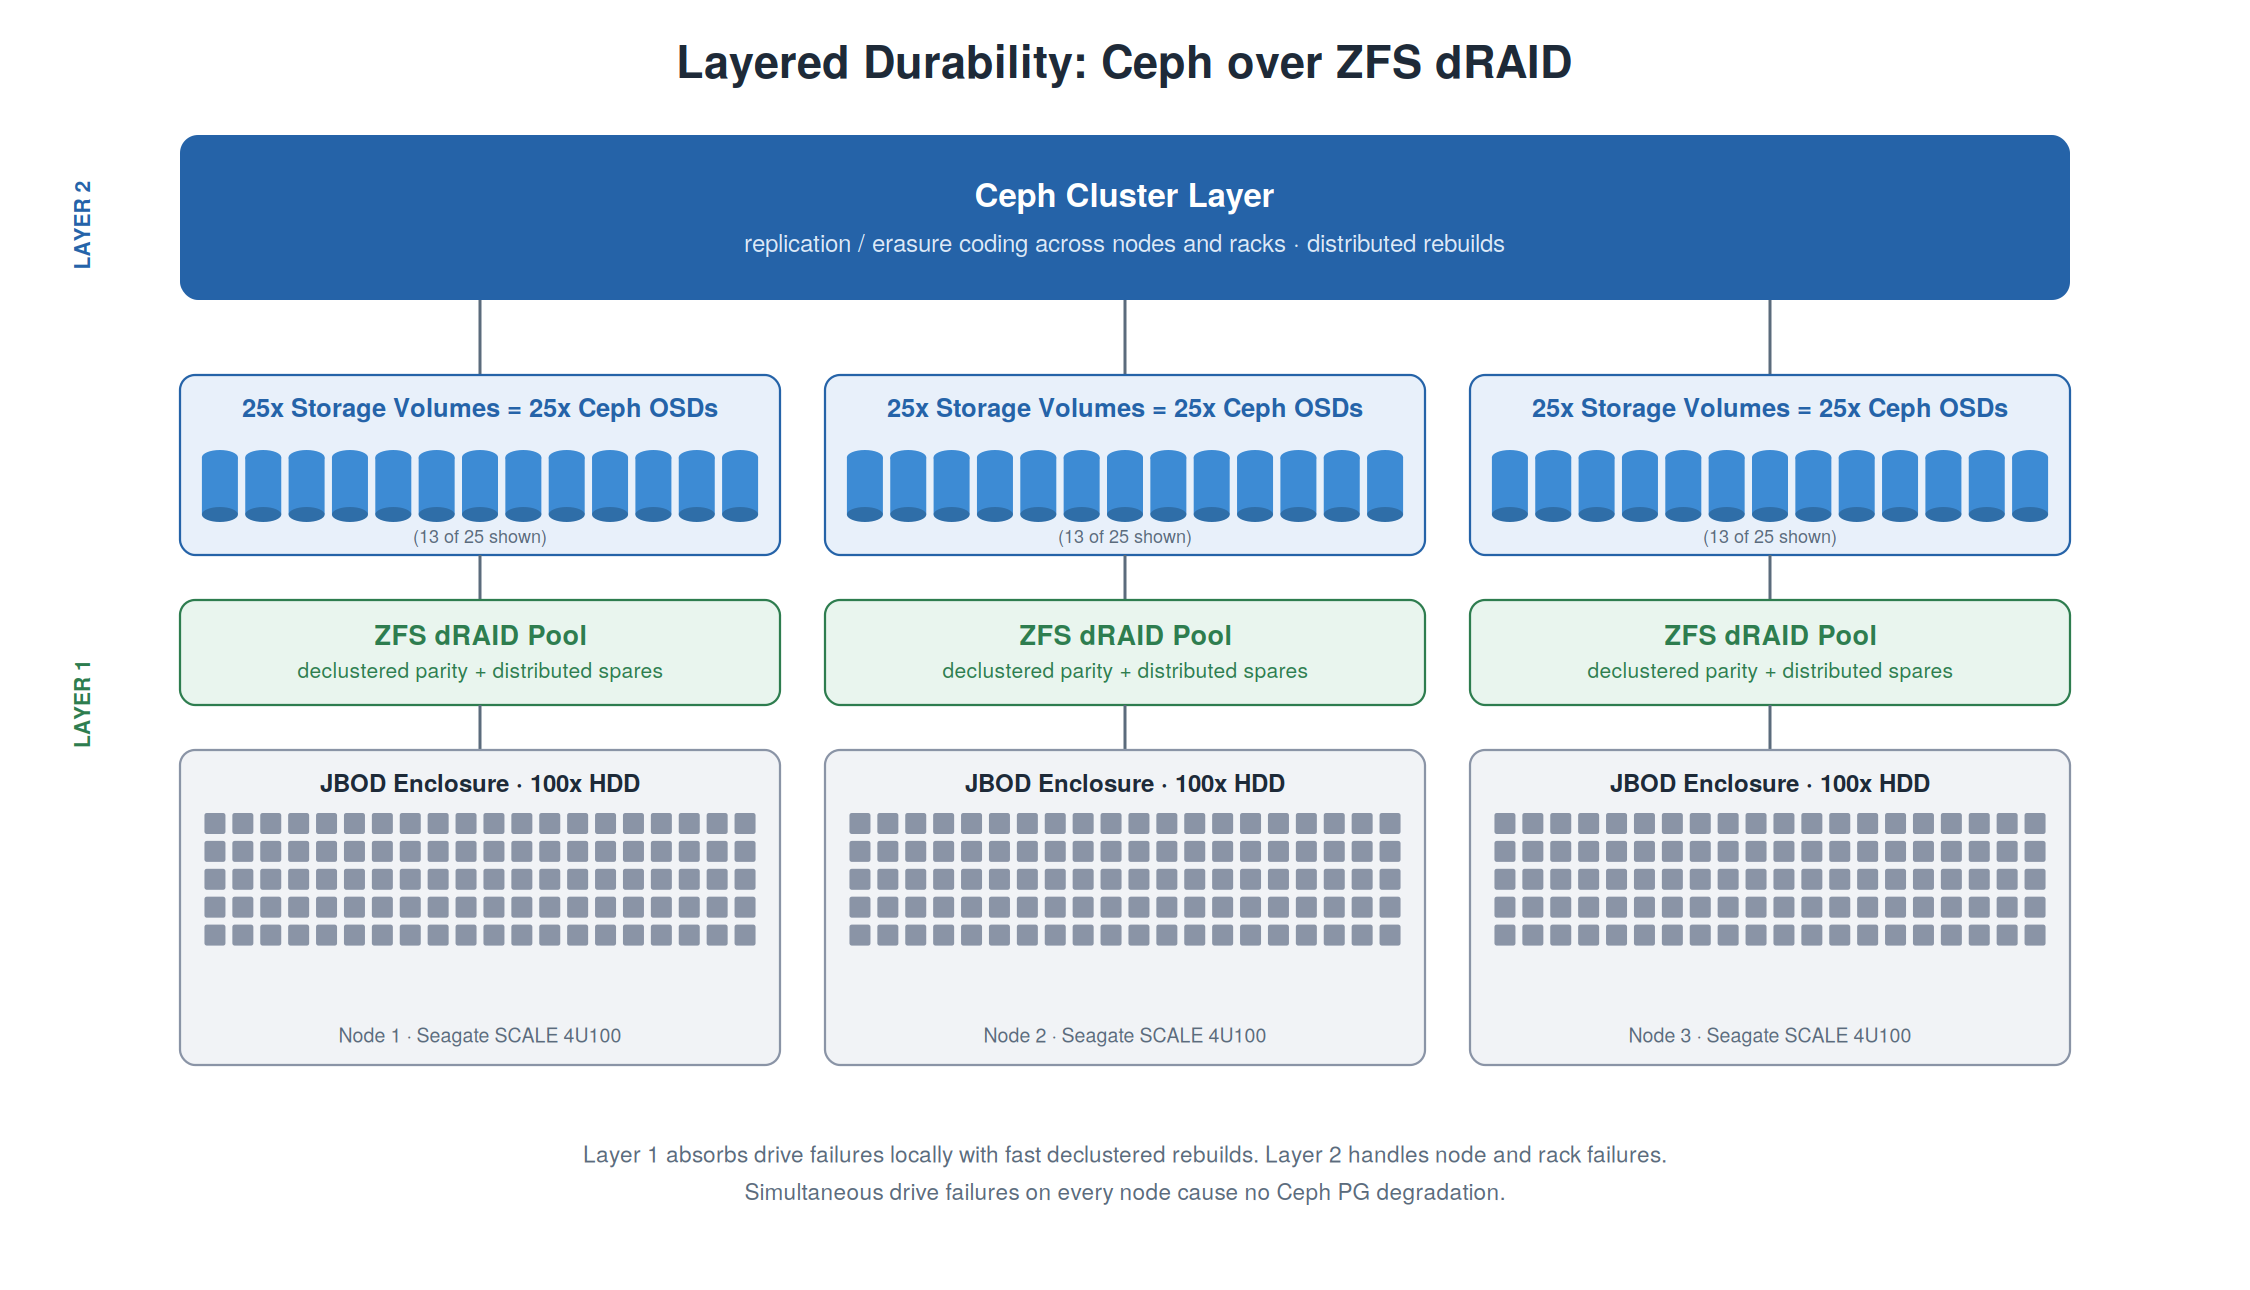
With QuantaStor 6.9 we’ve added support for layering Ceph over ZFS. A fair first question is: why put ZFS under Ceph when Ceph already provides all the fault tolerance you need through replication and erasure coding? The answer comes down to three things: durability, resource efficiency, and manageability at scale.
Durability: Two Layers of Rebuild, the Way Hyperscalers Do It
On larger clusters, in the tens to hundreds of petabytes, cluster design needs to follow the same approach the public cloud providers use: a layered strategy with local rebuilds and distributed rebuilds handled in two separate layers.
In a layered design, the bottom layer absorbs drive failures locally, within the enclosure or node, while the top layer (Ceph) handles node-level and rack-level failures across the cluster. The result is that you can have simultaneous drive failures across every node in the cluster with next to no impact on cluster performance and no degradation of the Ceph placement groups. Drive rebuilds happen locally and quickly, and Ceph never has to move data across the network to recover from them.
At OSNexus we’ve delivered this architecture for years by combining ZFS or Ceph with Seagate Corvault enclosures, putting a software layer of data protection over a hardware layer of distributed RAID (Seagate ADAPT). With Seagate’s recent changes to their product lineup, we’ve had a renewed focus on JBODs, and that raised the question: how do we keep all the benefits of the layered architecture without Corvault?

The answer was already built into the product. ZFS dRAID gives us a near exact match to the capabilities of Corvault’s ADAPT technology, in software. Like ADAPT, dRAID distributes parity and spare capacity across all drives in the pool, so rebuilds are declustered and fast rather than bottlenecked on a single hot spare. We can apply this to the new line of Seagate SCALE 4U100 and 4U74 JBODs, as well as enclosures from other vendors, without the need for custom hardware.
Efficiency: 4x Lower RAM and CPU Requirements
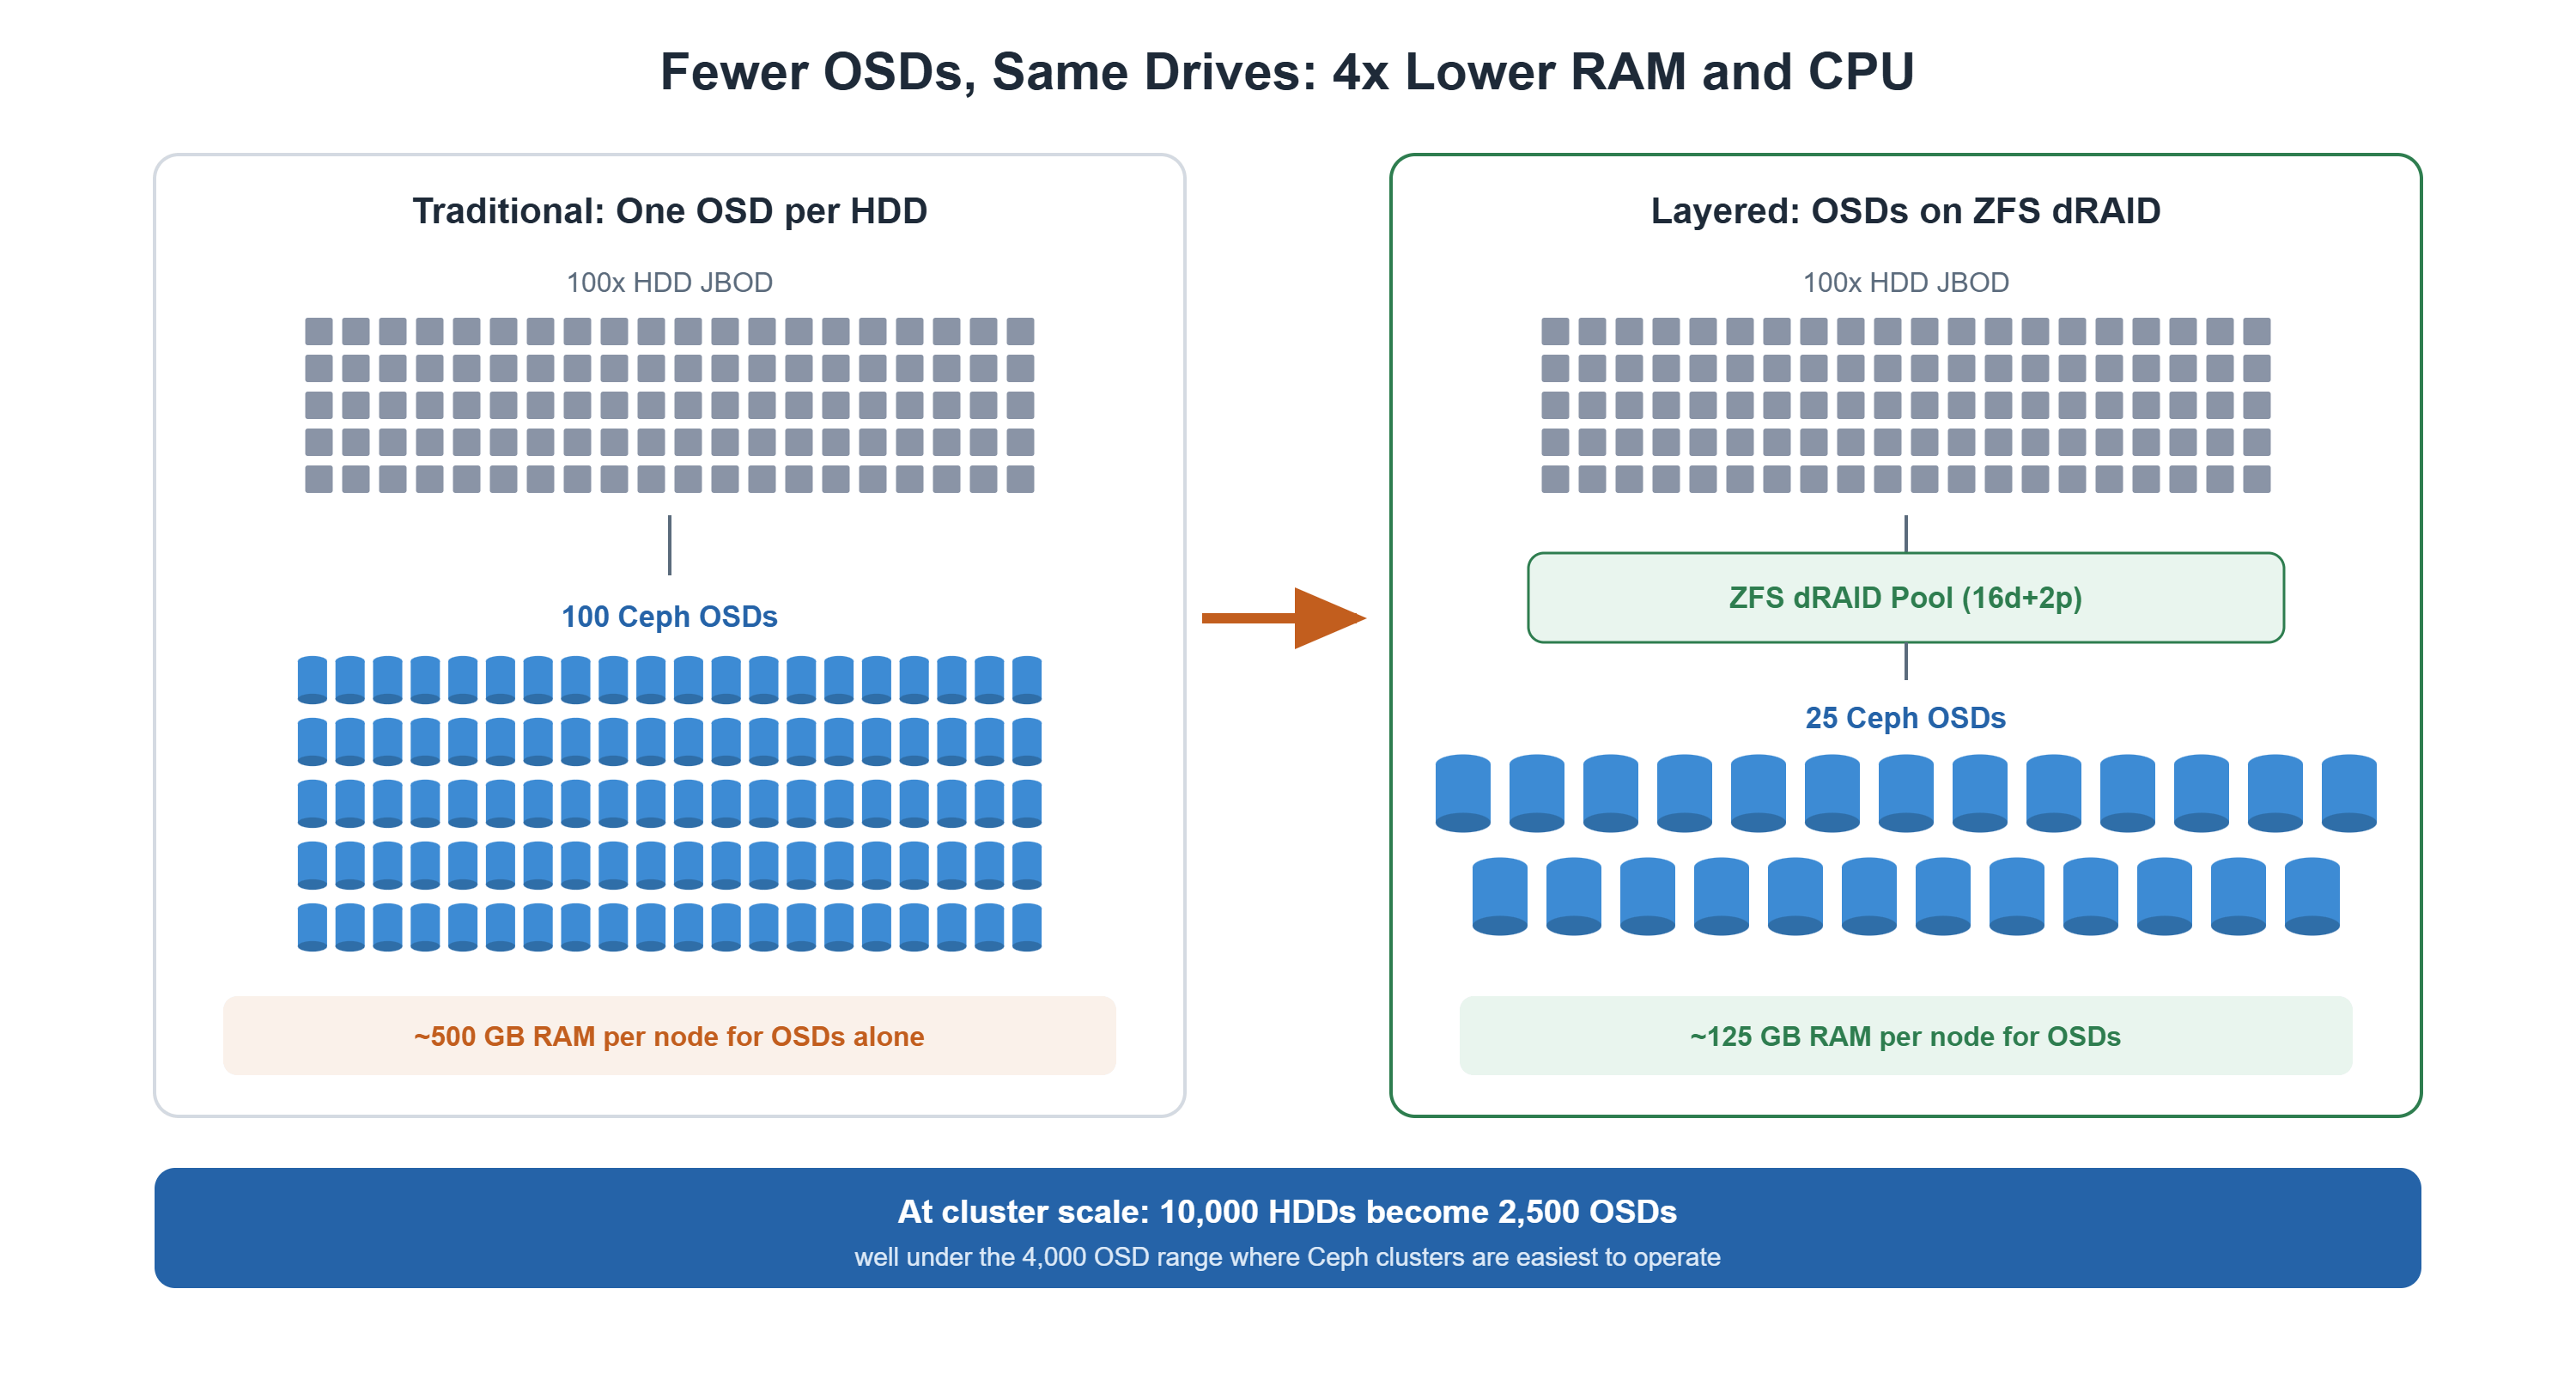
The second big benefit of the layered strategy is lower resource requirements. When we virtualize a 4U100 with 100 HDDs into 25 logical volumes, each backing one Ceph OSD, we reduce the OSD count for that enclosure by 4x, and with it the CPU and RAM requirements. Each OSD carries a fixed memory footprint, so fewer, larger OSDs translate directly into smaller memory configurations per node.
With the current cost of RAM in this supply constrained environment, that turns into real savings on every node in the cluster.
Scalability: Fewer OSDs, Easier Management
Third, scalability. Ceph clusters are easier to manage with fewer than 4,000 OSDs than they are with 10,000 or more. Monitor and manager load, peering traffic, and day-to-day operations all get heavier as OSD count grows.
By virtualizing the storage into logical drives, we can reduce the OSD count by whatever ratio makes sense for the deployment. For example, a cluster with 10,000 HDDs can be reduced to 2,500 OSDs by creating 25 logical drives per pool of 100 HDDs in dRAID 16d+2p. That makes for a much more durable and easier to manage cluster, in trade for some reduction in performance due to the reduced OSD count.
Configuration: Simple by Design
Setting this up in QuantaStor 6.9 is straightforward. Start by creating a scale-up (OpenZFS) Storage Pool on each server. In the Advanced tab of the Create Storage Pool dialog, be sure to choose ‘Ceph OSD’ as the ‘Use Case’. This restricts the pool to Ceph OSD usage.
One important note for deployments using SED drives: enable Hardware Encryption at pool creation time. Unlike the Seagate Corvault, hardware encryption in this configuration must be set up up-front and cannot be turned on later.
With the pools in place, create enough Storage Volumes on each pool to use up all the available capacity. Generally you’ll want to provision fewer Storage Volumes than the number of HDDs in the pool, usually a 3:1 reduction, but you can go higher or lower to meet specific performance requirements. Two things worth noting in the Create Storage Volume dialog: by default it sets the Reserved Capacity to 100%, which avoids over-provisioning and the risk of running out of space, and the ‘Batch:’ field lets you create all the Storage Volumes in a single operation. It also uses a block size of 64K but you can adjust that downward to 8K, keep within that range and QuantaStor configure the resulting OSDs to have a matching bluestore_min_alloc_size equal to the Storage Volume (zvol) block size.
With the scale-up pools created and the Storage Volumes provisioned, you can now create your Ceph Cluster and add the Storage Volumes as OSDs, just as if they were regular HDDs via the same ‘Create OSDs’ dialog as before.
The Trade-off
There’s no free lunch in storage design. Consolidating drives behind fewer OSDs reduces the parallelism Ceph can extract from the cluster, so raw performance per HDD is somewhat lower than a one-OSD-per-drive layout. For large archive, backup, and object storage deployments, where durability and cost per terabyte matter more than squeezing out the last bit of throughput, the layered design is the better trade. For workloads that need maximum performance, the traditional one-OSD-per-drive design remains available, and both approaches can coexist in the same QuantaStor grid.
Summary
QuantaStor 6.9’s Ceph over ZFS support brings the layered durability model that hyperscalers rely on to standard JBOD hardware. Local dRAID rebuilds keep drive failures invisible to Ceph, RAM and CPU requirements drop by 4x, and OSD counts stay in the range where clusters are easiest to operate. It’s the Corvault layered architecture, delivered entirely in software, on the hardware of your choice.
QuantaStor 6.9 will be available in Sept 2026 from our downloads page here. Questions, comments, please write us at info@osnexus.com.

I’m the CEO & co-founder of OS NEXUS, a storage appliance software company with a focus on scale-out storage management. We do a lot of hardware and software storage technology integration on Linux with our QuantaStor Software Defined Storage (SDS) platform this blog is our way to share some thoughts and insights on these technologies and where we’re headed with SDS.
About The Author

Leave a Reply