Server and Desktop virtualization with VMware is one of the most popular storage use cases for QuantaStor SDS. QuantaStor, certified for use with VMware ESXi, makes it easy to access iSCSI targets using the software iSCSI adapter built into VMware. The great thing about using iSCSI is that it’s fast, supports multipathing for increased reliability and provides better performance without the need for specialized hardware as would be the case with Fibre Channel or Infiniband.
In this article we’ll be going over the basics of getting VMware configured so that you can start provisioning VMs using a QuantaStor-based VMware Datastore using iSCSI storage.
Creating the VMware iSCSI Software Adapter
Creating a Datastore using QuantaStor and VMware ESXi is a multi-step process that requires a vSphere client as well as a QuantaStor appliance. First, you need to add your iSCSI adapter to the VMware host by clicking on the “Configuration” tab in your vSphere client. Next click on “Storage Adapters” in the “Hardware” left window pane, click on “Add” and then select “Add Software iSCSI Adapter.” (Figure 1)
Figure 1
After you’ve added the iSCSI Software Adapter, bring up the iSCSI Initiator Properties dialog box by right clicking on the highlighted iSCSI adapter. Find and copy the IQN. (Figure 2)
Assigning Storage Volumes from QuantaStor to VMware Servers
Next, add the VMware host to your QuantaStor appliance by going to “Hosts” and then adding a new host. In the “Add Host” dialog box, paste the IQN from the VMware host next to“iSCSI Qualified Name (IQN)” under “Initiator” and click “OK.” (Figure 3)
Now that you’ve added the VMware host to the QuantaStor appliance, you can assign a storage volume to it by clicking on “Assign” and then selecting a Volume. Note that QuantaStor automatically adds a VMware “eui” number to each Volume so that it is recognized by the VMware host. (Figure 4)
Figure 4
Verifying Access to the Assigned Storage
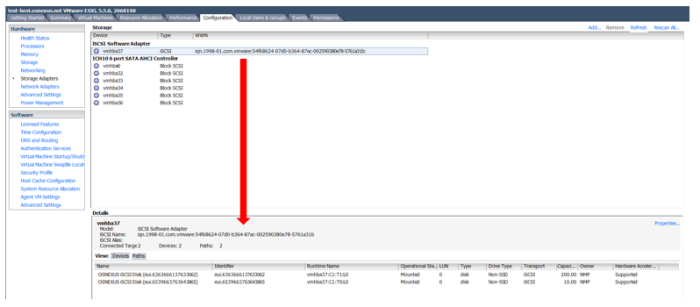
The next step is to map the VMware host to the target iSCSI server so that the QuantaStor Volumes can be seen in the iSCSI Software Adapter Details section as in Figure 5.
Figure 5
Once again, right click the highlighted iSCSI adapter or click on the “Properties” link in the bottom right of the vSphere client to bring up the iSCSI Initiator Properties dialog box. Click “Dynamic Discovery” and then add the IP address of the QuantaStor appliance to iSCSI Server in the “Add Send Target Server” dialog box. (Figure 6) Click “Rescan All” and in the detail section you should now see the QuantaStor storage volumes and their associated eui identifiers as seen in Figure 6.
Figure 6
Creating a VMware Datastore
After setting up the iSCSI adapters and associating the QuantaStor appliance target and volume, you can now create a Datastore on the QuantaStor iSCSi Disk. Datastores serve as repositories for virtual machines and can be provisioned to users and groups. To configure a Datastore, click on “Storage” in the left window pane and then “Add Storage.” (Figure 7)
Figure 7
Select “Disk/LUN,” the term in the ESXi context, meaning an iSCSI volume presented to your host from a storage target and available for formatting, and click “Next.”(Figure 8)
Figure 8
Select “VMFS-5” and click “Next.” (Figure 9)
Figure 9
Check your Current Disk Layout and click “Next.” (Figure 10)
Figure 10
Enter a Datastore name and click “Next.” (Figure 11)
Figure 11
Select the desired amount of storage capacity and click “Next.” (Figure 12)
Figure 12
Click “Finish.” (Figure 13)
Figure 13
You will now see your Datastore listed in the Datastore window. (Figure 14)
Figure 14
Conclusion
Now you can begin provisioning storage from your new Datastore(s) for existing and new VMs. For more information about managing vSphere storage for ESXi click here.
Categories: virtualization, vmware


Leave a comment