Ansible is an IT automation solution that helps reduce complexity and improve productivity in virtually any environment. Applications can be complex, but Ansible makes automation simple through a system of “playbooks”. Playbooks are like scripts but much simpler as it enables one to specify what you want done (installing software, provisioning storage, etc) and then the Ansible modules do the work requested in the playbooks. This eliminates a large amount of custom scripting and complex error checking that is normally required to automate operations
Automating Storage Provisioning
Provisioning file and block storage is a common administrative task in many organizations so numerous vendors including OSNEXUS have developed Ansible modules to help make that easy. In this article, we’re going to go over how to install, create and run some Ansible playbooks to provision and assign block storage (iSCSI/FC) and file storage (NFS/SMB) from a QuantaStor storage grid.
QuantaStor Storage System Setup
This article assumes that you already have at least one QuantaStor server or VM set up in your environment and that it has a static IP address assigned to it so that the Ansible modules will be able to communicate with it. QuantaStor Community Edition is free and available for download at osnexus.com/trynow and the ISO software installation media is available at osnexus.com/downloads.
Ansible Installation and QuantaStor Ansible Module Setup
Ansible installation is quick and easy. If you are looking to download the latest version of Ansible for Red Hat Linux, CentOS, Fedora, Debian or Ubuntu you can use an OS packet manager like EPEL or APT. Regardless of your operating system, you can also install Ansible via the `pip` Python packet manager. It requires a machine with Python 2 (soon to be deprecated) or Python 3 to install Ansible.
We have developed custom ansible modules for QuantaStor automation. See our GitHub page here to get your clone of the QuantaStor modules and for installation instructions. Our GitHub README file also provides some examples for getting started with ansible playbooks.
The QuantaStor Ansible modules utilize the QuantaStor Python client to make REST API requests, so you will also need to install the ‘quantastor-pkg’ python library using the pip installer with the following command:
Note: For more in-depth installation instructions you can reference the Ansible installation documentation here and the QuantaStor installation guide here.
Before you get started with Ansible playbooks, you can start your inventory of hosts to automate. Using your favorite text editor, edit the `/etc/ansible/hosts` file. This is a stanza delimited configuration file to which you can add and classify hosts. To get started we will just add one host but note that you can add any number of hosts and classifications to this file. Add the following lines of text and replace x.x.x.x with the IP address of your QuantaStor host, ‘user’ with your username, and ‘password’ with your password:
[qsservers]
x.x.x.x qs_username=user qs_password=password
Save your changes (you may need administrative privileges), and now we can get started with Ansible playbooks.
Getting Started With Playbooks
Playbooks are conf files in YAML format. YAML is both human and machine-readable, making the language easy to pick-up regardless of programming experience. A simple playbook can be broken down into 2 main sections, the declaration, and tasks. The declaration section will contain meta-data about the play that is to be executed like its name and what hosts to target. The following is an example of a playbook declaration.

Notice that we reference our ‘qsservers’ configuration that we set up in the previous section to get the IP and login credentials. The tasks that will be executed will be discussed in the following sections.
File Storage Provisioning
File storage is referred to as a Network Share in the QuantaStor architecture. Network Shares are accessible via two protocols, NFS and SMB. Once you create a Network Share you can assign users to set quotas and adjust configuration settings to suit specific application workloads. Before we can begin provisioning Network Shares via ansible you’ll need to create a Storage Pool within one of your QuantaStor systems as Network Shares are provisioned from a Storage Pool. For this tutorial, we’re going to refer to the storage pool as the “DefaultPool”.
To control access to the network share, we will need to create some users in QuantaStor. For this example, we will create user1, user2, and admUser. In this case, we will explicitly make user1 and user2 valid users and admUser will have admin privileges.
Now that you have a Storage Pool and some users created, we can start to use Ansible playbooks to provision some shares for a few users.
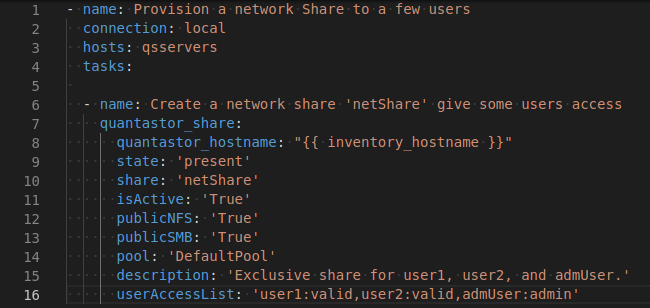
Playbook Explanation
This playbook has a single task that utilizes the ‘quantastor_share’ module. There are a few parameters in this playbook that are required to do a ‘create’ operation in QuantaStor. To do a create operation the ‘state’ parameter must be set to ‘present’. The default value for the ‘state’ parameter is ‘present’ so if you don’t explicitly declare the ‘state’ it will be set to present. The two other required parameters are ‘share’ and ‘pool’. The ‘share’ parameter is the name of the share that you are going to create and the ‘pool’ parameter is the storage pool that this network share will be built on.
The rest of the parameters are optional, but there are a few we should provide to accomplish the goal of this play. First of all, we want this share to be available as soon as it is created so we set the ‘isActive’ parameter to true. Next, we want this share to be accessible through NFS and SMB protocols. We do that by setting the ‘publicNFS’ and ‘publicSMB’ parameters to true. It is good practice to provide a description that describes the purpose of this network share for future administration operations. Finally, we will set the ‘userAccessList’ to administer access for the users that we set-up earlier.
Running Playbook
Save this playbook as ‘qs_createShare.yml’. From the directory you saved this file to run this playbook using the following command:
Note that you can also provide the ‘-vvv’ option to run it in verbose mode.
Output
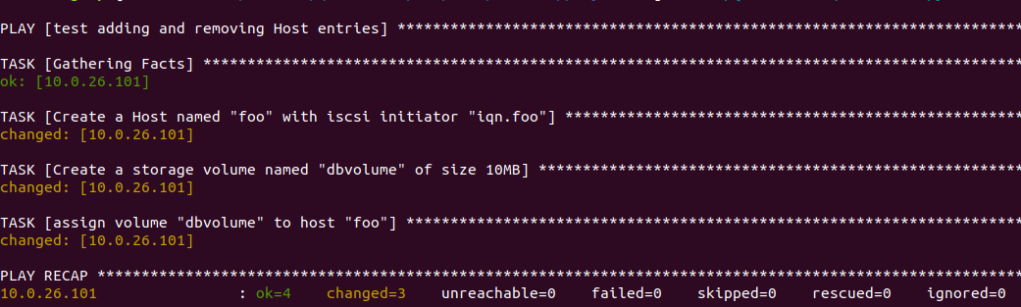
If this is your first time running this playbook, your output should look something like this:

Here we can view the exit status of our tasks. Even though we only specified one task notice that it ran two tasks. The ‘Gathering Facts’ task finds and validates access to your specified host. Notice that it returned with status ‘ok’. This means that the task was successful in its execution but it made no changes to the configuration. Next, we see the task that we designed in our playbook. This task returned with status ‘changed’. The ‘changed’ status means that the execution was successful just like ‘ok’ but this time some configuration was changed. In this case, we created a new network share. The ‘PLAY RECAP’ section shows the overall results of the play that was run. We had 2 successful tasks run with 1 change in configuration.
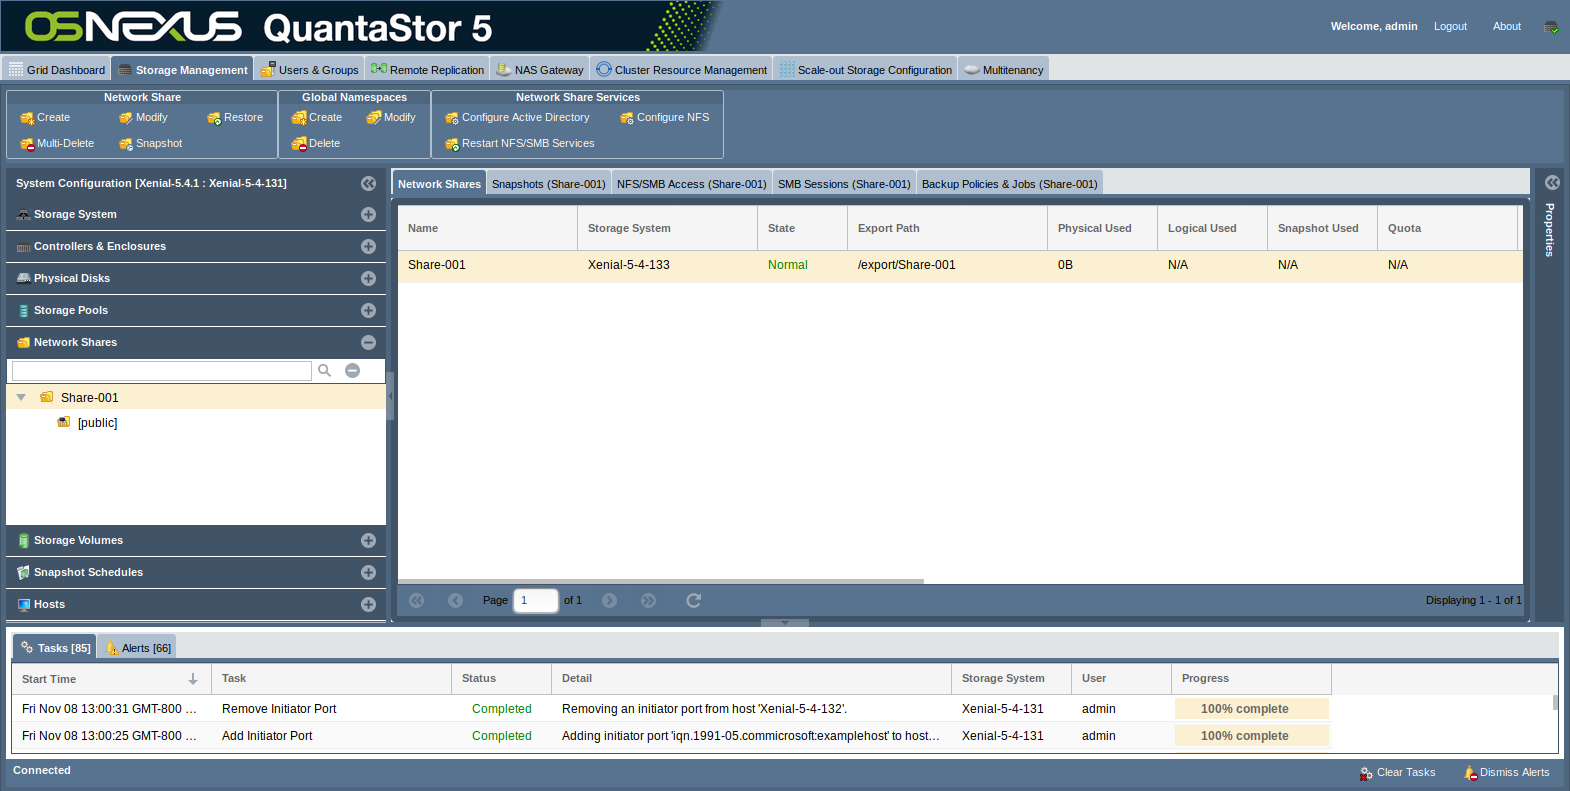
Now we can verify that our network share was created in the WUI.
Block Storage Provisioning
Next, we will explore the use-case of block storage provisioning. When you have a storage pool, you may want to break that pool up into storage volumes and assign certain hosts access to those divisions. In this example, we will need to utilize 2 of our QuantaStor modules in a single play ‘quantastor_volume’ and ‘quantastor_host’.

Playbook Explanation
Unlike the last playbook which only executed one explicit task, this play needs to execute 3 tasks. Ansible tasks are executed in-order so tasks will always be executed as expected. Assuming that you have no storage volumes or hosts defined already, it takes 3 steps to assign a host to a block storage volume: create a host, create a storage volume and assign the host to the storage volume.
Notice in the first task, instead of going with the default values for quantastor_username and quantastor_password, I explicitly told the playbook to use the qs_username and qs_password that we provided in the ‘/etc/ansible/hosts’ inventory file. This way you can run tasks as specific a specific user as the default username and password might not work on your system.
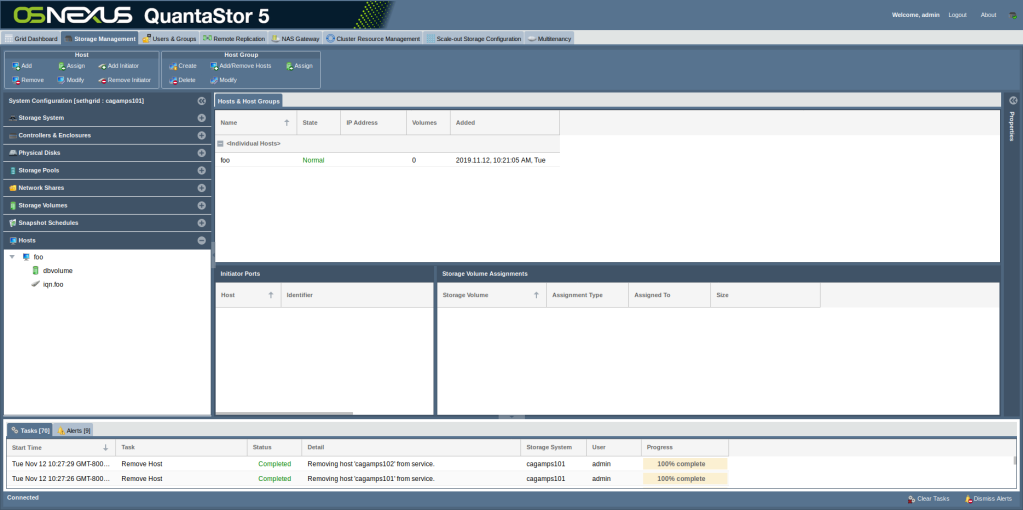
The first task creates a new host named “foo” with an ISCSI identifier “iqn.foo”. However, the only required parameter is ‘host’ which specifies the name of the host to be created. The next task provisions a block storage volume of 10MB from the “DefaultPool” storage pool named “dbvolume”. We did not specify the ‘state’ parameter so it defaults to present which signifies a create operation. The other required parameters are ‘volume’, ‘size’ and ‘pool’. Finally, we assign the storage volume to our newly created host.
Running Playbook
Save this playbook as ‘qs_createVol_wHost.yml’. From the directory you saved this file to run this playbook using the following command:
Output
Similar to the previous playbooks, ’ok’ status signifies success but not necessarily change while ‘changed’ status shows both that the operation was successful and configuration has changed. Let’s look to see what happens when we run the same playbook again.
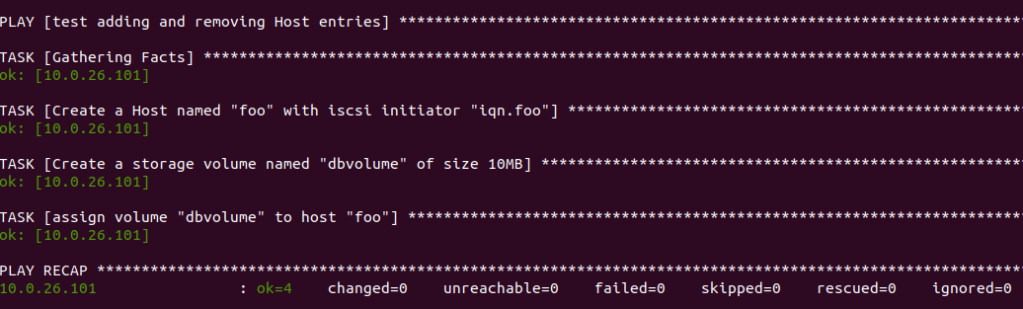
Here we see that all of the tasks exited with status ‘ok’. This is because on create operations, the ansible module checks to see if a matching resource with the same name already exists, then if it does it exits out with the ‘ok’ status. Because we had already run the playbook once, all of the resources the tasks were looking for already existed.
Now we can verify that our storage volume and host were created and that the volume is attached to the host in the WUI.
Conclusion
We hope that his article has helped introduce more people to the power of Ansible and how easy storage provisioning can be in an IT environment with the combination of Ansible and QuantaStor storage grid technology. If you have any questions or comments please add them below or write to us at sdr@osnexus.com, thanks for reading!
Categories: Ansible

Leave a comment